Know the True Cost, Lifespan, and Value of Each Brick Joint Repair Option Before You Spend a Dime
When your mortar joints between bricks start crumbling, you’re facing a decision that could cost you thousands. Should you invest in tuckpointing or stick with repointing? After 22 years fixing brick masonry across Central Indiana, I’ve seen homeowners make expensive mistakes by choosing the wrong approach.
The difference between tuckpointing and repointing isn’t just about technique—it’s about protecting your investment while keeping costs under control. Let me share what I’ve learned from over 1,200 brick restoration projects about which method truly saves money.
Key Takeaways
- Repointing costs 40-60% less than tuckpointing for standard repairs
- Tuckpointing provides premium aesthetics but requires master-level skills
- Structural damage always requires repointing regardless of budget constraints
- Historic properties may mandate specific restoration techniques by law
- Indiana’s climate creates unique challenges affecting long-term performance
The Fundamentals: Breaking Down Each Method
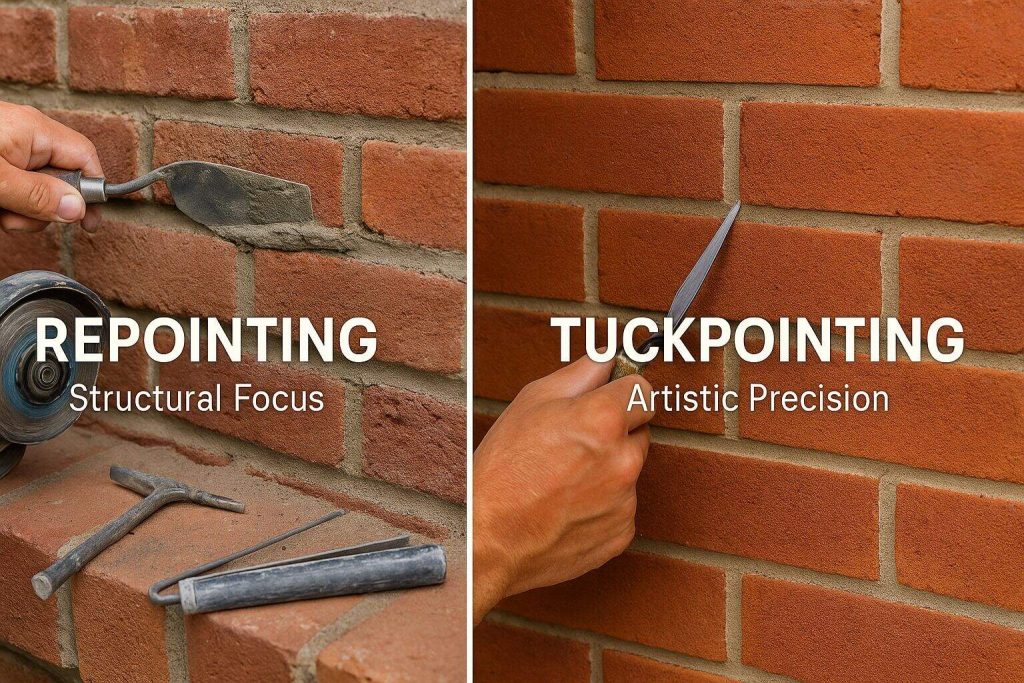
What is Repointing? The Practical Approach
Repointing is the process of surgically removing deteriorated mortar from joints and replacing it with new mortar that matches the original composition. Think of it as essential maintenance that keeps your brick wall structurally sound.
Here’s exactly what the process of repointing involves:
- Assessment Phase: Testing original mortar composition for proper matching
- Removal Stage: Using angle-grinder tuckpoint blade to cut out damaged mortar to joint rake depth of 2.5 times the joint width
- Cleaning Process: Dust-controlled grinding with HEPA vacuum attachment removes debris
- Installation Phase: Fresh mortar application using proper sand-to-cement ratio
- Finishing Work: Joint-tooling iron creates appropriate joint profile (concave, v-groove, or flush)
- Curing Period: Controlled mortar curing time ensures maximum bond strength
Repointing focuses on structural integrity first. When water seeps into the brick structure through failed joints, repointing stops the damage before it spreads to your home’s foundation or interior walls.
What is Tuckpointing? The Artistic Approach
Tuckpointing involves a sophisticated two-step process that creates visually stunning results. After filling joints with mortar that matches your brick color, we apply a thin contrasting line down the center using a specialized pointing trowel technique.
Tuckpointing uses two colors of mortar:
- Base mortar: Mixed to match brick color exactly
- Contrasting mortar: Usually white or cream for the decorative center line
The true definition of tuckpointing originated in 18th-century England. Wealthy homeowners wanted the appearance of rubbed brick with perfectly uniform joints. Tuckpointing was invented to create this illusion on existing brick structures without rebuilding walls.
Tuckpointing is a specialized art form requiring years of training. The decorative lines must be perfectly straight, uniformly wide (typically 1/8 inch), and centered precisely in each joint. One shaky hand or inconsistent pressure ruins the entire appearance.
Comprehensive Cost Analysis: Every Dollar Matters
Basic Cost Comparison
Cost Comparison: Repointing vs. Tuckpointing
💡 Repointing saves 40-60% compared to tuckpointing on most projects
Detailed Cost Breakdown Per Square Foot
Standard Repointing Costs:
- Material costs: $2-4 per square foot
- Labor costs: $6-11 per square foot
- Equipment rental: $0.50-1 per square foot
- Cleanup/disposal: $0.50-1 per square foot
- Total range: $8-15 per square foot
Premium Tuckpointing Costs:
- Material costs: $3-6 per square foot (specialty mortars)
- Skilled labor: $12-29 per square foot
- Color matching: $1-2 per square foot
- Detail work: $2-4 per square foot
- Total range: $15-35 per square foot
Hidden Costs That Surprise Homeowners
Preparation Expenses:
- Scaffold safety setup: $300-800 for two-story work
- Personal protective equipment: $150-300 for proper silica exposure protection
- Masonry permit requirements: $50-200 depending on scope
- Utility protection: $100-250 for covering electrical/gas lines
Material Testing Costs:
- Mortar compatibility test: $200-400 per sample
- Bond strength test: $150-300 for quality assurance
- Color matching trials: $100-200 for pigment oxide blend
Unexpected Repair Additions:
- Brick spalling repair: $15-25 per damaged brick
- Lintel rust jacking repair: $500-1,500 per lintel
- Wall tie corrosion replacement: $200-400 per tie
- Efflorescence removal: $3-6 per square foot
When Each Method Makes Financial Sense
Repointing: The Smart Choice for Most Situations
Repointing is the best option when your primary goals are structural integrity and cost control. Here’s when it’s the obvious winner:
Essential Repointing Situations:
- Mortar joints are damaged beyond cosmetic issues
- Water infiltration threatens your home’s foundation
- Efflorescence indicates moisture problems
- Cracked mortar lines allow freeze-thaw cycles damage
- Budget constraints require maximum protection per dollar
Property Types Ideal for Repointing:
- Residential applications where function trumps form
- Brick veneer repairs on newer construction
- Basement foundation walls where aesthetics don’t matter
- Commercial buildings prioritizing budget over appearance
- Urban brick rowhouse repair in working-class neighborhoods
Jeff Johnson explains: “When mortar needs repair, homeowners often think they need the premium option. But repointing is performed to reseal joints effectively at half the cost. I tell customers to save money here and invest in other home improvements.”
Tuckpointing: Premium Investment for Specific Situations
Consider tuckpointing when appearance directly affects your property’s value or when historical requirements mandate it.
High-Value Tuckpointing Applications:
- Historic brick restoration requiring period accuracy
- Heritage preservation following Secretary of the Interior standards
- Commercial façades where image impacts business
- High-end residential in prestigious neighborhoods
- Chimney tuckpointing as architectural focal point
Return on Investment Scenarios:
- Properties in historic districts where authenticity commands premium prices
- Commercial properties where appearance affects customer perception
- Luxury homes where curb appeal impacts resale value significantly
- Tourism-related businesses where historic character drives revenue
Advanced Material Science: Choosing the Right Mortar
Understanding Mortar Types and Performance
Mortar Types: Performance & Cost Analysis
🔬 Higher strength doesn’t always mean better – match mortar to your specific needs
Climate-Specific Material Selection for Indiana
Indiana’s climate challenges require careful mortar selection:
Temperature Considerations:
- Freeze-thaw cycles: 40-60 cycles annually in Central Indiana
- Temperature swings: Daily variations of 30-40°F common
- Thermal expansion: Requires compatible coefficient with existing brick
Moisture Management:
- Annual precipitation: 38-42 inches requires excellent drainage
- Humidity variations: 30-90% seasonal swings affect curing
- Snow/ice contact: Salt crystallization damage from road treatments
Optimal Material Combinations:
- Spring installations: Type N with moderate lime content
- Fall projects: Type S for enhanced freeze resistance
- Historic buildings: Lime-based mortar matching original composition
- High-exposure areas: Hydraulic lime mix for breathability
Color Matching: Getting It Right the First Time
Mortar color mistakes cost thousands to fix. Here’s our systematic approach:
Color Analysis Process:
- Sample collection: Multiple brick samples from different wall areas
- Aggregate analysis: Sand type and color significantly affect final appearance
- Binder evaluation: Cement vs. lime ratios change color over time
- Weather testing: UV exposure and moisture aging samples
- Final approval: Client sign-off on sample mortar panel
Common Color Matching Mistakes:
- Using Portland cement instead of lime (color shifts over time)
- Ignoring sand source variations
- Failing to account for weathering differences
- Rushing approval without proper curing time
The Science of Durability: What Really Lasts
Performance Testing Standards
Professional work should meet these ASTM C270 standard requirements:
Strength Requirements:
- Compressive strength: Minimum 750 psi for Type N
- Flexural strength: 10-15% of compressive strength
- Bond strength: Minimum 50 psi to brick substrate
- Water retention: 75% minimum for proper hydration
Durability Factors:
- Freeze-thaw resistance: 300+ cycles without failure
- Salt scaling resistance: Minimal surface deterioration
- Carbonation resistance: Maintains alkalinity for steel protection
- Permeability balance: Low enough to resist water, high enough to breathe
Long-Term Performance Comparison
Repointing Performance Data:
- Average lifespan: 25-30 years in Indiana climate
- Maintenance needs: Visual inspection annually, touch-ups every 10 years
- Failure modes: Usually edge erosion rather than catastrophic failure
- Repair costs: Typically 10-15% of original installation cost
Tuckpointing Performance Data:
- Average lifespan: 20-25 years due to complexity
- Maintenance needs: Decorative lines may need refreshing every 7-10 years
- Failure modes: Contrasting mortar lines fail first
- Repair costs: 20-30% of original cost due to skill requirements
Regional Building Codes and Compliance
Indiana-Specific Requirements
State Building Code Considerations:
- Seismic provisions: Zone 2 requirements for certain counties
- Wind load resistance: Up to 90 mph design winds
- Energy code compliance: Thermal bridging considerations
- Historic district regulations: Local preservation requirements
Local Permitting:
- Indianapolis: Permits required for work over $500
- Carmel: Historic preservation review for designated areas
- Fishers: Commercial facade work requires design review
- Zionsville: Village core regulations for historic character
Insurance and Liability Considerations
Homeowner Insurance Implications:
- Coverage verification: Many policies exclude masonry maintenance
- Damage documentation: Photos required before repair work
- Contractor requirements: Minimum insurance limits vary by company
- Claim timing: Weather-related damage has specific filing deadlines
Professional Liability:
- Workmanship warranties: Standard 1-2 years, premium up to 10 years
- Material defect coverage: Separate from installation warranty
- Structural damage protection: Requires specific liability coverage
- Code compliance guarantee: Important for permit-required work
Seasonal Timing: Maximizing Your Investment
🌤️ Best Times for Mortar Work in Indiana
🌸 SPRING
- ✓ Moderate temps
- ✓ Stable humidity
- ✓ Extended daylight
☀️ SUMMER
- ⚠️ Rapid drying
- ⚠️ Heat stress
- ✓ Long work days
🍂 FALL
- ✓ Lower humidity
- ✓ Stable temps
- ✓ Less competition
❄️ WINTER
- ❌ Freeze damage
- ❌ Poor curing
- ❌ Weather delays
🎯 Plan ahead: Spring and Fall bookings get the best rates and fastest scheduling
Optimal Working Conditions
Spring Installation Advantages:
- Moderate temperatures: Ideal for mortar curing time
- Stable humidity: Reduces rapid moisture loss
- Extended daylight: Longer working hours
- Weather predictability: Fewer surprise storms
Fall Project Benefits:
- Lower humidity: Faster surface preparation
- Stable temperatures: Consistent curing conditions
- Reduced scheduling pressure: Less competition for contractors
- Pre-winter completion: Protection before freeze damage season
Weather-Related Risks and Mitigation
🌡️ Indiana Climate Challenges
❄️ Winter Damage Factors
Winter conditions cause 60% of annual mortar damage in Indiana
🌧️ Moisture Challenges
High moisture requires superior drainage design in mortar joints
💨 Environmental Stress
Thermal expansion is the #1 cause of premature joint failure
🎯 Indiana-Specific Material Recommendations:
Temperature Constraints:
- Minimum temperature: 40°F for 24 hours after installation
- Maximum temperature: 90°F to prevent rapid drying
- Daily temperature swing: Less than 30°F for optimal curing
- Night protection: Insulating blankets for temperature stability
Moisture Management:
- Rain protection: Tarps and scaffolding coverage essential
- Humidity control: Misting in hot, dry conditions
- Wind protection: Screens to prevent rapid moisture loss
- Frost protection: Heating systems for late-season work
DIY vs. Professional: The True Cost Analysis
💰 DIY vs Professional: The Real Numbers
🎯 When you factor in tools, time, and redo risk, professional work often costs the same or less!
DIY Limitations and Hidden Costs
Skill Requirements Often Underestimated:
- Color matching expertise: Professional eye for subtle variations
- Mortar mixing consistency: Ratios affect strength and appearance
- Joint tooling technique: Creates proper weather-struck finish
- Timing coordination: Multiple steps must align perfectly
Equipment and Safety Costs:
- Professional-grade grinder: $300-500 purchase or $50/day rental
- Dust collection system: $200-400 for proper silica exposure protection
- Scaffolding rental: $150-300 per week for safe access
- Safety equipment: $200-400 for complete personal protective equipment
Material Waste Factors:
- Learning curve waste: 15-25% material overage for inexperienced workers
- Color matching failures: Expensive to replace incorrect batches
- Weather timing mistakes: Lost materials from improper curing
- Tool learning curve: Damaged materials during skill development
Professional Value Proposition
Expertise Benefits:
- 22 years experience: Indiana Wall Systems has seen every possible scenario
- Material supplier relationships: Access to specialty mortars at contractor pricing
- Code compliance knowledge: Ensures work meets all building code compliance requirements
- Problem diagnosis: Identifies underlying issues before they become expensive
Efficiency Advantages:
- Project timeline: Professionals complete work 3-4x faster than DIY
- Weather coordination: Experienced scheduling reduces weather delays
- Tool optimization: Professional equipment produces superior results
- Cleanup efficiency: Proper disposal and site restoration included
Advanced Diagnostic Techniques
Modern Assessment Technologies
Moisture Detection Methods:
- Masonry moisture meter: Identifies hidden water infiltration
- Infrared leak detection: Thermal imaging reveals problem areas
- Bore scope inspection: Internal cavity examination
- Salt analysis testing: Determines efflorescence causes
Structural Evaluation Tools:
- Crack monitoring: Gauges to track movement over time
- Plumb and level assessment: Laser technology for precise measurement
- Core sampling: Laboratory analysis of existing materials
- Load testing: Structural integrity verification for critical areas
Predictive Maintenance Strategies
Inspection Schedule Optimization:
- Annual visual assessment: Homeowner-level observation
- Bi-annual professional check: Spring and fall detailed inspection
- Five-year comprehensive evaluation: Complete diagnostic workup
- Post-storm assessment: Immediate damage evaluation after severe weather
Early Warning Systems:
- Moisture monitoring devices: Electronic sensors for problem areas
- Thermal imaging schedule: Annual heat signature analysis
- Photographic documentation: Progress tracking for gradual changes
- Performance benchmarking: Comparison to installation baselines
Specialized Applications and Unique Challenges
Historic Preservation Requirements
National Park Service Guidelines:
- Secretary of Interior Standards: Federal requirements for tax credit projects
- Material authenticity: Original composition matching requirements
- Technique accuracy: Period-appropriate installation methods
- Documentation standards: Detailed before/after recording
Local Historic District Rules:
- Design review process: Approval required before starting work
- Material restrictions: Limited approved mortar types and colors
- Craftsmanship standards: Qualified artisan requirements
- Inspection protocols: Multiple approval stages during installation
Challenging Architectural Features
Complex Geometry Solutions:
- Curved walls: Specialized forming and tooling techniques
- Decorative elements: Hand-carved replacement details
- Multi-story coordination: Scaffolding and access logistics
- Integration challenges: Connecting new work to existing systems
Special Environment Considerations:
- Coastal exposure: Salt air resistance requirements
- Industrial settings: Chemical resistance specifications
- High-traffic areas: Enhanced durability standards
- Seismic zones: Flexible joint design for movement accommodation
Troubleshooting Common Problems
Identifying Failure Modes
Early Stage Warning Signs:
- Hairline cracks: Surface tension from shrinkage
- Color variations: Inconsistent mixing or curing
- Soft spots: Inadequate strength development
- Edge erosion: Weather exposure beginning to show
🔍 Visual Warning Signs Guide
EARLY STAGE
- • Hairline cracks
- • Minor color fading
- • Slight edge erosion
Timeline: 1-2 years
PROGRESSING
- • Visible cracks
- • White staining
- • Soft/loose areas
Timeline: 3-6 months
SERIOUS
- • Deep cracks
- • Crumbling mortar
- • Water penetration
Timeline: 30 days
EMERGENCY
- • Loose bricks
- • Bulging walls
- • Interior damage
Timeline: 24-48 hours
📞 When to Call Indiana Wall Systems:
Immediate consultation needed if you see: Loose or falling bricks, interior water stains, bulging walls, or rapid deterioration. Don’t wait – emergency repairs cost 3-4x more than preventive maintenance!
Progressive Damage Patterns:
- Joint separation: Bond failure between mortar and brick
- Spalling: Freeze-thaw damage to brick faces
- Efflorescence: White staining from salt migration
- Structural movement: Settlement or thermal stress indicators
Repair Prioritization Matrix
Repair Prioritization Matrix
⚠️ Emergency repairs cost 3-4x more than planned maintenance
Emergency Response Protocols
Immediate Damage Control:
- Water diversion: Temporary gutters and tarps
- Structural support: Shoring for loose or bulging areas
- Area isolation: Barriers to prevent injury from falling debris
- Professional consultation: Expert assessment within 24 hours

Documentation Requirements:
- Photographic evidence: Multiple angles and detail shots
- Insurance notification: Immediate contact for covered damage
- Contractor estimates: Multiple quotes for permanent repairs
- Permit applications: Emergency permits for structural work
Financial Planning and Budget Optimization
Project Financing Options
Payment Structures:
- Upfront payment: Often includes 5-10% discount
- Progress payments: 30% down, balance on completion
- Extended terms: Some contractors offer financing plans
- Insurance claim coordination: Direct billing arrangements available
Cost Control Strategies:
- Off-season scheduling: 10-15% savings for winter planning
- Bulk project bundling: Multiple building repairs combined
- Material purchasing: Direct buying for large projects
- Maintenance contracts: Annual service agreements for ongoing care
Return on Investment Analysis
📈 Investment Payback Timeline
💚 Standard Repointing
🎨 Premium Tuckpointing
🚨 Deferred Maintenance
💡 Prevention costs 80% less than emergency repairs
Property Value Enhancement:
- Curb appeal improvement: 3-5% property value increase typical
- Structural integrity: Prevents major foundation issues
- Energy efficiency: Sealed joints reduce heating/cooling costs
- Insurance benefits: Maintained exteriors may reduce premiums
Long-term Financial Benefits:
- Preventive maintenance: Avoids 5-10x emergency repair costs
- Material longevity: Quality work lasts 25-30 years
- Technology integration: Modern materials offer improved performance
- Warranty protection: Professional installation includes guarantees
Quality Assurance and Performance Standards
Installation Best Practices
Pre-Installation Requirements:
- Substrate preparation: Surface cleaning and priming
- Weather monitoring: 48-hour forecast verification
- Material staging: Proper storage and mixing procedures
- Quality control setup: Testing and verification protocols
During Installation:
- Batch consistency: Color and strength matching between mixes
- Joint uniformity: Consistent depth and profile maintenance
- Curing protection: Temperature and moisture control
- Progress documentation: Photo record of each stage
Post-Installation Verification:
- 24-hour inspection: Initial curing assessment
- 7-day evaluation: Strength development check
- 30-day review: Final quality confirmation
- Annual follow-up: First-year performance monitoring
⏱️ Project Timeline & Scheduling
Warranty and Guarantee Structure
Workmanship Coverage:
- 1-year standard: Basic installation guarantee
- 5-year premium: Enhanced coverage for quality contractors
- 10-year exceptional: Top-tier warranty for premium work
- Lifetime guarantee: Some specialists offer material performance warranties
Material Performance Guarantees:
- Manufacturer warranties: 5-25 years depending on product
- Color stability: UV resistance and fade protection
- Structural integrity: Bond strength and adhesion guarantees
- Weather resistance: Freeze-thaw and moisture protection
Frequently Asked Questions
What’s the main difference between tuckpointing and repointing?
Repointing replaces deteriorated mortar with matching material for structural integrity, while tuckpointing involves adding decorative contrasting lines for enhanced appearance. Repointing costs 40-60% less and focuses on function over form.
Which method lasts longer in Indiana’s climate?
Properly executed repointing typically lasts 25-30 years, while quality tuckpointing lasts 20-25 years. Indiana’s harsh freeze-thaw cycles and thermal expansion create challenges for the more complex tuckpointing structure.
Can I save money doing this work myself?
DIY mortar repair appears cost-effective but often leads to expensive failures. Professional work includes material compatibility testing, proper mortar curing time, and ASTM C270 standard compliance that DIY projects typically miss.
How do I know if my mortar needs repair?
Look for cracked mortar lines, white staining (efflorescence), loose mortar that crumbles when touched, water infiltration signs, or gaps where mortar joints between bricks have deteriorated. Early action prevents expensive structural damage.
What time of year is best for mortar work?
Spring and fall provide ideal conditions with moderate temperatures and stable humidity. Avoid winter freeze damage risk and summer’s rapid drying that affects proper curing. Plan projects when temperatures stay between 40-80°F.
How much should I budget for professional work?
Repointing costs range $8-15 per square foot, while tuckpointing typically costs $15-35 per square foot. Include 20% contingency for unforeseen issues like brick spalling repair or structural integrity problems discovered during work.
Do I need permits for brick repair work?
Masonry permit requirements vary by location and project scope. Work over $500 typically requires permits in most Indiana cities. Historic districts may have additional heritage preservation rules requiring design review approval.
How long does mortar repair take to complete?
Project timeline estimate depends on scope and weather. Small repairs take 2-3 days, medium projects need 1-2 weeks, and large restorations require 3-6 weeks. Weather-struck finish work adds time for proper joint-tooling iron application.
What causes mortar to fail prematurely?
Common causes include freeze-thaw cycles, water infiltration, incompatible portland cement mortar on historic buildings, poor sand-to-cement ratio, inadequate mortar curing time, and salt crystallization damage from road treatments.
Can mortar repair improve energy efficiency?
Yes, sealing cracked mortar lines and gaps eliminates thermal bridging and air infiltration. Proper joint profile and breathable sealant application can reduce heating and cooling costs by 5-15% while improving indoor comfort.
💰 Your Potential Savings Summary
✅ Choose Repointing & Save
- Medium Project: Save $1,400-4,000
- Large Project: Save $3,500-10,000
- 25-30 year lifespan: $0.27-0.60/sq ft annually
🎨 Premium Tuckpointing Investment
- Historic Properties: Required for authenticity
- Commercial Facades: Professional appearance
- Luxury Homes: Maximum curb appeal
🚨 Cost of Waiting
- Structural Damage: $10,000-50,000+
- Foundation Issues: $25,000-100,000+
- Interior Damage: $5,000-25,000+
📞 Ready to Start Saving?
Don’t let small problems become expensive emergencies. Our expert assessment will help you choose the most cost-effective solution for your specific situation.
Bottom Line: Making the Smart Financial Decision
After completing over 1,200 brick restoration projects across Central Indiana, here’s my honest assessment: repointing is the best financial choice for 80% of homeowners. You get essential structural protection and decent appearance at half the cost of premium tuckpointing.
Consider tuckpointing only when:
- Aesthetics directly impact property value (historic districts, commercial facades)
- Heritage preservation rules mandate specific techniques
- You’re investing in long-term curb appeal enhancement
- Budget allows for premium craftsmanship
Choose repointing when:
- Structural integrity is the primary concern
- Budget constraints require maximum protection per dollar
- Water seeps into the brick structure threatening foundation
- Appearance is secondary to function
The biggest mistake I see homeowners make is delaying action until emergency repair becomes necessary. Emergency work costs 3-4 times more than planned maintenance, often requiring extensive brick spalling repair and structural integrity restoration.
Whether tuckpointing or repointing, the key is partnering with experienced professionals who understand Indiana’s unique climate challenges. Poor workmanship costs more to fix than doing it right the first time.
Ready to protect your investment with the right approach? Our team at Indiana Wall Systems has the experience to assess your specific situation and recommend the most cost-effective solution.
Don’t wait until small problems become big expenses. Call (765) 341-6020 today for your free comprehensive evaluation. We’ll help you determine whether repointing focuses on your priorities or if tuckpointing helps achieve your long-term goals while staying within budget.
About Indiana Wall Systems: With 22 years of experience and 160 years of combined expertise, we’ve completed projects ranging from small residential repairs to 300,000 square foot commercial restorations. We serve Indianapolis, Carmel, Fishers, Zionsville, and all of Central Indiana with professional brick restoration and EIFS repair services.