Expert EIFS Window Repairs That Blend Seamlessly, Protect Against Leaks, and Restore Your Home’s Beauty
Getting new windows is exciting. But what happens when you’re left with damaged EIFS stucco around the old window openings?
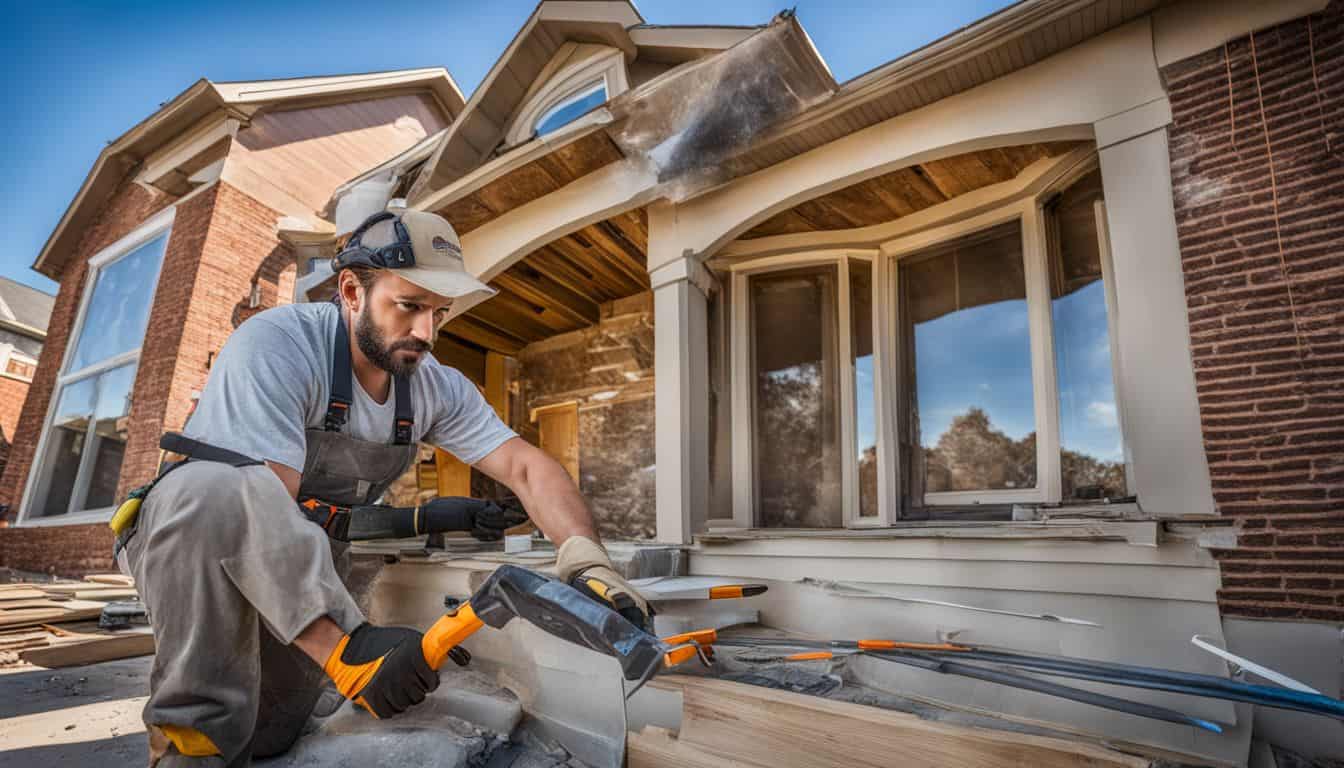
That’s where things get tricky. You can’t just slap some patch material on there and call it good. Professional EIFS repair requires skill, the right materials, and an understanding of how synthetic stucco systems work together.
After 22 years in the business, I’ve seen homeowners struggle with mismatched repairs that stick out like a sore thumb. The good news? With the right approach, you can make those repairs invisible.
Key Takeaways
- Color matching requires systematic sampling and testing before any repair work begins
- Texture blending depends on using the right tools and application techniques for your specific EIFS system
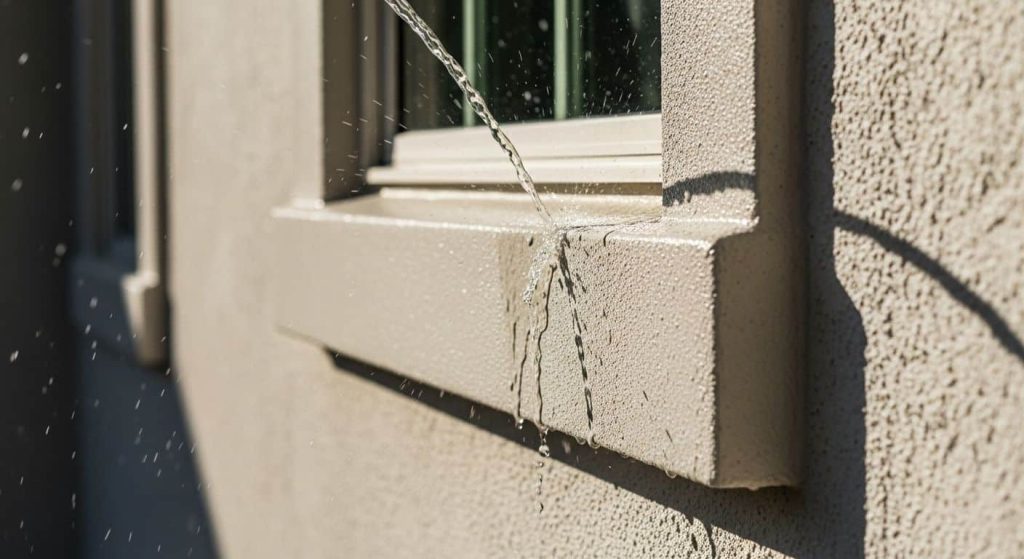
- Moisture protection must be addressed during window replacement to prevent future damage
- Professional installation ensures long-term durability and maintains your home’s curb appeal
- Proper drainage around new windows prevents costly water damage behind the EIFS
Understanding EIFS and Window Replacement Challenges
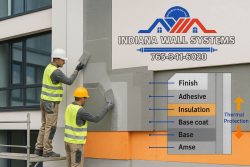
When you install a new window in an EIFS system, you’re dealing with multiple layers that all need to work together. Unlike traditional stucco, EIFS (Exterior Insulation and Finish System) has specific components that can’t be mixed and matched.
The main challenge is that EIFS color match isn’t just about getting the right paint color. You’re dealing with pigments that are integral to the finish coat, textures that vary based on application technique, and aging that affects how the existing finish looks.
What Makes EIFS Different from Traditional Stucco
Synthetic stucco systems like Dryvit use acrylic-based finish coats that cure differently than cement-based traditional stucco. The insulation board underneath also responds differently to temperature changes.
When you’re working around windows, these differences matter. The nailing flange on vinyl windows creates specific challenges for proper drainage and moisture management.
Understanding Different EIFS System Types
Before any repair work begins, I need to understand exactly what type of EIFS system we’re dealing with:
System Types and Their Implications:
| System Type | Installation Era | Drainage Features | Repair Considerations |
|---|---|---|---|
| Barrier EIFS | Pre-1995 | No built-in drainage | Requires upgrade to drainable system |
| Drainable EIFS | Post-1995 | Built-in water management | Must maintain drainage features |
| Hardcoat EIFS | Various | Depends on substrate | Different material compatibility |
Older systems present unique challenges. Houses built in the 1980s and early 1990s often have barrier EIFS without proper drainage. These systems rely entirely on the finish coat to keep water out.
Window Types and Installation Challenges
Different window types create different repair challenges:
Vinyl Windows with Nailing Flanges:
- Flange sits on top of EIFS finish
- Requires careful sealing to prevent water entry
- Trim around window may need custom fabrication
- Caulk joints are critical for long-term performance
Construction Windows (Direct Mount):
- Window jamb sits directly against substrate
- EIFS finish comes right up to window frame
- More complex flashing requirements
- Higher risk of water intrusion if not detailed properly
Replacement Windows in Existing Openings:
- May not align with original EIFS details
- Often requires patch work around entire perimeter
- Insulation continuity must be maintained
- Substrate conditions may vary around opening
Common Problems After Window Replacement
Here’s what I see most often when homeowners try to tackle EIFS patching themselves:
- Color doesn’t match – The new patch looks obvious against the existing finish
- Texture is wrong – Smooth patches on textured walls or vice versa
- Water problems – Poor flashing leads to moisture intrusion behind the EIFS
- Delamination – The patch doesn’t bond properly to the existing system
- Cracking – Stress concentrations around the repair area cause future problems
The Professional EIFS Window Repair Process
🏗️ Professional EIFS Window Repair Process
System Assessment
Comprehensive evaluation of existing EIFS type, age, and condition
Moisture Management
Critical water intrusion prevention and drainage system design
Substrate Preparation
Professional surface preparation and insulation board replacement
Color Matching
Scientific color analysis and laboratory-grade matching process
Texture Replication
Advanced application techniques for seamless texture blending
Quality Control
Professional application with systematic quality verification
Step 1: Comprehensive System Assessment
Detailed System Evaluation Includes:
- System age and type identification
- Previous repair history evaluation
- Moisture intrusion assessment
- Substrate condition analysis
- Manufacturer specifications verification
- Building code compliance review
This assessment determines everything from material selection to application techniques. I’ve seen too many repair jobs fail because the contractor didn’t understand what they were working with.
Step 2: Comprehensive Moisture Management Strategy
Water damage is the enemy of any EIFS system, but it’s especially problematic around windows. After two decades in this business, I can tell you that moisture problems cause 90% of EIFS failures.
Critical Moisture Management Components:
| Component | Function | Failure Points | Professional Solutions |
|---|---|---|---|
| Window head flashing | Directs water away from opening | Poor integration with EIFS | Custom-bent flashing with hemmed edges |
| Sill flashing | Sheds water from window bottom | Inadequate slope, end dams | Continuous membrane with proper slope |
| Jamb sealing | Prevents side water entry | Sealant failure, thermal movement | Structural glazing sealants with backer rod |
| Drip cap | Forces water drip-off | Missing or inadequate projection | Minimum 1-inch projection with drip groove |
| Weep system | Allows trapped moisture to exit | Blocked openings, improper spacing | Weep holes every 24 inches maximum |

The jamb area is particularly vulnerable because it sees the most thermal movement. Vinyl windows expand and contract significantly with temperature changes, which can break the seal between the window and EIFS stucco.
Advanced Moisture Detection Techniques
Before starting any repair, I use several methods to detect water damage that might not be visible:
Non-Destructive Testing Methods:
- Infrared thermography – Identifies wet insulation through temperature differences
- Moisture meters – Pin-type and non-invasive scanning meters
- Core sampling – Small samples to check system condition
- Visual indicators – Staining, efflorescence, biological growth
Step 3: Substrate Preparation and Structural Assessment
Substrate adhesion is the foundation of any successful EIFS repair. Poor substrate preparation is one of the main reasons DIY repairs fail within the first few years.
Complete Substrate Evaluation Process
- Remove damaged material – Cut back to completely sound EIFS layers
- Assess insulation board condition – Check for water damage, delamination, mechanical damage
- Evaluate sheathing integrity – Look for rot, delamination, structural issues
- Test existing finish bond – Use pull-tests to verify remaining system integrity
- Document substrate conditions – Photos and notes for repair planning
Insulation Board Replacement Standards
EPS insulation board that’s been wet needs complete replacement. You can’t just dry it out and keep using it. Wet EPS loses its insulating value and can harbor mold growth behind the EIFS surface.
Insulation Board Selection Criteria:
| Board Type | Density | Compressive Strength | Best Applications |
|---|---|---|---|
| EPS Type I | 1.0 pcf | 10 psi | Residential applications |
| EPS Type II | 1.35 pcf | 15 psi | Commercial, high-traffic areas |
| EPS Type VIII | 1.15 pcf | 15 psi | Below-grade applications |
| Polyiso | 2.0 pcf | 20+ psi | High-performance applications |
Step 4: Advanced Color Matching Methodology
This is where most amateur attempts fail spectacularly. EIFS color match isn’t just about eyeballing the existing color and hoping for the best. It requires a scientific approach.
Understanding EIFS Color Systems
Synthetic stucco gets its color from several sources:
- Integral pigments mixed into the finish coat
- Aggregate color in textured finishes
- Surface treatments like elastomeric coatings
- Weathering patterns that develop over time
Each of these factors affects the final color, and they all change differently as the system ages.
Professional Color Matching Process
Phase 1: Sample Collection and Analysis
- Collect multiple samples from different areas and exposures
- Document lighting conditions when samples were taken
- Photograph samples under consistent lighting
- Catalog weathering differences between exposures
- Note texture variations that affect color perception
Phase 2: Laboratory Color Analysis
- Spectrophotometer readings under standardized lighting
- Pigment identification using color databases
- Aggregate analysis for textured finishes
- Fade resistance testing for long-term color stability
Phase 3: Test Batch Creation
- Small batch mixing using identified pigment ratios
- Multiple test samples with slight variations
- Cure time matching to replicate field conditions
- Texture testing using actual application tools
Phase 4: Field Verification
- Mock panels applied to actual substrate
- Multiple lighting evaluations – morning, noon, afternoon
- Weather condition testing – wet and dry conditions
- Client approval process before full-scale application
Step 5: Texture Replication and Blending Techniques
Texture matching is both art and science. After 22 years, I can usually identify the original application method just by looking at the finish. But replicating it perfectly? That takes practice and the right techniques.
Common EIFS Textures and Repair Methods
Fine Sand Float Finish:
- Application method: Plastic float in circular motions
- Aggregate size: 16-30 mesh silica sand
- Key technique: Consistent pressure and overlapping patterns
- Common mistakes: Too much pressure creates smooth spots
Medium Dash Finish:
- Application method: Hopper gun or texture sprayer
- Aggregate size: 12-20 mesh
- Key technique: Consistent distance and spray pattern
- Common mistakes: Inconsistent thickness causes color variation
Coarse Aggregate Finish:
- Application method: Hand trowel or spray application
- Aggregate size: 8-16 mesh
- Key technique: Feathering technique at repair boundaries
- Common mistakes: Sharp repair boundaries that are always visible
Advanced Application Techniques
Feathered-Edge Repair Method: This is my go-to technique for seamless repairs:
- Create graduated repair zone – Full thickness in center, feathered to zero at edges
- Multiple base coat lifts – Build thickness gradually
- Texture transition zone – Blend texture over 18-inch minimum width
- Final finish blending – Use existing texture as guide
The key to seamless repairs is patience. Rushing any step in this process will result in a visible repair that screams “patch job.”
Step 6: Professional Application and Curing
Uniform thickness and proper curing are critical for both color match and long-term performance. This is where understanding the chemistry of EIFS systems really matters.
Base Coat Application Standards
Professional base coat application follows strict standards:
Layer Thickness Requirements:
- First lift: 1/8 inch maximum to avoid cracking
- Mesh embedding lift: Just enough to fully embed reinforcement
- Final base coat: Build to specified thickness (usually 1/8 to 3/16 inch)
- Total thickness: Varies by manufacturer – typically 1/4 inch minimum
Application Environmental Controls:
- Temperature range: 40°F to 90°F during application and initial cure
- Humidity considerations: Below 70% RH preferred for proper cure
- Wind conditions: Protect from direct wind during application
- Precipitation protection: No rain for 24 hours minimum after application
Material Selection and Compatibility
Understanding EIFS Chemistry and Compatibility
EIFS repair materials must be perfectly compatible with existing systems. Mixing incompatible materials is one of the fastest ways to create expensive failures.
Manufacturer Cross-Compatibility Issues
Different EIFS manufacturers use different polymer chemistries:
Dryvit Systems:
- Base polymer: 100% acrylic polymer
- Pigment system: Lightfast acrylic-compatible pigments
- Aggregate types: Silica sand, limestone, recycled glass
- Compatibility: Generally compatible with other 100% acrylic systems
STO Systems:
- Base polymer: Acrylic polymer with special additives
- Pigment system: High-performance organic and inorganic pigments
- Aggregate types: Specialty graded aggregates
- Compatibility: Best results with STO-specific repair materials
BASF Wall Systems:
- Base polymer: Modified acrylic systems
- Pigment system: Fade-resistant pigment blends
- Aggregate types: Engineered aggregate blends
- Compatibility: Requires compatibility testing with other systems
Advanced Material Performance Characteristics
Modern EIFS Materials offer significant improvements over older systems:
| Feature | Benefit | Application Impact |
|---|---|---|
| Self-priming base coats | Single-step application | Reduced labor, better adhesion |
| Crack-bridging technology | Accommodates substrate movement | Prevents future cracking |
| Improved workability | Extended working time | Better texture matching |
| Enhanced color retention | Reduced fading over time | Long-term appearance |
| Mold/mildew resistance | Prevents biological growth | Healthier indoor air |
Advanced Repair Techniques and Quality Control
Stress Relief Mesh Application Systems
Around windows, thermal movement creates significant stress in EIFS systems. Stress relief mesh helps distribute these forces and prevents future cracking.
Mesh Selection and Placement Strategy
Primary Mesh Systems:
| Mesh Type | Weight | Application | Stress Capacity |
|---|---|---|---|
| Standard fiberglass | 4.5 oz/sq yd | General base coat | Normal stress areas |
| Heavy-duty fiberglass | 6.0 oz/sq yd | High-stress zones | Window/door openings |
| Alkali-resistant glass | 5.5 oz/sq yd | Premium applications | Maximum durability |
| Carbon fiber mesh | Various | Specialty repairs | Extreme stress situations |
Strategic Placement Principles:
- Continuous around openings – No breaks in mesh at stress points
- Corner reinforcement – Double mesh at all 90-degree transitions
- Overlap specifications – Minimum 3 inches, 6 inches at corners
- Tension control – Proper embedding without overstretching
Quality Control During Application
✅ Professional Quality Assurance Checklist
1 Pre-Application Inspection
2 During Application
3 Final Verification
Every professional EIFS repair includes systematic quality control:
Application Checkpoints:
- Base coat thickness verified with wet-film gauge
- Mesh positioning checked before base coat cures
- Surface preparation complete before next coat
- Environmental conditions documented throughout process
- Material batch consistency verified for each mixing cycle
Post-Application Verification:
- Color match verified under multiple lighting conditions
- Texture consistency checked across entire repair area
- Edge blending evaluated for smooth transitions
- Surface defects identified and corrected before final cure
- Protective measures implemented during cure period
Regional Considerations for Indiana Climate
🌦️ Indiana’s Four-Season EIFS Repair Guide
Winter (Dec-Feb)
- Heated enclosures often needed
- Extended cure times
- Material freeze protection
- Limited weather windows
Spring (Mar-May)
- Moderate temperatures
- Low humidity levels
- Stable weather patterns
- High contractor demand
Summer (Jun-Aug)
- High temperature stress
- Humidity affects curing
- UV protection needed
- Storm season planning
Fall (Sep-Nov)
- Temperature stability
- Shorter cure windows
- Critical timing
- Cold-weather materials
Indiana Climate Challenges for EIFS Systems
Indiana’s four-season climate creates unique challenges that affect both EIFS installation and repair techniques. After working in this market for 22 years, I’ve learned to adapt my methods for local conditions.
Seasonal Considerations for EIFS Repair
Winter Repairs (December-February):
- Temperature limitations: Most materials require 40°F minimum
- Heated enclosures: Often necessary for winter work
- Cure time extension: Cold weather doubles cure times
- Material storage: Prevent freezing of water-based materials
- Ice dam considerations: Address roof drainage issues first
Spring Repairs (March-May):
- Optimal conditions: Moderate temperatures, low humidity
- Weather windows: Watch for late spring freeze events
- Substrate moisture: Check for winter moisture accumulation
- Thermal shock: Rapid temperature swings stress repairs
- Seasonal scheduling: High demand period, plan ahead
Summer Repairs (June-August):
- Heat stress: High temperatures affect material workability
- Humidity impact: High humidity slows cure rates
- UV protection: Shield fresh repairs from direct sunlight
- Thermal expansion: Account for maximum movement
- Storm season: Plan around severe weather patterns
Fall Repairs (September-November):
- Temperature stability: Generally good working conditions
- Cure time considerations: Shorter days affect cure cycles
- Winter preparation: Complete critical work before cold weather
- Moisture infiltration: Address any issues before freeze cycles
- Material transition: Switch to cold-weather formulations
Troubleshooting Common Problems
Color Matching Failures and Corrections
Problem: Repair color doesn’t match existing EIFS after curing.
Diagnostic Process:
- Compare cure conditions – Temperature, humidity, substrate absorption
- Verify material specifications – Pigment ratios, aggregate content
- Check application thickness – Thin areas appear lighter, thick areas darker
- Assess substrate influence – Underlying colors can show through
- Evaluate lighting conditions – Different exposures require different approaches
Correction Strategies:
- Tint adjustment: Add small amounts of pigment to adjust color
- Texture modification: Change surface roughness to affect color perception
- Glaze application: Thin topcoat to adjust final color and sheen
- Complete reapplication: Remove and restart if color difference is too significant
Texture Matching Difficulties
Problem: New texture doesn’t blend seamlessly with existing finish.

Analysis Methods:
- Texture depth measurement using profile gauges and calipers
- Application tool identification from texture patterns
- Aggregate analysis – size, shape, and distribution
- Surface energy evaluation – how materials flow and level
Correction Techniques:
- Tool modification: Adjust spray tips, trowel techniques, or float patterns
- Material adjustment: Modify aggregate content or polymer ratios
- Application timing: Change timing between base coat and texture application
- Blending zone expansion: Increase transition area for gradual change
Professional vs. DIY: The Reality Check
The True Cost of DIY EIFS Repair Failures
Every year, I see dozens of failed DIY EIFS repairs that end up costing homeowners far more than hiring a professional would have cost initially.
Common DIY Failure Scenarios:
Scenario 1: Color Mismatch Disaster
- Initial attempt: Homeowner buys closest color match at home center
- Result: Obvious patch that looks like a bandage on the wall
- Correction cost: 3-4 times original professional estimate
- Timeline impact: Months of living with ugly repair before fixing
Scenario 2: Moisture Intrusion from Poor Flashing
- Initial attempt: Window installed without proper EIFS integration
- Result: Water damage spreads behind entire wall section
- Correction cost: $10,000-$30,000 for comprehensive remediation
- Timeline impact: Major disruption, possible mold remediation
Scenario 3: Incompatible Material Use
- Initial attempt: Wrong base coat chemistry used
- Result: Delamination of entire repair area within 1-2 years
- Correction cost: Complete removal and re-application
- Timeline impact: Repeated failures, multiple repair cycles
Professional Advantages in Complex Repairs
System Integration Expertise:
- Understanding how all EIFS layers work together
- Knowledge of manufacturer specifications and compatibility
- Experience with drainage systems and moisture management
- Ability to troubleshoot problems during the repair process
Specialized Tools and Equipment:
- Professional spray equipment for texture matching
- Mixing equipment for consistent material properties
- Environmental controls for optimal cure conditions
- Testing equipment for quality assurance
Cost Analysis and Investment Planning
💰 EIFS Repair Cost Analysis
✅ Professional Repair
- Perfect color matching
- Moisture protection guaranteed
- Professional-grade materials
- Long-term durability
❌ DIY Attempt
- Visible color mismatches
- Potential water damage
- Material incompatibility
- Repeated failure cycles
Understanding True EIFS Repair Costs
EIFS window repair costs vary dramatically based on complexity, but understanding the cost drivers helps homeowners make informed decisions.
Cost Breakdown by Repair Complexity
Simple Window Perimeter Repair:
- Material costs: $3-5 per square foot
- Labor costs: $8-12 per square foot
- Equipment/setup: $200-400 per project
- Total range: $500-1,500 for typical single window
Complex Multi-Window Project:
- Material costs: $4-7 per square foot (economies of scale)
- Labor costs: $10-15 per square foot (access complexity)
- Equipment/setup: $800-1,500 per project
- Total range: $3,000-8,000 for 4-6 windows with extensive repairs
Full System Integration:
- Material costs: $6-10 per square foot
- Labor costs: $12-20 per square foot
- Equipment/setup: $1,000-2,000 per project
- Additional costs: Engineering, permits, extended warranties
When Repair vs. Replacement Makes Sense
Decision Matrix for Homeowners
Repair is Best When:
- System age under 15 years with good overall condition
- Localized damage around specific windows only
- Good maintenance history with regular upkeep
- Budget constraints make full replacement impractical
- Aesthetic requirements only need invisible repairs
Full Replacement Consideration:
- System age over 20 years with multiple problem areas
- Widespread moisture damage affecting large wall sections
- Energy efficiency goals require upgraded insulation values
- Architectural changes planned for building exterior
- Insurance claims covering full replacement costs
Maintenance and Long-Term Performance
Preventive Maintenance for Repaired Areas
Proper maintenance extends the life of EIFS repairs significantly. I recommend specific maintenance schedules based on Indiana’s climate conditions.
Annual Maintenance Checklist
Spring Inspection (March-April):
- Visual inspection of all repair areas for winter damage
- Sealant condition around window perimeters
- Drainage function verification – check weep holes and gutters
- Surface cleaning to remove winter salt and debris
- Small crack repair before they become bigger problems
Fall Preparation (September-October):
- Comprehensive inspection before winter weather
- Sealant renewal on any joints showing wear
- Gutter/downspout evaluation for proper water management
- Surface protection application if needed
- Winter damage prevention measures implementation
Long-Term Performance Optimization
5-Year Maintenance Cycle:
- Professional inspection by qualified EIFS contractor
- Comprehensive cleaning with appropriate methods and materials
- Sealant replacement around all window and door openings
- Touch-up program for any color or texture variations
- System upgrade evaluation for improved performance options
Industry Standards and Compliance
EIMA Standards Compliance
The Exterior Insulation Manufacturers Association (EIMA) provides industry standards that guide professional repair practices:
EIMA TB-1001: Drainage in EIFS
- Drainage plane requirements behind insulation boards
- Flashing integration with EIFS layers
- Weep system design for moisture management
- Quality assurance procedures for drainage components
EIMA TB-1002: Flashing Details
- Window head flashing integration with EIFS
- Sill pan requirements for proper water shedding
- Jamb sealing methods for long-term performance
- Inspection criteria for proper installation
When to Call a Professional
⚠️ URGENT: When to Stop DIY and Call Professionals
🚨 Immediate Dangers
- Water damage behind EIFS
- Structural issues at openings
- Multiple system failures
- Mold or mildew growth
💸 Cost Multipliers
- DIY attempts that failed
- Wrong materials used
- Incomplete moisture barriers
- Insurance claim requirements
Red Flags for DIY Attempts
EIFS repair is more complex than it looks. Call a professional if you see:
- Extensive water damage behind the existing system
- Structural issues around window openings
- Multiple layer failures in the EIFS system
- Historic building requirements
- Commercial property applications
What Professional Service Includes
When you hire Indiana Wall Systems, you get:
- Complete system evaluation before any work begins
- Moisture remediation if needed
- Manufacturer-approved materials for all repairs
- Color and texture matching guarantee
- 10-year workmanship warranty on all repairs
Frequently Asked Questions
How long does EIFS color matching take?
Color matching typically takes 2-3 days including sample preparation, testing, and approval. Rush jobs often result in visible repairs that homeowners regret later.
Can you repair EIFS in winter?
Cold weather repairs are possible but require special considerations. Temperature and humidity must be controlled during application and curing. Indoor heating may be necessary.
Will my EIFS repair be invisible?
With proper techniques and materials, repairs should be virtually invisible. However, this requires professional expertise and attention to detail throughout the process.
How do I prevent water damage during window replacement?
Proper flashing and temporary weather protection are essential. Never leave EIFS openings exposed to weather during multi-day window replacement projects.
What’s the difference between barrier and drainable EIFS for repairs?
Drainable EIFS has built-in water management that must be maintained during repairs. Barrier EIFS relies entirely on the finish coat for water protection.
Can I paint over EIFS repairs?
Painting EIFS is possible but changes the system characteristics. It’s better to achieve the desired color through the finish coat rather than surface painting.
Conclusion and Professional Recommendations
After 22 years of EIFS installation and repair experience, I can confidently say that repairing EIFS around replaced windows is one of the most challenging aspects of exterior building maintenance. The combination of moisture management, color matching, and texture replication requires both technical expertise and artistic skill.
Key Success Factors for Invisible Repairs
Technical Excellence:
- System understanding – Know how all EIFS components work together
- Material compatibility – Use only approved, compatible repair materials
- Application precision – Follow manufacturer specifications exactly
- Quality control – Implement systematic inspection and verification
Professional Approach:
- Comprehensive planning – Address all aspects of the repair, not just the visible damage
- Proper sequencing – Complete each step fully before moving to the next
- Environmental consideration – Work within optimal conditions for best results
- Documentation – Record all procedures and materials for future reference
The Indiana Wall Systems Advantage
Our systematic approach to EIFS repair and restoration has been refined through thousands of successful projects across Indiana, Kentucky, Ohio, Tennessee, Michigan, and Illinois.
What Sets Us Apart:
- 160 years of combined experience across our team
- Manufacturer certification on all major EIFS systems
- 10-year workmanship warranty on all repair work
- Comprehensive moisture management approach
- Invisible repair guarantee – if you can see our repair, we’ll fix it free
Regional Service Excellence
Whether you’re dealing with window replacement in Carmel’s Village of WestClay, managing commercial property renovations in downtown Indianapolis, or maintaining residential EIFS in Fishers, we bring the same level of expertise and attention to detail.
Investment Protection and Long-Term Value
Professional EIFS repair isn’t just about fixing current problems – it’s about protecting your long-term investment. Proper repairs done right the first time:
- Prevent water damage that could cost tens of thousands to remediate
- Maintain property value by preserving your home’s appearance
- Ensure warranty protection through professional workmanship guarantees
- Provide peace of mind knowing the job is done correctly
🏆 Indiana Wall Systems Advantage
22 Years of EIFS Excellence in Central Indiana
🎯 Our Invisible Repair Guarantee
“If you can see our repair, we’ll fix it free. Your satisfaction is our reputation.”
Taking Action: Next Steps for Homeowners
If you’re facing EIFS repair needs around replaced windows, don’t wait for small problems to become major expenses. Here’s what you should do:
Immediate Actions:
- Document current conditions with photos from multiple angles
- Check for moisture intrusion signs around windows
- Avoid temporary solutions that might make permanent repairs more difficult
- Contact professional contractors for proper evaluation
Professional Consultation Benefits:
- Free estimates with detailed scope of work
- Moisture testing to identify hidden problems
- Material recommendations specific to your system
- Timeline planning that works with your schedule
- Warranty protection for peace of mind
Final Professional Advice
“The difference between a repair that lasts 2 years and one that lasts 20 years isn’t in the price – it’s in understanding the science behind EIFS systems and having the experience to execute complex repairs flawlessly,” as I tell every homeowner.
Don’t compromise on quality when it comes to protecting your home’s exterior. The cost of doing it right the first time is always less than the cost of fixing failed repairs.
Ready to restore your EIFS to like-new condition? Call us at (765) 341-6020 for a comprehensive evaluation and detailed repair estimate. We serve central Indiana including Indianapolis, Carmel, Fishers, Zionsville, and surrounding communities with the same commitment to excellence that’s built our reputation over 22 years.
Your home deserves professional EIFS repair that protects both your investment and your family’s comfort. Let us show you the difference that experience, expertise, and genuine craftsmanship make.
About Jeff Johnson and Indiana Wall Systems: With 22 years specializing in EIFS installation and repair, Jeff Johnson leads Indiana Wall Systems’ team of certified professionals. The company has completed over 1,200 successful EIFS projects ranging from small residential repairs to large commercial installations. Indiana Wall Systems maintains manufacturer certifications on all major EIFS brands and provides comprehensive warranty protection on all work. Contact them at (765) 341-6020 or visit centralindianastuccorepair.com for more information.