Everything You Need To Know About Installing EIFS For A Beautiful, Energy-Efficient Home Exterior
Building your first home can feel scary when you face choices about exterior finishes. EIFS installation offers a cost-effective way to add both insulation and style to your home’s outside walls.
This guide will walk you through each step of the EIFS process, from picking materials to final touches. Get ready to learn how this modern siding system can make your home more energy-efficient and beautiful.
Key Takeaways
- EIFS combines insulation with a stucco-like finish that saves money on energy bills while adding style to your home’s exterior.
- Proper wall prep is vital – clean surfaces, fix damage, and install a water barrier before adding any EIFS materials.
- Apply adhesive to at least 40% of each insulation board and stagger joints like brick patterns to prevent future cracks.
- Embed mesh fully in wet base coat with 2.5-inch overlaps at seams to create a strong, crack-resistant surface.
- Create proper drainage paths and seal all joints where EIFS meets windows and doors to prevent water damage.
Understanding EIFS (Exterior Insulation and Finish System)
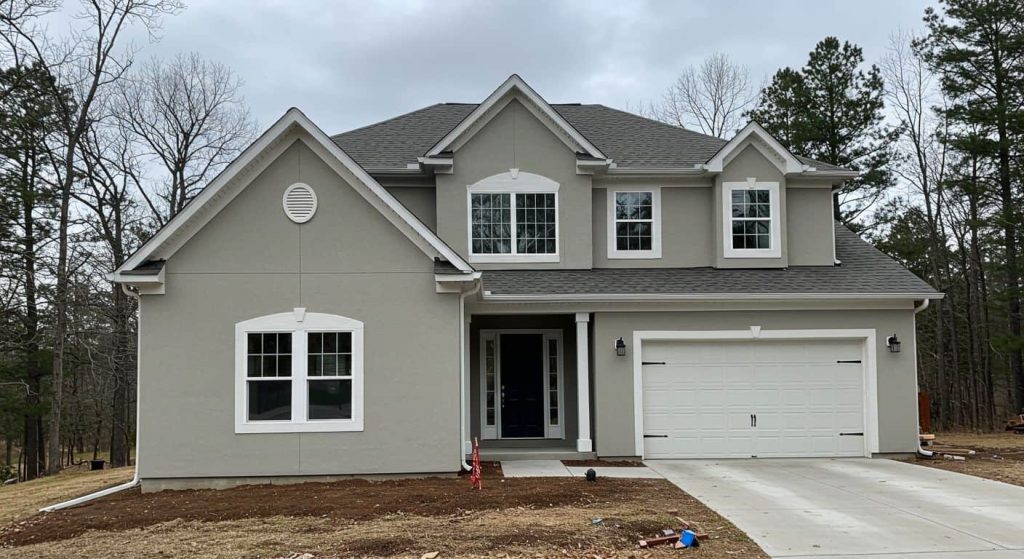
EIFS systems give your home both beauty and better energy use in one package. This modern wall covering uses foam boards, special mesh, and finish coats to create a tough, good-looking exterior that lasts for years.
What is EIFS?
EIFS stands for Exterior Insulation and Finish System. This wall cladding system uses foam boards on the outside of your home with a special coating on top. EIFS has many layers that work together – a base layer, insulation board, mesh for strength, and a finish coat that looks like stucco.
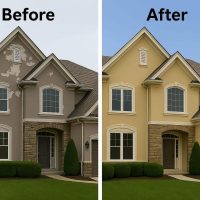
Unlike real stucco, EIFS is lighter and costs less to put up.
EIFS combines insulation and design flexibility in one system, giving homebuilders the best of both worlds – energy efficiency and curb appeal.
The design options with EIFS are almost endless. You can shape it into curves, angles, and even add fancy details to your home’s exterior. The system creates a sealed barrier that keeps heat in during winter and out during summer.
Many builders choose EIFS because it offers great thermal protection while still looking nice. The finish coat comes in many colors and textures to match your style.
Benefits of EIFS for Homebuilders
EIFS offers many perks for first-time homebuilders looking to create a stunning exterior. This multi-layered system combines insulation with a durable finish that stands the test of time.
- Cost Savings – EIFS costs less than traditional stucco while giving the same look. You’ll spend less on materials and labor during your build.
- Energy Efficiency – The foam insulation board creates a thermal barrier that keeps homes warmer in winter and cooler in summer. This leads to lower energy bills month after month.
- Design Freedom – EIFS comes in many colors and can be shaped into curves, angles, and details. Your design options are almost unlimited compared to other siding types.
- Weather Resistance – A proper EIFS installation creates a shield against rain, wind, and harsh weather. The water-resistant barrier stops moisture from getting into your walls.
- Low Maintenance – Once installed, EIFS needs very little upkeep. A simple wash now and then keeps it looking fresh for years.
- Crack Resistance – Unlike traditional stucco, EIFS has more give and flex. This means fewer cracks over time as your home settles.
- Sound Dampening – The thick insulation layer helps block outside noise. Your home will be quieter and more peaceful.
- Lightweight System – EIFS puts less stress on your home’s structure than heavy materials like brick or stone. This can mean simpler foundation needs.
- Seamless Look – The finish coat creates a smooth, joint-free surface. Your home’s exterior will have a clean, modern look.
- Added Home Value – The curb appeal and energy savings from EIFS can boost your home’s market value. This makes it a smart long-term investment.
Now let’s look at what you need to do before starting your EIFS project.
Pre-Installation Preparations
Good prep work makes EIFS install much easier and prevents future problems. You need to check your wall surface and gather all items before you start the job.
Importance of Planning and Substrate Preparation
Planning is the first step to a perfect EIFS installation. Your substrate must be smooth and free of debris before you start. Dirt, loose paint, or bumps can ruin your finish later.
Take time to clean walls and fix any damage. A moisture barrier is vital too – EIFS needs proper water management to last. Many homeowners face problems because they rush this step.
Your project success depends on this groundwork. Check that walls are flat and stable. Measure moisture content in wood substrates. Mark spots for control joints and expansion areas.
Create a timeline that allows for proper drying between steps. The right start leads to fewer headaches during installation. Next, you’ll need to gather all the right tools and materials for your EIFS project.
Pre-Installation Checklist
Getting ready for EIFS installation takes careful planning. Your checklist must cover all steps to make sure your project goes well.
- Check local building codes and get needed permits before starting any work.
- Make sure the wall surface is clean, smooth, and free of dirt or debris.
- Test the substrate moisture content – it must be within the maker’s allowed range.
- Gather all tools like trowels, mixers, and thickness gauges before starting.
- Buy high-quality materials from trusted brands for better results.
- Plan for proper drainage systems to prevent water damage.
- Mark spots for expansion joints to allow for normal building movement.
- Create a weather plan since EIFS should not be installed in rain or extreme temps.
- Set up a proper work area with safe access to all parts of the wall.
- Inspect the wall for cracks or damage that need fixing before EIFS goes on.
- Measure the wall area to figure out how much material you’ll need.
- Arrange for help if needed – EIFS work often needs more than one person.
- Set up a clear timeline with enough time for each layer to dry fully.
- Take “before” photos to track your work and for any future needs.
- Contact an EIFS expert to check your plans if this is your first time.
Tools and Materials Needed for EIFS Installation
Getting ready for your EIFS project means having the right gear on hand. You’ll need specific tools and materials to make sure your installation goes smoothly from start to finish.
Essential Tools
You’ll need the right gear to install EIFS on your home. These tools help make the job easier and ensure proper installation.
- Utility knife – Cuts insulation boards to size with clean edges.
- Notched trowel – Spreads adhesive evenly on the back of insulation boards.
- Rasp or sanding block – Smooths rough edges and surfaces of insulation boards.
- Drill with mixing paddle – Mixes base coat and adhesive to the right texture.
- Straight edge – Ensures insulation boards line up perfectly.
- Tape measure – Gets exact measurements for cutting boards and planning layout.
- Level – Checks that boards are straight during installation.
- Caulking gun – Applies sealant around joints and edges.
- Stainless steel trowel – Applies base coat and finish coat smoothly.
- Float – Creates texture in the finish coat for the final look.
- Plastic sheeting – Protects areas you don’t want coated during the job.
- Painter’s tape – Marks off edges and creates clean lines.
- Staple gun – Attaches water-resistant barrier to the wall surface.
- Safety glasses – Protects your eyes from dust and debris.
- Dust mask – Keeps you from breathing in particles during sanding and mixing.
- Work gloves – Guards your hands while handling materials with rough edges.
- Scaffolding or ladders – Provides safe access to higher areas of your walls.
Key Materials
Now that you have all your tools ready, let’s look at the materials you’ll need for your EIFS project. Quality materials form the backbone of any successful EIFS installation and help ensure optimal performance of your exterior wall system.
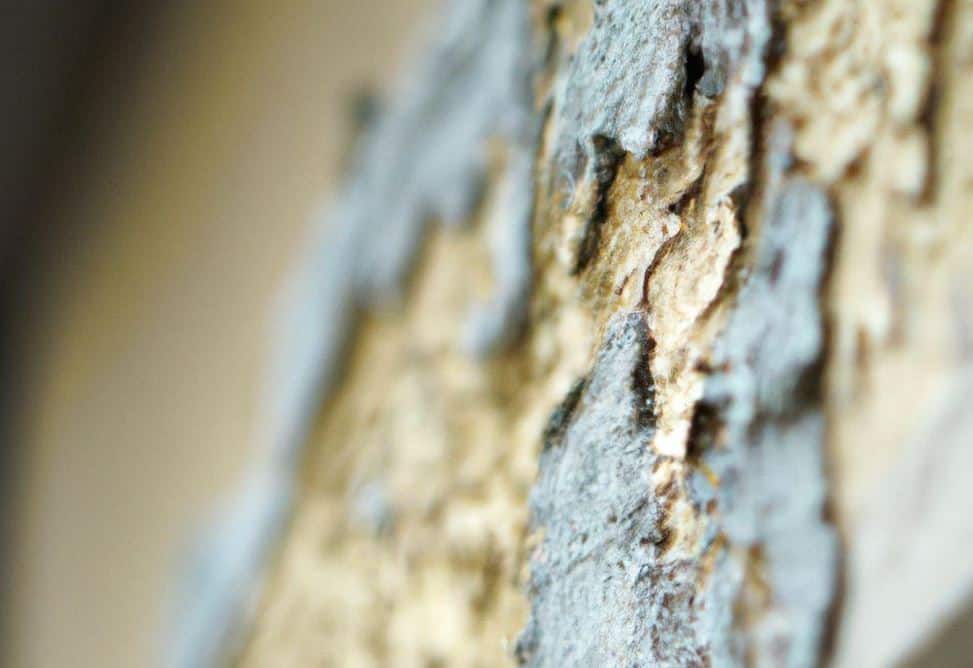
- Insulation Board – This forms the core of your EIFS system. Most projects use expanded polystyrene (EPS) boards that come in various thicknesses for different insulation needs.
- Water-Resistant Barrier – This crucial layer stops moisture from getting behind your EIFS. It creates a drainage plane that protects your building envelope from water damage.
- Adhesive – Used to attach the insulation boards to your wall surface. Make sure to get an adhesive made for EIFS that matches your substrate type.
- Base Coat – This material creates the surface that holds the reinforcing mesh. It needs to be applied evenly for proper strength and durability.
- Reinforcing Mesh – Fiberglass mesh adds strength and flexibility to your EIFS system. Standard mesh works for most areas, while heavy-duty mesh helps spots that might get bumped.
- Primer – Some EIFS systems need a primer between the base coat and finish coat. Check your manufacturer guidelines to see if yours does.
- Finish Coat – The final layer that gives your home its color and texture. Polymer finish coats come in many colors and textures to match your design plans.
- Mechanical Fasteners – These anchor pins may be needed along with adhesive for certain substrates or in high-wind areas.
- Sealants – Used around windows, doors, and other places where the EIFS meets different materials to stop water from getting in.
- Corner Reinforcements – These special pieces add extra strength to corners and edges where damage is most likely to happen.
- Trim Accessories – Items like drip edges, expansion joints, and starter tracks help with proper installation and water management.
- Flashing Materials – Used around openings to direct water away from your walls and stop leaks before they start.
Steps for EIFS Installation
EIFS installation follows a clear set of steps that must be done in the right order. Our guide breaks down each stage from substrate prep to finish coat application with easy-to-follow tips.
Preparing the Substrate
Proper substrate prep is the first step to a great EIFS installation. Your wall surface must be clean and stable before you add any EIFS materials.
- Clean the wall surface to remove all dirt, dust, and loose debris. A power washer works well for this task.
- Check for and fix any damage to the exterior walls. Fill holes, cracks, or uneven spots with proper patching materials.
- Make sure the substrate is dry before starting. Moisture trapped under EIFS can cause big problems later.
- Remove any old paint, wallpaper, or coatings that might stop the adhesive from sticking well.
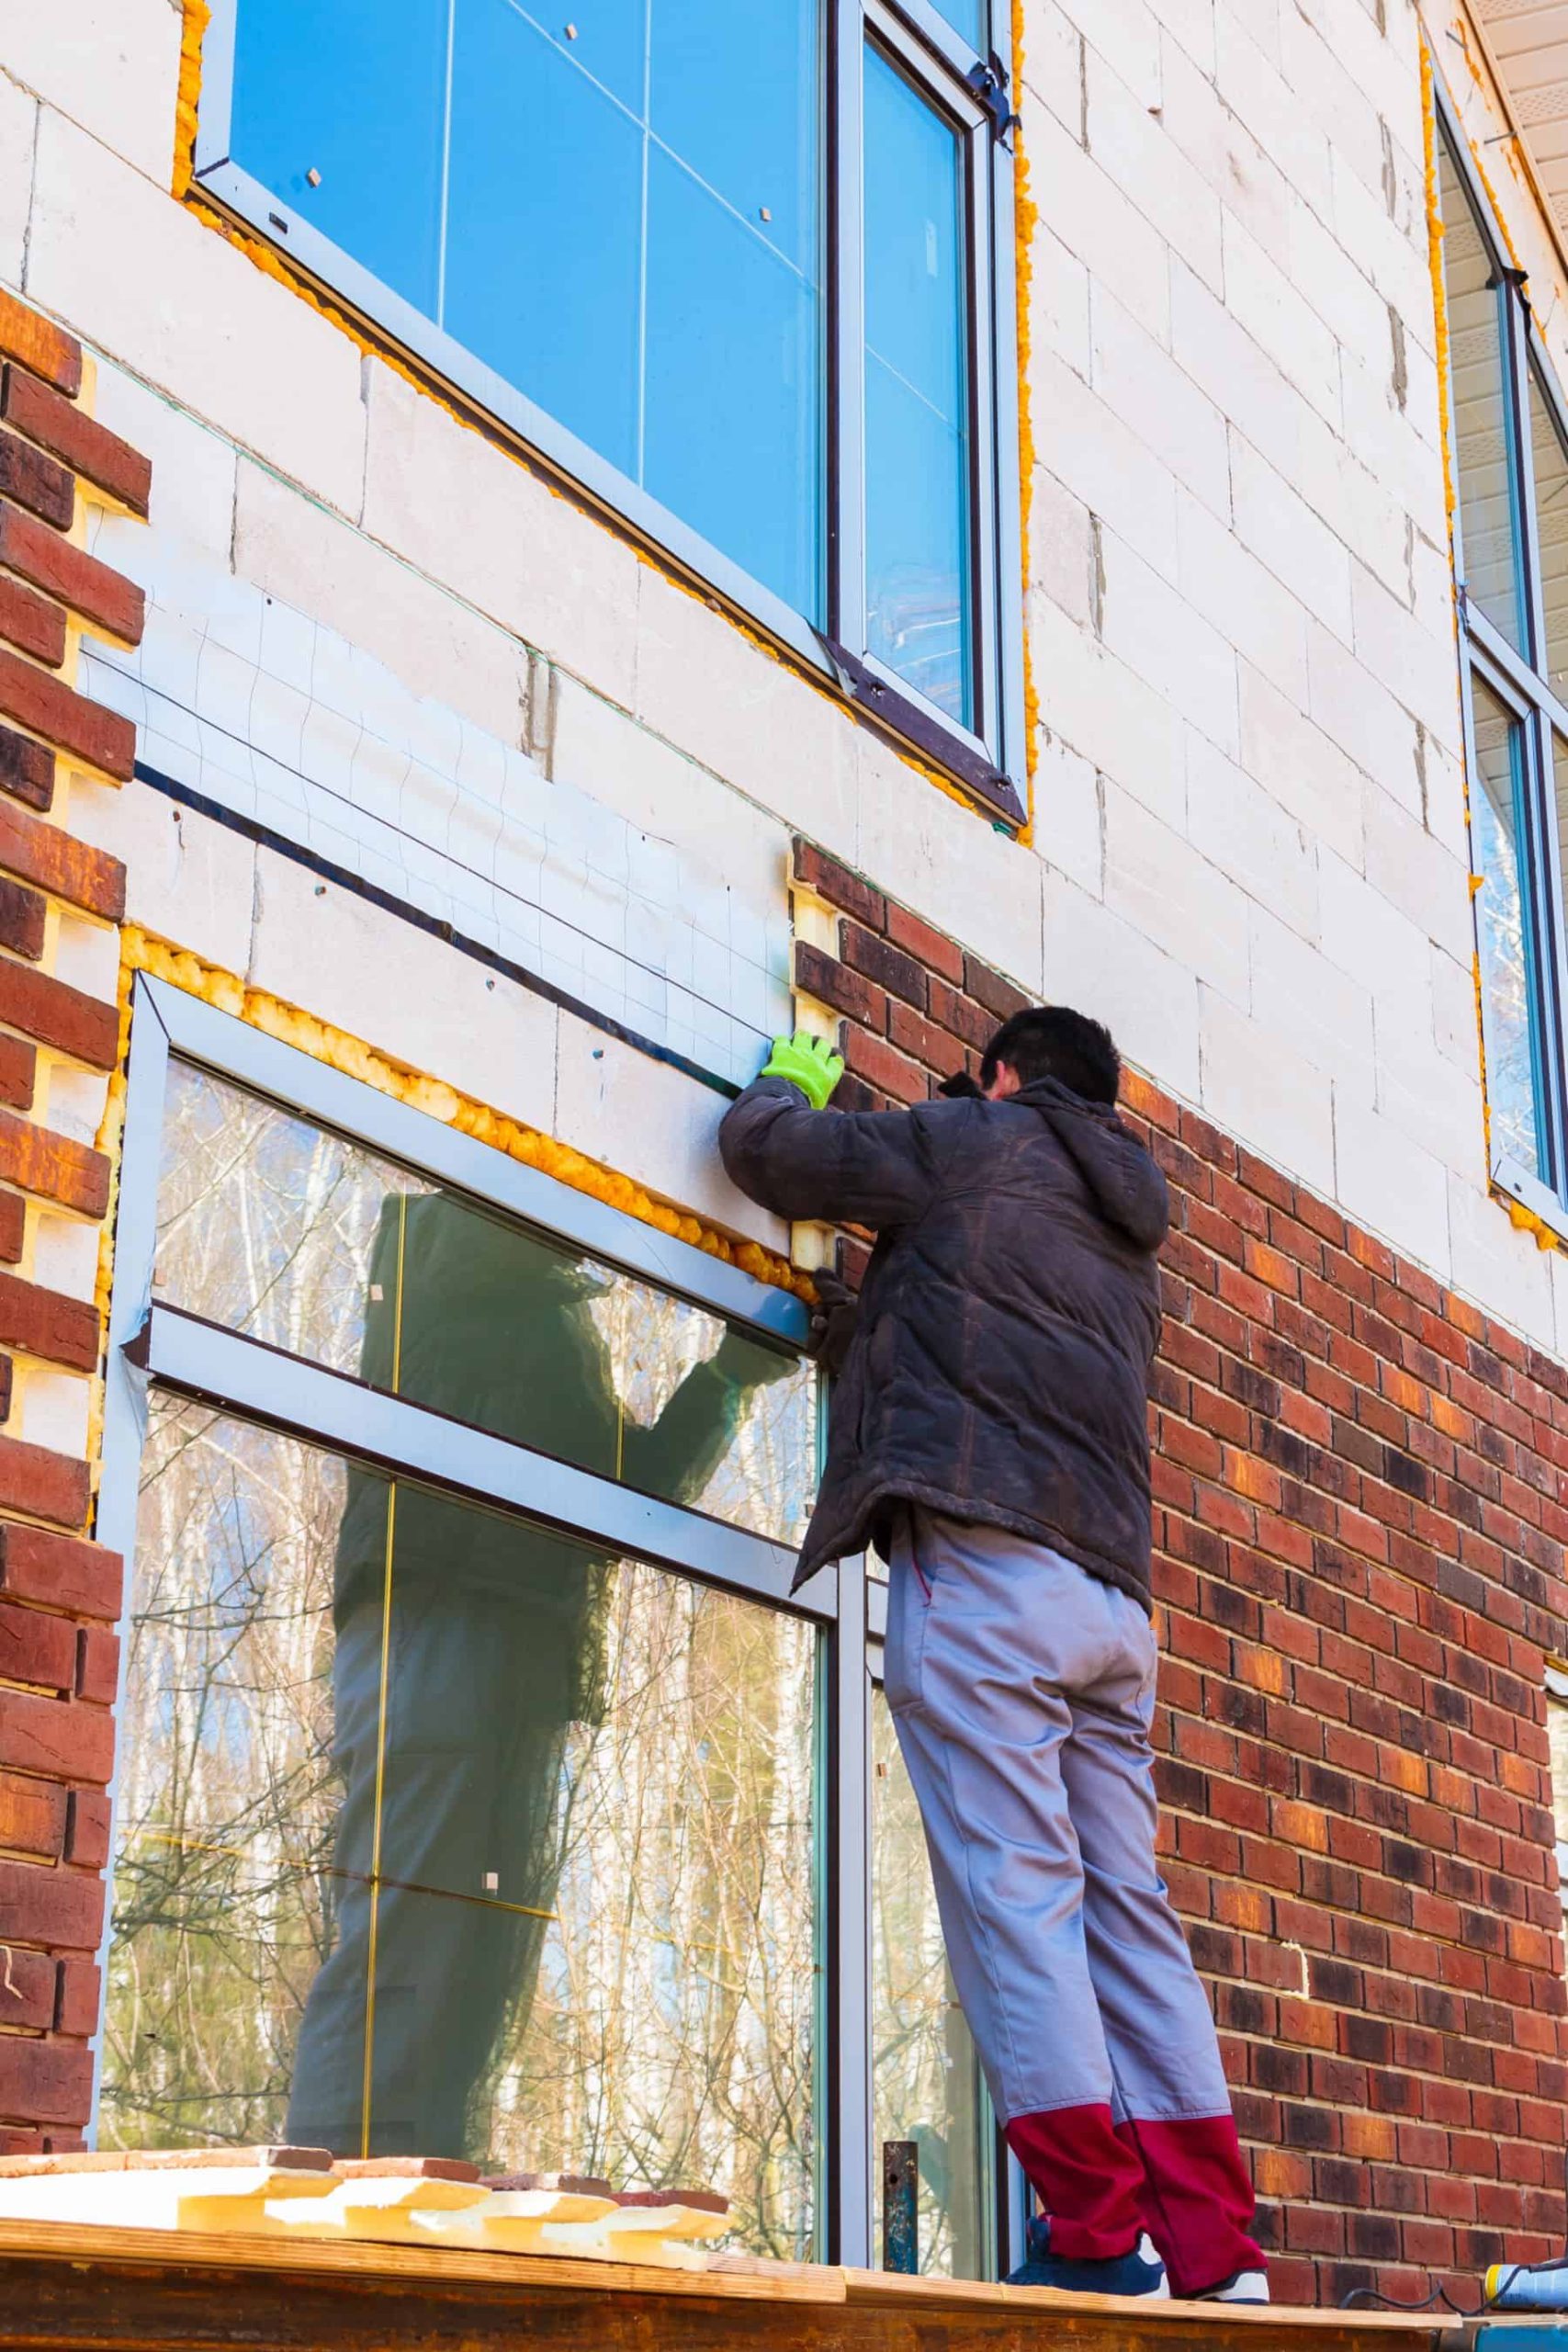
- Install flashing around windows, doors, and other openings to help with water drainage.
- Apply a water-resistant barrier over the entire wall surface. This step is key for moisture protection.
- Level any bumps or dips in the wall. The smoother your starting surface, the better your final EIFS will look.
- Mark stud locations on the substrate for later reference if you plan to use mechanical fastening.
- Check local building codes to make sure your substrate meets all rules for EIFS installation.
- Take photos of the prepped substrate for your records and possible warranty needs.
- Test the substrate strength to make sure it can hold the weight of the EIFS system.
- Let any repairs or patches dry fully based on product specs before moving to the next step.
Installing the Water-Resistant Barrier
After you prepare the wall surface, you must install a water-resistant barrier. This step is vital to protect your home from moisture damage and create a solid base for the EIFS system.
- Check that your substrate is clean and free of dust before starting this step.
- Choose a high-quality water barrier that meets local building codes for your area.
- Start at the bottom of the wall and work your way up when applying the barrier.
- Overlap each sheet by at least 6 inches to prevent water from getting behind the system.
- Seal all seams with special tape made for water barriers to stop leaks.
- Pay extra care to areas around windows, doors, and other openings in your walls.
- Use a roller tool to smooth out the barrier and remove air bubbles that could trap moisture.
- Apply the barrier on a dry day with low wind for best results.
- Make sure the barrier covers the entire wall surface with no gaps or tears.
- Allow the barrier to set fully before moving to the next step of attaching insulation boards.
- Test the barrier for any missed spots by spraying water and looking for places where it soaks through.
- Fix any problems you find right away to avoid water damage later.
- Take photos of the finished barrier for your records before it gets covered up.
- Follow the maker’s instructions about drying time before you continue.
- The water barrier is your first line of defense against moisture problems, so take your time to get it right.
Attaching the Insulation Board
Attaching insulation boards is a key step in your EIFS installation journey. This phase creates the foundation for your home’s new exterior wall cladding system.
- Clean your substrate completely before starting. A smooth, debris-free surface helps the insulation boards stick better.
- Mix the adhesive according to the maker’s instructions. Too thick or too thin mixtures won’t work right.
- Apply the adhesive to your insulation board using a notched trowel. Cover at least 40% of the board for proper adhesive coverage.
- Press each board firmly against the wall surface. Push with even force to create a strong bond.
- Stagger the joints between boards like brick patterns. This stops long seams that might crack later.
- Leave no gaps between boards bigger than 1/16 inch. Larger gaps can cause problems with your finish coat.
- Sand any uneven spots between boards. Flat surfaces make the next steps easier.
- Wait 24 hours for the adhesive to dry fully. Rushing this step can weaken your whole system.
- Check that all boards are level and secure. Tap lightly to hear if any sound hollow.
- Fix any loose boards right away. The base coat won’t hide attachment problems.
- Install mechanical fasteners if needed for extra hold. Some building codes require both adhesive and fasteners.
- Mark spots for any needed expansion joints. These prevent cracks as your home settles.
Applying the Base Coat
After securing your insulation boards firmly to the wall, you’ll need to apply the base coat. This crucial step creates a strong foundation for your EIFS system and helps protect against water damage.
- Mix the base coat material according to the maker’s instructions until smooth and lump-free.
- Use a stainless steel trowel to spread the base coat evenly over the insulation boards at about 1/8 inch thick.
- Work in small sections of about 4 feet by 4 feet to keep the base coat wet for mesh embedding.
- Check for any gaps or thin spots as you go – these can lead to cracks later.
- Apply extra base coat around windows, doors, and other spots where water might get in.
- Make sure the base coat covers the whole surface with no insulation board showing through.
- Keep the base coat thickness even across the whole wall for best results.
- Smooth out any rough spots or trowel marks before the material starts to set.
- The base coat needs to be still wet when you embed the mesh, so plan your work time well.
- Allow the right curing time based on weather and the product you’re using.
- Avoid applying base coat in extreme heat, cold, or rain as these can harm the final result.
- Clean your tools right away since dried base coat is hard to remove.
Embedding the Reinforcing Mesh
Mesh placement is a key step in your EIFS installation that adds strength to your home’s exterior. This part of the process creates a tough surface that stops cracks and damage to your new walls.
- Lay the mesh flat on the base coat while it’s still wet to make sure it sticks well.
- Press the mesh into the base coat using a trowel with even pressure across the whole surface.
- Start at the top of the wall and work down in small sections to keep the base coat from drying too fast.
- Overlap mesh edges by at least 2.5 inches to make a strong, seamless layer.
- Smooth out any wrinkles or bubbles with your trowel as you go for a flat finish.
- Check that no mesh shows through the base coat – it should be fully covered but still close to the surface.
- Add extra mesh at stress points like corners, doors, and windows where cracks might form.
- Use special corner mesh pieces for clean, strong edges on your home.
- Make sure the mesh is fully embedded before the base coat dries for best results.
- Allow the base coat with mesh to dry fully before moving to the finish coat step.
- Look over the whole surface once dry to spot any spots that need fixing before you move on.
- Fix any thin spots with more base coat to ensure your EIFS system’s long-term durability.
Applying the Finish Coat
The finish coat gives your EIFS system its final look and protection. This crucial step needs care and the right tools to create a smooth, lasting surface that stands up to weather.
- Make sure the base coat is fully dry before starting – this usually takes 24 hours in good weather.
- Mix the finish coat material according to the maker’s instructions until you get a smooth, lump-free paste.
- Use a clean stainless steel trowel to apply the finish coat in small sections, working from top to bottom of the wall.
- Keep a wet edge as you work to avoid visible seams between sections.
- Apply the finish coat to match the thickness of the largest sand grain in the mix – this helps create the right texture.
- Use steady pressure and hold your trowel at a slight angle for the best results.
- Create your desired texture right away while the material is still wet using a plastic float or trowel.
- Work in shade whenever possible since direct sun can dry the finish coat too quickly and cause problems.
- The design options with EIFS are almost unlimited – you can create many textures from smooth to rough.
- Allow the finish coat to dry completely for at least 24 hours before touching or testing it.
- Check the whole surface for any spots you missed or texture differences that need fixing.
- Protect fresh EIFS finish from rain for at least 24 hours after application.
- Clean all tools right away with water before the finish material hardens on them.
- The finish coat adds both beauty and a water-shedding surface to your home’s exterior.
- Different colors come pre-mixed from the maker, so you don’t need to paint after install.
Best Practices for a Flawless EIFS Installation
Perfect EIFS installation needs strict attention to detail and proper methods. You can get great results by using the right tools, proper sealing at joints, and correct mesh placement.
Ensuring Effective Waterproofing and Drainage
Water damage is the biggest threat to your EIFS system. You must create proper drainage paths behind the insulation boards. Install a water-resistant barrier first, then add flashings around all openings.
Make sure to leave small gaps at the bottom of walls so water can escape. These drainage points stop moisture from getting trapped, which can rot wood and grow mold.
Good sealing makes your EIFS last longer. Seal all joints where EIFS meets windows, doors, and other materials. Use high-quality caulk made for exterior use. Check that all seams line up with your house plans.
The right waterproofing steps now will save you from costly repairs later and keep your home’s exterior looking great for years.
Proper Adhesive Application Techniques
Applying adhesive correctly forms the base of a good EIFS system. Spread the glue in an even layer using a notched trowel – this creates ridges that help the board stick better. For flat areas, use a U-notched trowel and apply in straight lines.
For edges and corners, put extra adhesive to ensure strong bonds. The adhesive must cover at least 40% of the board’s back surface for proper grip. Mix only what you can use in 30 minutes since most products start to harden quickly in warm weather.
The right amount of pressure matters when placing boards against the wall. Push firmly but don’t crush the adhesive layer completely. Check that each board sits flush with others to create a smooth surface.
Too little adhesive leads to loose boards, while too much causes uneven walls. Next, we’ll look at managing expansion and control joints – crucial steps that prevent cracks in your finished EIFS system.
Managing Expansion and Control Joints
After you master proper adhesive methods, you need to focus on joints. Expansion and control joints are vital parts of any EIFS system. These joints allow your home’s exterior to move slightly as temperatures change.
Without them, your EIFS might crack or split. Place joints where building materials meet and at floor lines. Most homes need joints every 75-100 square feet of wall space.
Make sure joints are clean and free of debris before sealing them. Use a high-quality sealant made for EIFS systems. The right joint design helps stop water from getting behind your walls.
This step may seem small, but it’s one of the most crucial parts of your EIFS project. Skipping proper joint planning can lead to big problems down the road, even with perfect installation of other parts.
Addressing Common Installation Challenges
EIFS projects face hurdles like bad weather and common mistakes that can harm your results – our guide walks you through these issues with clear fixes to keep your project on track.
Navigating Weather Conditions During Installation
Weather plays a huge role in EIFS installation success. Rain, extreme heat, or cold can ruin your project fast! Never install EIFS when temps drop below 40°F or climb above 100°F.

The adhesive won’t cure right, and the finish coat might crack or dry too quickly. Plan your work during dry, mild days for best results. Check weather reports before starting each phase of your project.
Rain is the biggest enemy during installation. Moisture trapped under EIFS causes big problems later. Cover your work area with tarps if surprise showers pop up. The base coat must dry fully before you apply the finish coat – this takes 24 hours in good weather.
Smart planning around weather helps avoid damage to the system and saves you from costly fixes down the road.
Avoiding Installation Mistakes
Common EIFS mistakes can cost you time and money. Many first-time builders rush through substrate prep, which leads to big problems later. Always check that your wall surface is smooth and free of debris before you start.
Skipping the water-resistant barrier is another major error that causes moisture damage. Follow the maker’s specs exactly for mixing adhesives and base coats. Proper thickness matters too – too thin won’t protect, too thick wastes materials and may crack.
Mesh must be fully embedded in the base coat while it’s still wet. Gaps between insulation boards create cold spots and possible water entry points. Cutting corners on drying times between steps ruins the final look and durability.
Take your time with each phase of the process to avoid these pitfalls.
Tools like proper trowels and mixers make a huge difference in your results. Using the wrong equipment leads to uneven application and poor adhesion. Measure twice, cut once applies to EIFS installation too.
Marking your walls for expansion joints helps prevent cracking as buildings settle. Keep a level handy to check your work often. Many builders forget to protect finished areas during later construction phases.
Simple covers prevent damage to your EIFS surface. The small extra effort to avoid these mistakes pays off with a beautiful, long-lasting exterior that performs as designed.
Safety Considerations During EIFS Installation
Safety gear is a must when you install EIFS to protect yourself from harmful dust and chemicals – read on to learn which items you need and how to set up a safe work area.
Personal Protective Equipment (PPE)
Working with EIFS requires proper safety gear to protect yourself from materials and job hazards. Your health matters just as much as the quality of your EIFS installation.
- Gloves are needed when handling adhesives and base coats to prevent skin irritation and chemical burns.
- Eye protection shields your eyes from dust, debris, and chemical splashes during the installation process.
- Dust masks filter out harmful particles when cutting insulation boards or mixing dry materials.
- Long sleeves and pants guard your skin against scratches and chemical contact while applying EIFS layers.
- Hard hats protect your head from falling objects at multi-level construction sites.
- Steel-toed boots prevent foot injuries from heavy tools or materials dropping during installation.
- Knee pads reduce strain when working at lower levels of the wall during the EIFS application.
- Ear protection blocks harmful noise from power tools used for cutting insulation boards.
- Face shields offer extra protection when mixing chemicals for the base coat or finish coat.
- Harnesses must be worn when installing EIFS on high walls or multi-story buildings.
- Respirators are crucial when working with spray adhesives or in poorly ventilated areas.
- First aid kits should be readily available to treat minor cuts or chemical exposure quickly.
Job Site Safety Tips
Safety must come first when installing EIFS on your home building project. Proper safety measures protect you and your workers from harm during the installation process.
- Wear the right safety gear at all times. This includes hard hats, safety glasses, gloves, and dust masks when mixing materials.
- Use stable ladders and scaffolding that can support your weight plus materials. Check all equipment before climbing.
- Keep your work area clean and free of trip hazards. Remove scrap materials, tools, and cords from walkways.
- Stay aware of weather conditions. Never install EIFS in rain or high winds that could cause falls.
- Follow all tool safety guidelines. Read manuals for power tools and keep guards in place.
- Have a first aid kit ready on site. Make sure it contains bandages, antiseptic, and eye wash.
- Drink plenty of water, especially on hot days. Heat stress can happen quickly when working outdoors.
- Take regular breaks to avoid fatigue. Tired workers make more mistakes that can lead to injuries.
- Use proper lifting techniques to protect your back. Bend at the knees, not the waist, when picking up heavy items.
- Mark off work zones with caution tape. This keeps visitors and other workers away from falling objects.
- Check electrical cords for damage before use. Damaged cords can cause shocks or start fires.
- Keep fire safety equipment nearby. A fire extinguisher should be within easy reach at all times.
Now let’s look at how to make sure your EIFS installation meets all building codes and regulations.
Compliance with Building Codes and Regulations
Building codes set the rules for EIFS on your home, and you must follow both local laws and what the maker says – read on to learn how proper permits can save you from fines and future headaches.
Understanding Local Building Requirements
Local building codes set rules for EIFS installation that you must follow. Each area has its own rules about insulation thickness, vapor barriers, and drainage systems. Check with your town or county office before you start your project.
Getting permits early helps avoid costly fixes later. Most areas need proof that your EIFS plan meets fire safety and energy codes.
Your EIFS design must match what local laws require. Many places now ask for special moisture control features after past problems with water damage. The EIFS manufacturer can help explain which products meet your local codes.
Smart builders talk to building officials during planning stages to catch any issues early. This step saves time and money while ensuring your home passes all inspections.
Meeting Manufacturer Guidelines
Always follow the exact steps from your EIFS maker’s guide. Each brand has its own rules for how to mix adhesives, how long to let coats dry, and what tools work best. These details matter a lot for your warranty to stay valid.
EIFS makers test their products in specific ways, so changing their methods might cause problems later.
Get the full guide from your supplier before you start. Most brands offer training videos or phone support if you get stuck. Your final product needs to match what the maker promised – in looks, strength, and how long it lasts.
Skipping steps or using the wrong materials can lead to water damage or early failure of your new exterior wall system.
Post-Installation Tips and Maintenance
After you finish installing EIFS, you’ll need to check for cracks, clean the surface, and plan for yearly inspections to keep your home looking great – learn more about how proper care can extend your EIFS system’s life by up to 30 years!
Inspecting the Completed EIFS System
Once your EIFS system is in place, a final check is vital for your home’s safety and looks. Walk around the whole house and look for any cracks, bumps, or spots where the finish isn’t smooth.
Check all edges, joints, and places where the EIFS meets windows, doors, and other parts. Make sure water can drain well, as moisture issues can harm your EIFS over time. A good EIFS job should have a flat, even look with no gaps or loose spots.
Take photos of your finished EIFS for your records. These will help if you need to fix things later or make an insurance claim. You might want to hire a pro who knows EIFS well to do this check.
They can spot small problems that might grow bigger with time. Good checks now will help your EIFS last longer and keep your home safe. Next, let’s talk about how to take care of your EIFS system to make it last for many years.
Regular Maintenance for Longevity
Your EIFS system needs simple care to last many years. Clean the surface with mild soap and water at least twice a year to remove dirt and prevent mold growth. Check for cracks, holes, or signs of water damage during these cleanings.
Small cracks should be fixed right away before they grow bigger. Keep plants and shrubs trimmed back from your EIFS walls to prevent moisture buildup. Spray your exterior with a garden hose yearly to test for leaks around windows and doors.
These easy steps will help your EIFS keep its beauty and function for 20-30 years with minimal work. Proper upkeep extends the life of your exterior and saves money on costly repairs down the road.
Advanced EIFS Techniques and Innovations
Learn about cutting-edge drainable EIFS systems that boost water control and new tools that speed up work time – read on to master these game-changing methods that will set your home apart from the rest!
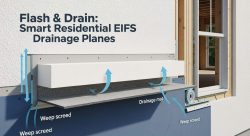
Engineered Drainable EIFS Systems
Drainable EIFS systems fix the biggest problem with older EIFS – trapped water. These modern systems include special channels that let water flow out instead of staying behind the wall.
This smart design helps stop mold and rot that can damage your home. The system works with a drainage plane behind the insulation board, plus weep holes at the bottom that let moisture escape.
Most building codes now require these drainable systems for new homes. They cost a bit more than basic EIFS but save you money in the long run by avoiding water damage repairs. Drainable EIFS still gives you all the benefits of regular EIFS – great insulation, endless design options, and a smooth finish – but with much better moisture control for your home’s exterior.
Innovations in EIFS Tools and Materials
EIFS tools and materials have changed a lot in recent years. New spray-on water barriers now make it faster to protect walls from moisture. This is key since moisture management is crucial for proper EIFS installation.
Smart adhesives that work in cold weather let builders install EIFS year-round instead of waiting for warm days. The insulation boards have also improved – they now come with built-in drainage channels that help water flow away from the wall.
These channels cut down on water infiltration problems that used to plague older EIFS systems.
Newer finishing tools like textured rollers and digital sprayers give homes more design options with less work. The finish coats now include dirt-resistant formulas that keep the exterior looking clean longer with minimal maintenance.
Some even have special additives that reflect heat, boosting thermal efficiency beyond standard EIFS. These improvements make EIFS more durable while giving homebuilders almost unlimited design choices for creating unique exterior wall cladding that stands out in the neighborhood.
Start to Finish: EIFS Project Timeline
Planning your EIFS project helps you stay on track and finish on time. A clear timeline gives you a road map from start to finish for your exterior wall system.
- Project Planning Phase (1-2 weeks) – Create design specs, get permits, and choose materials for your EIFS system.
- Hiring Contractors (1-3 weeks) – Find skilled contractors with EIFS experience who can show past work samples.
- Material Ordering (2-4 weeks) – Order all needed supplies like insulation boards, mesh, base coat, and finish coat.
- Site Preparation (3-5 days) – Clear the work area and make sure you have a smooth, debris-free surface.
- Substrate Repair (1-2 weeks) – Fix any damage to the wall surface before starting the EIFS installation.
- Weather-Resistant Barrier Installation (1-2 days) – Apply this key layer to manage moisture and protect your home.
- Insulation Board Installation (3-7 days) – Attach foam boards using adhesive or mechanical fastening methods.
- Base Coat Application (2-3 days) – Apply the base coat over the insulation boards with proper trowel techniques.
- Mesh Embedding (1-2 days) – Press the mesh into the base coat while it’s still wet for strong support.
- Drying Time (24-72 hours) – Allow the base coat to dry fully before moving to the next step.
- Finish Coat Application (2-3 days) – Apply the final layer that gives your home its color and texture.
- Curing Period (5-7 days) – Let the finish coat cure fully before any touch-ups or inspections.
- Final Inspection (1 day) – Check the whole system for proper installation and any spots that need fixing.
- Clean-Up (1-2 days) – Remove all tools, extra materials, and debris from the work site.
- Maintenance Plan Setup (1 day) – Create a schedule for regular inspections to spot signs of damage early.
EIFS Expert Tips for Flawless Installation
Pro installers know that perfect EIFS jobs start with clean, smooth surfaces. Remove all dirt and debris from your substrate before you begin. This step helps the insulation board stick properly.
Make sure you plan for moisture control too – it’s the number one cause of EIFS problems. Install proper flashing around windows and doors, and add a drainage system behind the EIFS.
Apply your base coat at the right thickness and embed the mesh fully while the coat is still wet. Many first-time builders rush this step, but pros take their time here. The mesh must be completely covered for the system to work right.
For edges and corners, use extra reinforcement to prevent cracks. Your finish coat should be applied in one session per wall section to avoid visible seams. These simple but crucial steps will maximize your EIFS system’s durability and appeal for years to come.
FAQs About EIFS Installation
Our FAQ section tackles the most common questions about EIFS installation from first-time builders. You’ll find clear answers about building types, system durability, and fire resistance ratings to help with your project decisions.
Can EIFS Be Installed on All Types of Buildings?
EIFS works great on most building types but not all surfaces. This exterior wall cladding system needs a smooth, clean base to stick properly. You can install EIFS on wood, concrete, masonry, and metal frames.
The system’s design flexibility makes it perfect for both homes and business buildings. Unlike traditional stucco, this synthetic option costs less and goes up faster.
Your building must have good drainage paths for EIFS to work right. Moisture control is a must for proper installation and maintenance. The system includes layers of insulation board and base coat that need to be put on correctly.
If you’re not sure about doing it yourself, hiring a professional siding contractor might be smart. They understand the installation techniques needed for the system’s performance and longevity.
How Long Does EIFS Last?
After learning where EIFS can be installed, you might wonder about its lifespan. A well-installed EIFS system can last 20-30 years with proper care. This type of exterior wall cladding offers great durability and aesthetic appeal compared to traditional siding options.
The key to maximizing the lifespan of your EIFS lies in proper installation techniques and regular upkeep.
Your EIFS will stay in top shape longer if you check for cracks yearly and clean it gently. Water is the main enemy of any exterior finish, so good drainage design is crucial to ensure your system lasts.
The multi-layered nature of EIFS helps protect your home from weather damage while keeping its fresh look for decades. First-time builders find this long-term value makes EIFS worth the upfront cost.
Is EIFS Fire-Resistant?
EIFS systems offer good fire resistance for your home’s exterior. Most EIFS products include fire-retardant materials in their makeup, making them less likely to burn than some other siding options.
The insulation layer in EIFS helps slow the spread of flames if a fire does occur. Testing shows that properly installed EIFS can achieve fire ratings that meet or exceed many building codes for residential and commercial construction.
Fire safety depends on proper installation of all EIFS layers. The base coat, mesh, and finish coat work together to create a barrier against flames. Make sure your contractor follows industry standards for installation to get the full fire-resistant benefits of your EIFS system.
Next, let’s look at what you need to know about EIFS maintenance for lasting protection.
Conclusion
You now have the tools to tackle your first EIFS project with skill and care. This step-by-step guide provides you the knowledge to create a beautiful, energy-saving exterior for your home.
Follow these steps and pay close attention to moisture control for a successful installation. Your new EIFS system will look great and protect your home for years to come. With proper planning and the right methods, you can enjoy all the benefits this versatile siding option offers.
FAQs
What is EIFS and why should I consider it for my home?
EIFS, known as Exterior Insulation and Finish System, is a popular wall covering that adds insulation to the exterior of your home. It comes in a variety of textures and colors, making architectural accents and custom designs possible with EIFS.
What are the basic steps for installing EIFS?
The step-by-step guide for successful installation starts with preparing the substrate, then installing the insulation boards using mechanical attachment or adhesive. Next, the base coat is applied with mesh embedded while still wet, and finally, the finish coat creates the desired look.
Do I need special tools for applying the EIFS system?
Yes, you’ll need trowels, mixers, cutting tools, and scaffolding for proper EIFS installation. Having the right equipment helps you stay on track with the design specification and avoid potential issues.
How long does the installation of EIFS take?
A typical EIFS project takes 1-2 weeks for an average home. You must allow each layer to dry completely before moving to the next step.
Can I install EIFS myself or should I hire a professional?
While a DIY approach is possible, hiring contractors experienced in EIFS is recommended for first-time homebuilders. They understand common pitfalls and can prevent damage to the EIFS during installation.
What weather conditions are best for starting an EIFS project?
Install EIFS when temperatures are between 40-100°F with no rain in the forecast for at least 24 hours. Extreme weather can affect how materials cure and bond.