What Homeowners Need to Know Before the Roofing Crew Shows Up
Updated April 28th 2026: A brand-new roof is supposed to end water problems, not start them. But on homes clad in Exterior Insulation and Finish System (EIFS), a roof replacement done the wrong way can create hidden leaks that did not exist before the roofers showed up. Indiana Wall Systems sees it happen across Central Indiana EIFS homes every year: a homeowner pays for a new roof, and within months, water stains appear on interior ceilings, walls feel soft near the roofline, or mold starts growing inside the wall cavity.
The issue is not that roofing contractors are careless. Most are experienced with shingles, underlayment, and ventilation. The problem is that EIFS requires specific detailing at every point where the roof meets the wall, and many roofing crews have never worked on a synthetic stucco home. One wrong move during tear-off, one skipped flashing detail, or one missed coordination step, and water finds a path behind the cladding that can go undetected for years.
This article covers seven reroofing mistakes that lead to hidden leaks in EIFS walls, explains why each one matters, and describes how Indiana Wall Systems approaches these transitions differently on both new builds and reroofing projects.
| 1 | Roof tear-off on EIFS homes can puncture or tear the weather-resistive barrier (WRB) behind the cladding, creating leak paths that stay hidden until rot or mold has already started. |
| 2 | Missing or improperly reinstalled step flashing and kickout flashing are among the top causes of post-reroofing leaks on EIFS walls. |
| 3 | On newer projects, Indiana Wall Systems applies a liquid-applied barrier over wall sheathing and extends it onto the roof deck to build backup protection at every roof-to-wall transition. |
| 4 | Homeowners should involve an EIFS contractor before, during, and after a reroofing project to make sure wall-system details are not overlooked. |
| 5 | A post-reroofing EIFS inspection within 30 to 60 days catches problems early, before minor moisture intrusion turns into a five-figure restoration. |
Why Roof Replacements Are High-Risk Events for EIFS Homes
Most cladding types tolerate imperfect roofing work fairly well. Vinyl siding can be removed and reinstalled. Brick veneer has weep holes and a natural drainage cavity. Fiber cement panels are individually replaceable.
EIFS is different. The system works as a continuous, bonded assembly: foam insulation adhered to wall sheathing, covered by a reinforced base coat and an acrylic finish. There is no easy way to “pop a piece off” to inspect the barrier behind it. If water gets past the finish coat and into the wall cavity, EIFS hides the damage. The acrylic surface repels moisture on the outside while trapping it on the inside.

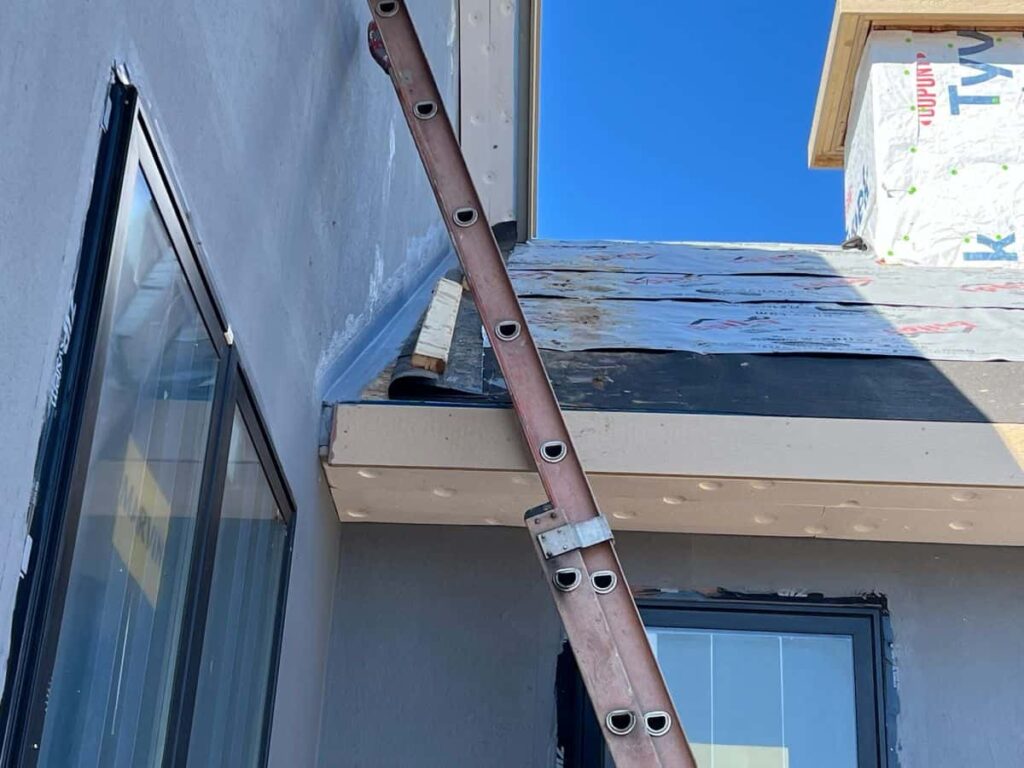
During a reroofing project, the details at every roof-to-wall intersection are exposed, disturbed, and sometimes damaged. If they are not rebuilt correctly, the homeowner ends up with a brand-new roof above a wall that is slowly filling with water.
Indiana Wall Systems has repaired reroofing-related EIFS damage on homes in Fishers, Carmel, Indianapolis, Zionsville, Plainfield, and surrounding communities. In many of these cases, the homeowner had no idea the roofing project caused the problem.
How Indiana Wall Systems Builds Backup Protection at the Roofline
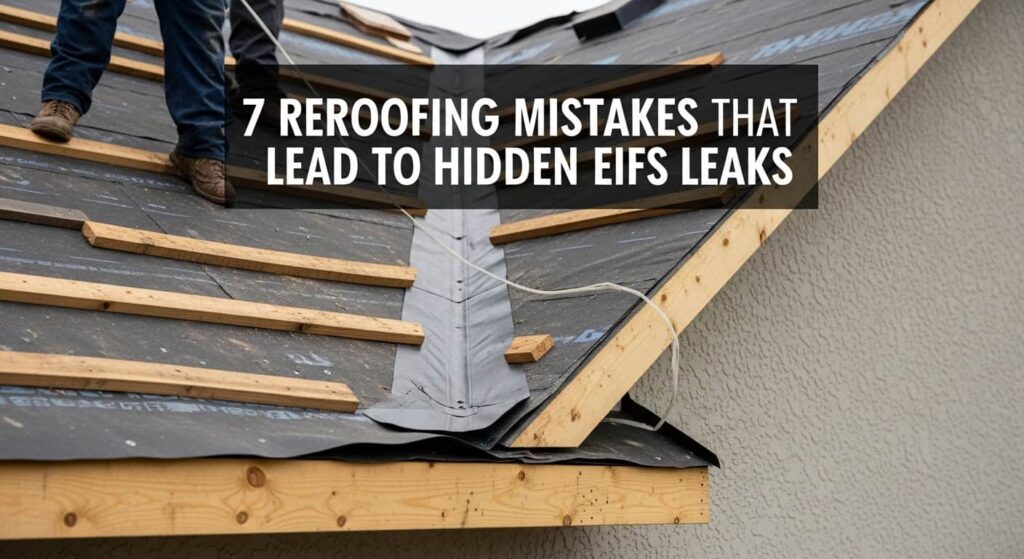
Liquid-applied air/water barrier fully coating the wall sheathing before any flashing or roofing materials are installed.
Before getting into the seven mistakes, it is worth understanding the approach Indiana Wall Systems uses on newer projects, because it addresses several of these failure points at once.
On new construction, the crew follows a specific sequence at roof-to-wall transitions:
- Seal rough window openings with Senershield-VB (a liquid-applied air/water-resistive barrier) before windows are installed. The barrier coats the wood framing inside each rough opening, so even if a window eventually leaks, the framing underneath is protected.
- Coat the exterior OSB wall sheathing with the same liquid-applied barrier. This creates a continuous, bonded membrane over the entire wall surface, with no seams, laps, or staple holes.
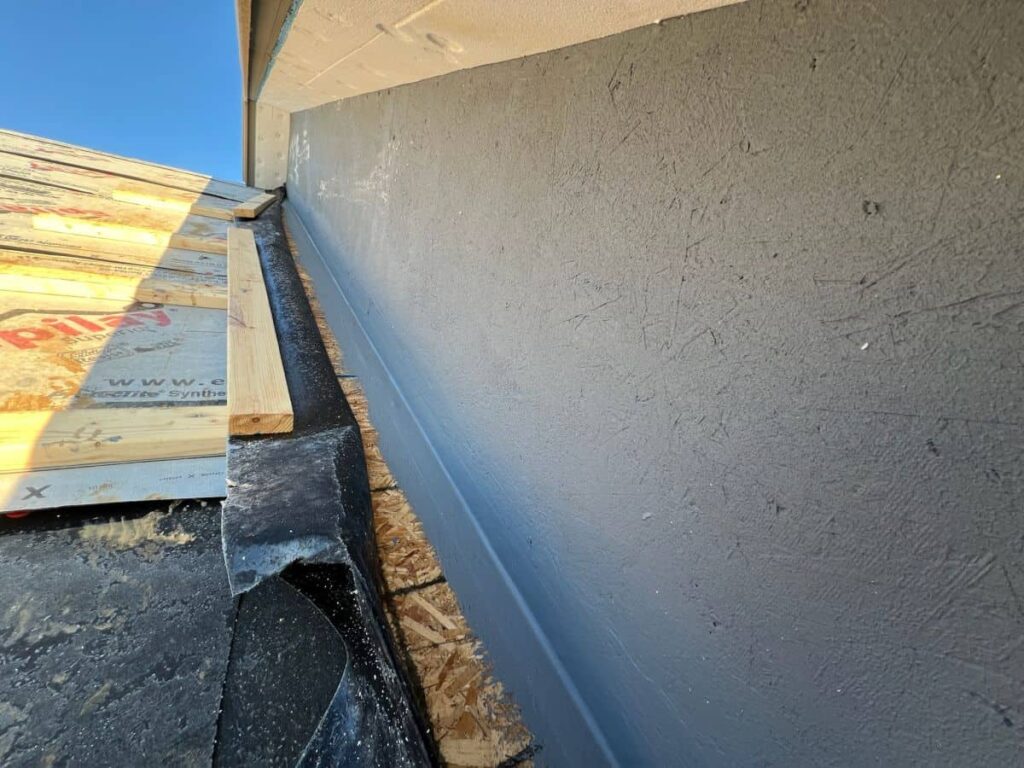
3. Extend the barrier from the wall onto the roof decking at every wall-to-roof transition. The crew carries the liquid membrane out onto the exposed roof deck (typically about 8 inches), building up a couple of solid coats at this transition point.
4. Roofing goes on afterward. Underlayment, step flashing, and shingles are installed over the top of the sealed transition.
Jeff Johnson, CEO of Indiana Wall Systems, puts it this way: “Step flashing is supposed to be behind the EIFS about 2 inches. But if that flashing gets a hole, or it’s installed wrong, or it fails 15 years later, that sealed transition underneath still gives the wall another layer of protection. We don’t rely on one layer of anything.“
The jobsite photos included with this article show this detail in practice: the gray liquid-applied barrier is visible on the wall sheathing, extending down and out onto the exposed roof decking. Once the roofer finishes, all of that is covered by underlayment, step flashing, and shingles. But the sealed inside corner at the wall-to-roof junction is already protected before any roofing material goes on.
This is Indiana Wall Systems’ field-developed approach to redundancy at a known failure point. It does not replace proper flashing; it backs it up. And it is the kind of detail that makes a real difference 15 or 20 years later, when the next reroofing project disturbs that intersection again.
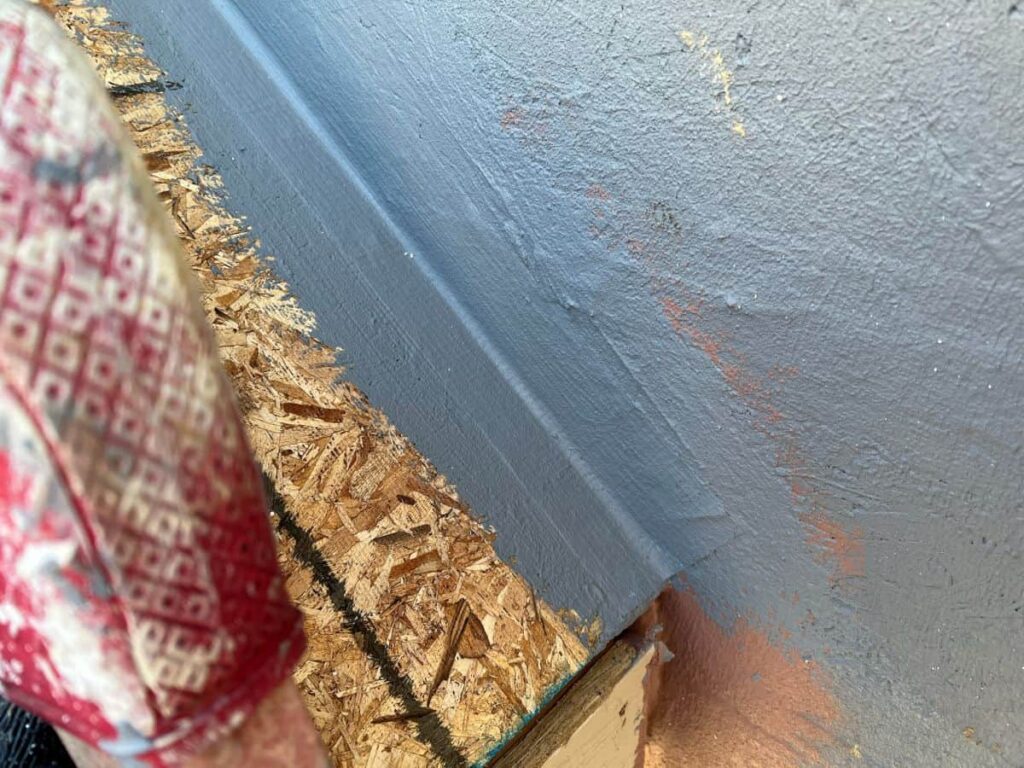
Mistake 1: Tearing Off Shingles Without Protecting the EIFS Termination
When a roofing crew strips old shingles, the work area extends right to the edge where the roof meets the wall. Pry bars, shovels, and falling debris can easily damage the EIFS termination at the roofline. This is the point where the cladding system ends and the roof surface begins.
What Goes Wrong
- Shingle removal tools scrape or crack the EIFS base coat and finish coat at the bottom edge
- Falling shingle debris chips the acrylic surface, exposing the foam underneath
- Pry bars used near the wall dislodge the starter track or weep screed
- Workers stepping near the wall edge compress or crack the EIFS lamina
Why It Matters
Any break in the EIFS finish at the roofline becomes a direct entry point for water. Even a small crack can let wind-driven rain travel behind the cladding. Because EIFS is bonded to the sheathing, that water has nowhere to drain except into the foam, the sheathing, and eventually the framing.
How to Prevent It
Before tear-off begins, the roofing crew should protect the EIFS termination with drop cloths, rigid shielding, or temporary flashing covers. The EIFS contractor should inspect the termination before and after the roofing project to catch any damage. Some homeowners coordinate a pre-roofing walk with both contractors present, which is the best approach.
Mistake 2: Damaging the Weather-Resistive Barrier During Tear-Off
Behind the EIFS, the wall sheathing should be covered by a weather-resistive barrier (WRB): a layer of house wrap, building paper, or (in better installations) a liquid-applied membrane like Senershield-VB. This barrier is the wall’s last line of defense against bulk water.
During a roof tear-off, the WRB at the top of the wall is exposed. It can be torn by pry bars, punctured by nails, or pulled away from the sheathing entirely.
What Goes Wrong
- The existing WRB is ripped when old step flashing is removed
- Roofing nails driven near the wall penetrate the WRB without being sealed
- Underlayment removal pulls the WRB away from the sheathing at the roofline
- The WRB was never properly lapped over the step flashing to begin with, and tear-off reveals it was inadequate all along
Why It Matters
If the WRB is compromised at the roofline, water that bypasses the step flashing enters the wall cavity directly. On older EIFS homes (especially barrier systems from the 1990s and early 2000s), there may be no drainage plane behind the foam. Any water that gets past a torn WRB has nowhere to go.
This is one of the reasons Indiana Wall Systems applies a liquid-applied barrier directly to the OSB sheathing on newer projects, as described in the backup protection approach above. A bonded liquid membrane conforms to every surface irregularity and tends to self-seal around nail penetrations, making it much harder to damage during tear-off than a sheet-type house wrap.
Mistake 3: Failing to Replace Step Flashing Correctly
Step flashing is the series of L-shaped metal pieces installed at each shingle course along a roof-to-wall intersection. Each piece overlaps the one below it, directing water outward and away from the wall.
When a roof is replaced, the old step flashing should typically be replaced as well. But this is where things frequently go wrong.
What Goes Wrong
- The roofer reuses old, corroded, or bent step flashing instead of installing new pieces
- New step flashing should be corrosion-resistant and properly sized. Many roofing instructions call for pieces at least 4 inches by 4 inches by 8 inches, but the final detail should match the roofing manufacturer’s instructions, EIFS requirements, and local code.
- Flashing pieces are face-nailed through the exposed face, creating leak points
- The overlap between pieces is too short
- Step flashing is not re-integrated with the WRB on the wall side
Why It Matters on EIFS Homes
On EIFS homes, step flashing typically extends behind the cladding. The EIFS finishes over the top of the flashing, so it is hidden. During reroofing, the step flashing may be replaced on the roof side, but if the wall side is not re-integrated with the EIFS termination and the WRB, there is a gap where water can enter.
This is a common coordination failure. The roofer handles the roof side; the EIFS side gets ignored because it “looks fine” from the outside.
For a deeper look at how step flashing integrates with EIFS at roof-wall intersections, see Indiana Wall Systems’ guide to kickout flashing for EIFS homes.
Mistake 4: Skipping or Undersizing the Kickout Diverter
At the bottom of every step flashing sequence, where the roof meets the wall and terminates at the gutter, a kickout diverter should redirect water away from the wall and into the gutter. Without it, water follows the wall surface downward through surface tension and capillary action, eventually finding a path behind the cladding.
What Goes Wrong During Reroofing
- The original roof never had a kickout, and the new roofer does not add one
- The roofer installs a kickout but uses the wrong angle or an undersized diverter
- The kickout is not sealed to the gutter apron, letting water bypass it
- The roofer assumes the EIFS contractor will handle it, and the EIFS contractor assumes the roofer already did
The Scale of the Problem
A single roof-wall intersection can channel runoff from 500 to 1,000 square feet of roof surface. During a heavy Central Indiana storm, that volume of water concentrated at one point, with no kickout, can push a significant amount of water behind the EIFS every year.
| ✅ Properly Installed Kickout | ❌ No Kickout Installed |
|---|---|
| Water exits into the gutter at a proper angle | Water clings to the wall and runs behind the cladding |
| Wall stays dry below the roofline | Persistent moisture leads to sheathing rot and mold |
| EIFS termination remains intact | Water erodes the base coat and foam over time |
| Early repair if needed: a few hundred dollars | Ignored damage: $5,000 to $15,000+ |
Mistake 5: No Backup Protection at the Roof-to-Wall Transition
Even when step flashing and a kickout diverter are installed correctly, flashing can fail over time. Metal corrodes. Sealant joints crack. Nails work loose. Wind lifts a flashing piece just enough to create a gap.
The question is: what happens when that flashing fails?
On most homes, the answer is that water enters the wall. On newer Indiana Wall Systems projects, there is a second layer of protection underneath, as described in the backup protection section earlier in this article.
Most roofers are not thinking about what is behind the EIFS or what will happen to this intersection 10 years from now. They install flashing to current standards, button up the roof, and move on. That is not wrong; it is their job. But EIFS walls benefit greatly from redundancy at this particular junction, and if no one builds that backup into the assembly, the wall depends entirely on flashing that may or may not last the life of the roof.
For homeowners who already have an EIFS home and are getting a new roof, this is worth a conversation with their EIFS contractor. A reroofing project exposes the top of the wall, which creates an opportunity to inspect the WRB condition, verify flashing integration, and (in some cases) apply a liquid-applied barrier as a retrofit before the new roof goes on.
Mistake 6: No Coordination Between the Roofing and EIFS Contractors
Roof replacements on EIFS homes involve two different trades, and when those trades do not talk to each other, critical details fall through the cracks.
| ✅ What Should Happen | ❌ What Actually Happens |
|---|---|
| EIFS contractor inspects termination before tear-off | Roofer starts work without notifying EIFS contractor |
| Roofing crew protects EIFS edges during tear-off | EIFS damage is not noticed until weeks or months later |
| Step flashing wall upturn is verified against EIFS manufacturer specs | Roofer installs a shorter upturn that does not meet EIFS requirements |
| Kickout diverter is specified in the roofing scope of work | Kickout is assumed to be someone else’s job |
| EIFS contractor repairs termination damage after roofing is complete | No one checks the EIFS termination after the roofers leave |
| A moisture inspection or water test is performed | Homeowner signs off on the new roof without checking the walls |
Who Is Responsible?
This is where finger-pointing starts. The roofer says the wall is not their responsibility. The EIFS contractor says they were never called to the job. The homeowner assumed both trades would coordinate on their own.
The best approach is for the homeowner or property manager to write the coordination requirement into the reroofing scope of work. Both contractors should be present for a pre-roofing walkthrough and a post-roofing inspection.
Mistake 7: Skipping the Post-Reroofing EIFS Inspection
After the new shingles are on and the roofing crew has left, homeowners often consider the project finished. But on an EIFS home, the most important inspection happens after the roof is complete.
What a Post-Reroofing EIFS Inspection Should Cover
- EIFS termination at the roofline: Is the base coat and finish coat intact? Are there chips, cracks, or exposed foam near the roof edge?
- Step flashing integration: Is the flashing properly lapped behind the EIFS? Are there visible gaps?
- Kickout flashing presence: Is a kickout installed at every roof-wall intersection? Is it angled correctly into the gutter?
- Sealant joints: Are all sealant joints between the EIFS and flashing intact and properly tooled?
- WRB condition: If any wall area was exposed during roofing work, was the WRB repaired or replaced?
- Interior check: Are there any new stains, soft spots, or musty odors on interior walls or ceilings near the roofline?
Timing Matters
Indiana Wall Systems recommends scheduling a post-reroofing EIFS inspection within 30 to 60 days of the roofing project’s completion. That gives enough time for moisture intrusion to show early signs (elevated moisture meter readings, interior staining) without allowing months of hidden damage to accumulate.

For a breakdown of what professional EIFS inspectors look for, see the Indiana Wall Systems guide to what an EIFS inspection involves.
What Homeowners Should Include in a Reroofing Scope of Work
When hiring a roofing contractor to replace the roof on an EIFS home, the scope of work should address wall-system details explicitly. Here is a checklist of items to include or request:
☐ Replacement of all step flashing with new pieces meeting manufacturer specs
☐ Installation of kickout diverters at every roof-wall intersection
☐ Step flashing wall upturn verified against EIFS manufacturer requirements
☐ Ice and water shield turned up the wall at roof-to-wall intersections
☐ Verification that the WRB is intact at the roofline after tear-off
☐ Sealant compatibility with EIFS finish coat confirmed before application
☐ Pre-roofing walkthrough with EIFS contractor (recommended)
☐ Post-roofing EIFS inspection within 30-60 days
☐ Written warranty that covers flashing work at wall intersections
Homeowners who include these items in the scope of work before signing a roofing contract are far less likely to discover hidden EIFS damage after the project is complete.
The Real Cost of Getting It Wrong
Reroofing-related EIFS damage follows a predictable escalation pattern. The longer the problem goes undetected, the more expensive the repair.
The difference between a $500 fix and a $25,000 restoration often comes down to whether the homeowner scheduled a post-reroofing EIFS inspection or assumed everything was fine because the new roof looked good from the ground.
Older EIFS Homes: Even Higher Risk During Reroofing
Homes built with barrier EIFS (the pre-2000 systems with no drainage plane) face greater risk during a roof replacement. These systems were designed as face-sealed assemblies, meaning the acrylic finish coat was intended to be the only defense against water. There is no drainage channel behind the foam to redirect incidental moisture.
On these older systems:
- WRB damage during tear-off is more consequential because there is no secondary drainage path
- Step flashing that was never properly integrated during original construction may already be inadequate
- The existing EIFS termination may already be weakened by years of thermal cycling and sealant deterioration
- Reroofing may be the first time in 20+ years that anyone has looked at the roof-wall intersection details
For homeowners with older barrier EIFS, a reroofing project is actually an opportunity. The tear-off exposes the top of the wall, allowing an EIFS contractor to inspect the WRB, verify flashing integration, and in some cases add a liquid-applied barrier as a retrofit.
Indiana Wall Systems recommends that homeowners with older EIFS systems treat any reroofing project as a chance to upgrade the wall-to-roof transition, not just replace shingles.
Central Indiana Climate: Why These Details Matter Even More Here
Central Indiana’s weather punishes every weak point in a reroofing job. The region delivers:
- Freeze-thaw cycles from November through March that cause trapped water to expand, cracking EIFS and widening flashing gaps
- Wind-driven rain from summer thunderstorms that pushes water horizontally into joints that stay dry during light rainfall
- Ice dam potential on complex rooflines, especially in neighborhoods like Carmel, Fishers, and Noblesville where multi-gable homes have many roof-to-wall intersections
- Rapid snowmelt events that concentrate large volumes of water at a single wall intersection in a matter of hours
A reroofing project that leaves even one flashing detail unfinished is gambling against all four of these conditions.
Questions to Ask Your Roofing Contractor Before Work Begins
Before signing a reroofing contract, homeowners with EIFS should ask these questions directly:
- Have you replaced a roof on an EIFS home before? If not, the contractor should be willing to coordinate with an EIFS specialist.
- Will you install kickout flashing at every roof-wall intersection? This should be a yes, and it should be written into the scope of work.
- How will you protect the EIFS termination during tear-off? Look for specific answers (rigid shielding, drop cloths, careful hand removal near walls), not vague assurances.
- Will all step flashing be replaced, and what wall upturn will you use? The answer should be new flashing with an upturn that meets the EIFS manufacturer’s requirements.
- Will you install ice and water shield at roof-wall intersections? In Indiana’s climate, self-adhered membrane at these locations is strongly recommended.
- Who is responsible for the final condition of the EIFS termination after the roof is complete? Get the answer in writing. This is where trade coordination breaks down most often.
- Do you have any objection to my EIFS contractor inspecting the work before and after? Any hesitation here is worth paying attention to.
When to Call Indiana Wall Systems
Homeowners across Central Indiana should contact Indiana Wall Systems before, during, or after a reroofing project if they:
- Are planning a roof replacement and want a pre-roofing EIFS inspection to document existing conditions
- Want an EIFS contractor present during the reroofing project to monitor wall-system details
- Have already completed a roof replacement and want a post-roofing moisture inspection
- Notice new water stains, soft spots, or musty odors near rooflines after a roof was replaced
- Own an older barrier EIFS home and want to upgrade the wall-to-roof transition during reroofing

Jeff Johnson and the Indiana Wall Systems team bring over 26 years of EIFS contracting experience to every inspection and repair project. The company serves all of Central Indiana, including Carmel, Fishers, Zionsville, Indianapolis, Greenwood, Plainfield, Avon, and the surrounding communities.
Frequently Asked Questions
Can a roofer damage my EIFS during a roof replacement?
Yes. Pry bars, falling debris, and foot traffic near wall edges can crack the EIFS finish coat, chip the base coat, and tear the weather-resistive barrier behind the cladding. Most roofers are not trained on EIFS-specific termination details, so pre-roofing protection and a post-roofing EIFS inspection are important for homeowners with synthetic stucco.
Should I hire an EIFS contractor before getting a new roof?
A pre-roofing EIFS inspection documents the existing condition of wall terminations, step flashing integration, and sealant joints before the roofing crew begins. This creates a baseline record. If damage occurs during reroofing, the documentation makes it easier to identify what changed and who is responsible for the repair.
How do I know if my roof replacement caused EIFS water damage?
Watch for new water stains on interior ceilings or walls near rooflines, soft spots in the EIFS when pressed near the roof edge, musty odors in rooms below roof-wall intersections, and dark streaks on the exterior below the roofline. Any of these signs appearing within months of a reroofing project should prompt a professional EIFS moisture inspection.
What is a liquid-applied barrier, and why does it help at roof-to-wall transitions?
A liquid-applied barrier (such as Senershield-VB) is a fluid coating rolled or sprayed onto wall sheathing that cures to a rubber-like, waterproof membrane. At roof-to-wall transitions, Indiana Wall Systems extends this barrier onto the roof deck to create a continuous sealed surface. If step flashing fails later, this backup layer still protects the framing.
Does Indiana Wall Systems work with roofing contractors during reroofing projects?
Yes. Indiana Wall Systems can perform a pre-roofing EIFS inspection, be present during the project to monitor wall-system details, and conduct a post-roofing moisture inspection after the roof is complete. Coordinating both trades reduces the risk of missed flashing details and EIFS termination damage. Call (765) 341-6020 to schedule.