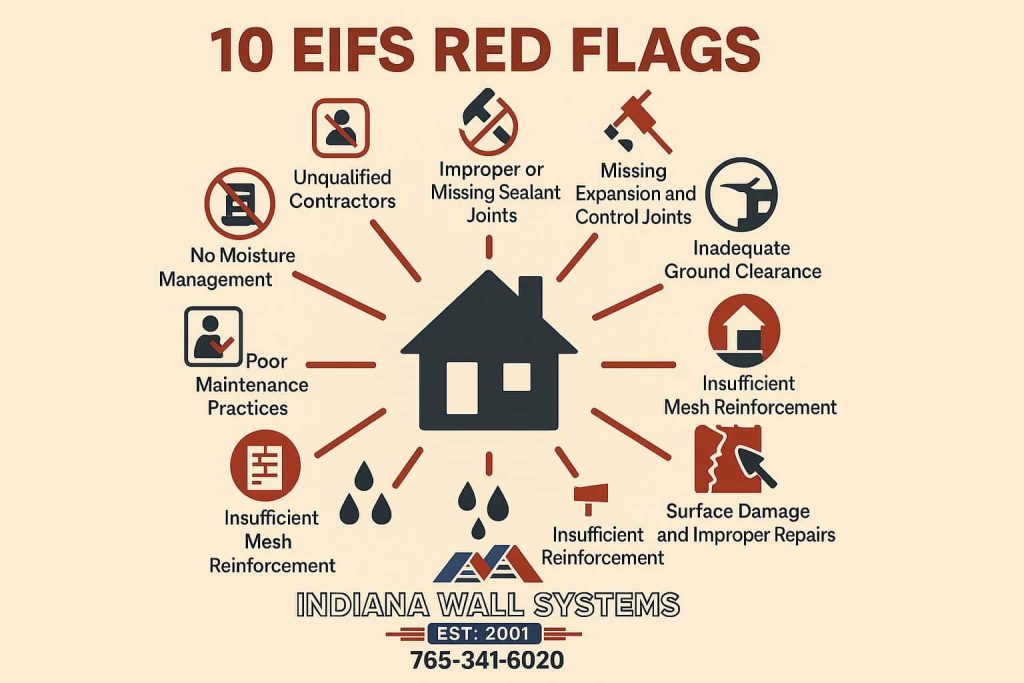
Don’t Let Hidden EIFS Problems Turn Into Costly Disasters
Key Takeaways
- Water intrusion behind EIFS is the #1 threat to your home’s structural integrity – look for stains, bulges, or soft spots
- Proper drainage systems and flashing details prevent 95% of EIFS failures
- Annual professional inspections can save homeowners an average of $15,000 in repair costs
- The difference between barrier EIFS and drainage EIFS can determine your system’s lifespan
- Sealant failure around windows and doors is the most common entry point for moisture
Looking at your beautiful EIFS exterior, you’d never guess what might be happening behind that smooth, attractive finish. As Indiana homeowners, we face unique challenges with our wild temperature swings, freeze-thaw cycles, and moisture-heavy seasons. These conditions can be particularly tough on Exterior Insulation and Finish Systems (EIFS).
In my 22 years running Indiana Wall Systems, I’ve seen countless homes with serious EIFS problems that could have been avoided if homeowners had known what to look for. The worst part? Many contractors won’t mention these issues until it’s too late.
The truth is, while EIFS offers outstanding energy efficiency and design flexibility, it requires proper installation and maintenance to perform as intended. When corners get cut or maintenance gets ignored, problems develop silently behind those perfect walls – often causing extensive damage before they’re noticed.
Let’s pull back the curtain on what you should know to protect your investment and your home.
Customer Story Spotlight: The $35,000 Lesson
When the Johnsons from Carmel called us about a small water stain on their ceiling, they had no idea what we’d find. Their 15-year-old EIFS home looked beautiful from the outside, but behind the system was a different story.
“We noticed a small leak during heavy rain, but our previous contractor told us it was just a roofing issue,” explained Mark Johnson (no relation to me!). “After a roof repair didn’t fix it, we called Indiana Wall Systems.”
Our inspection revealed extensive water intrusion around improperly flashed windows. The moisture had been trapped behind their barrier-type EIFS for years, rotting nearly 40% of the structural sheathing.
“Jeff and his team showed us exactly what was happening with moisture meters and photos. We were shocked at how bad it had gotten from what seemed like a small problem,” Mark said.
The repair required removing large sections of EIFS, replacing damaged sheathing, and installing a modern drainage-plane EIFS system with proper flashing details. Total cost: $35,000 – most of which could have been avoided with proper installation and earlier detection.
The good news? Their new system includes proper drainage channels, kickout flashing, and expansion joints. Five years later, they haven’t had a single moisture problem.
![Thermal imaging scan showing moisture in walls]
The Indiana EIFS Challenge: Why Our Climate Demands Special Attention
Before diving into specific red flags, let’s understand why EIFS systems in Indiana face unique challenges. Our climate combines several factors that create the perfect storm for EIFS problems:
- Dramatic freeze-thaw cycles – Central Indiana can experience temperature swings of 40+ degrees in a single day, causing building materials to expand and contract rapidly.
- High humidity seasons – Our humid summers create ideal conditions for mold growth if moisture penetrates your EIFS system.
- Heavy seasonal rains – Spring downpours can overwhelm poorly designed drainage systems, while winter ice dams create persistent moisture sources.
- Extended winter freezes – When water infiltrates an EIFS system and freezes, it expands and creates cracks that lead to even more water entry.
These climate factors mean Indiana homeowners need to be particularly vigilant about their EIFS systems. What might be a minor issue in a drier climate can quickly become a major problem here.

During my years serving Indianapolis, Carmel, Fishers, and surrounding communities, I’ve seen how homes with identical EIFS installations perform completely differently based on their orientation to prevailing winds and exposure to elements. North-facing walls, for instance, stay wetter longer and are more prone to problems.
Now, let’s examine the critical red flags every EIFS owner needs to know.
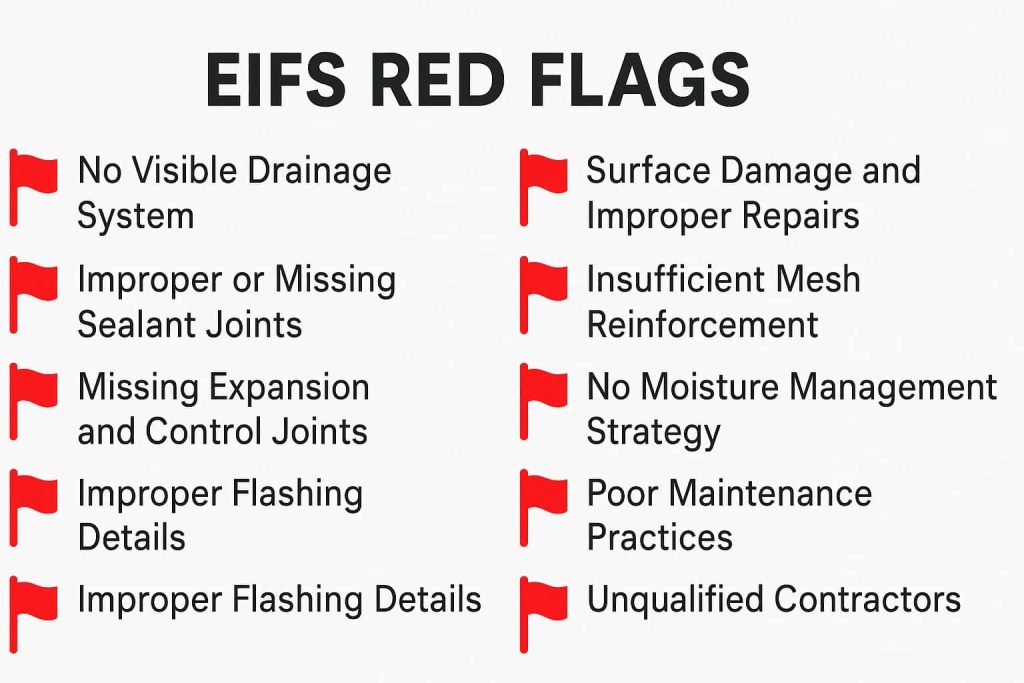
Red Flag #1: No Visible Drainage System
The biggest advancement in EIFS technology was the shift from barrier EIFS to drainage EIFS. Older barrier systems relied entirely on perfect sealing to keep water out. Modern drainage systems accept that some moisture will get in and provide a path for it to escape.
“The difference between these two systems is like night and day,” says Jeff Johnson, CEO of Indiana Wall Systems. “When I see a home with no visible drainage features, I know we’re likely to find problems.”
What to look for:
- Weep screeds at the bottom of walls (small perforated strips)
- Kickout diverters where rooflines meet walls
- Drainage channels behind the foam insulation
Older homes built before 2000 in Central Indiana often have barrier EIFS systems that are particularly vulnerable to our climate’s moisture challenges. If your home lacks these critical drainage features, consider an EIFS evaluation to determine if an upgrade is needed.
Why Drainage Systems Matter So Much in Indiana
When I first started working with EIFS in the early 2000s, we were just beginning to understand how crucial proper drainage is in our climate. The industry had primarily developed EIFS for drier regions, and those early systems simply weren’t designed for Indiana’s moisture levels.


Today, we know that even perfectly installed barrier EIFS will eventually allow some moisture penetration in our climate. The question isn’t if water will get in, but when—and more importantly, how it gets out.
Modern drainage EIFS includes several critical components:
- A water-resistive barrier (WRB) applied to the substrate
- Vertical drainage channels or grooves in the foam insulation
- Drainage openings at the bottom of the system
- Properly integrated flashings at all penetrations
These components work together to create a “second line of defense” against moisture. If water penetrates the outer barrier (through a crack, damaged sealant, etc.), it encounters the WRB and is directed downward through drainage channels and out through weep holes.
The cost difference between barrier and drainage EIFS during initial installation is relatively small (typically $1-2 per square foot), but the long-term savings can be enormous. If your home has a barrier system without these drainage features, consider upgrading to a drainage system during your next repair or renovation.
Red Flag #2: Improper or Missing Sealant Joints
Sealant joints are the unsung heroes of your EIFS system. These flexible barriers must accommodate movement while maintaining a watertight seal around windows, doors, and other penetrations.
Poor sealant work is responsible for about 70% of the water intrusion cases we see. The problem? Many contractors use:
- The wrong type of caulk (using regular silicone instead of EIFS-specific sealant)
- Improper application techniques
- No backer rod to control sealant depth
“I can’t stress this enough – proper sealant installation around windows and doors is absolutely critical,” notes Jeff Johnson. “We regularly see homes less than 5 years old with failing sealant joints because someone took shortcuts.”
Look for:
- Cracked or peeling sealant
- Gaps between EIFS and windows/doors
- Staining around window frames
If you notice these issues, don’t wait! Sealant failure can allow water to bypass your entire wall system and cause extensive damage.
The Science Behind Proper Sealant Joints
Understanding why sealant joints fail requires knowing a bit about how they work.
The Anatomy of a Proper EIFS Sealant Joint
Why professional sealant application is critical to your EIFS system’s performance
Figure: Cross-section of properly designed EIFS sealant joint showing the critical “hourglass” shape. This configuration allows maximum joint movement while maintaining a weathertight seal.
✓ Correct Sealant Configuration
- Proper Width: Minimum ½” (12mm) to accommodate movement
- Hourglass Shape: Wider at edges, narrower in center
- Backer Rod: Closed-cell polyethylene foam properly sized
- 2:1 Width-to-Depth Ratio: Maintains maximum flexibility
- Bond Breaker: Prevents three-sided adhesion
- EIFS-Compatible Sealant: High-performance elastomeric type
Expected Performance: 15-20+ years in Indiana’s climate with proper materials and installation
✗ Common Sealant Mistakes
- Too Narrow: Joints under ¼” cannot accommodate movement
- No Backer Rod: Causes excessive sealant depth and failure
- Three-Sided Adhesion: Prevents proper joint movement
- Improper Sealant: Using standard silicone or latex caulk
- Poor Surface Prep: Failing to clean or prime substrates
- Smeared Application: Spreading sealant over EIFS surface
Typical Results: Failure within 2-3 years, leading to water intrusion and costly damage
Sealant Joint Maintenance Schedule
| Timeframe | Recommended Action |
|---|---|
| Every Spring | Visual inspection for cracks, separation, or discoloration |
| Every 2-3 Years | Professional evaluation of sealant flexibility and adhesion |
| Every 7-10 Years | Proactive replacement of critical sealant joints (windows, doors) |
| After Extreme Weather | Inspect for storm damage, especially hail impacts near joints |
Unlike regular caulk you might use for interior projects, EIFS sealant joints are engineered systems with specific requirements:
- Joint width must be properly sized for anticipated movement (typically at least 1/2″ wide)
- Backer rod (a foam cylinder) must be installed to control sealant depth
- Proper adhesion requires special primers on some surfaces
- Sealant type must be compatible with EIFS components and flexible enough for movement
The ideal joint configuration follows what we call the “hourglass principle” – the sealant should be shaped like an hourglass in cross-section, adhering only to the sides of the joint (not the bottom). This shape allows maximum flexibility.
Most sealant manufacturers recommend a 2:1 width-to-depth ratio. For example, a 1/2″ wide joint should be 1/4″ deep. Without a backer rod controlling this depth, the sealant will likely fail prematurely.
In my experience, sealant failure often begins at the corners of windows and doors, where movement stress is greatest. During your visual inspections, pay special attention to these areas.
High-quality sealants designed specifically for EIFS typically cost 3-4 times more than standard construction caulk, but their performance difference is dramatic. Quality sealants maintain flexibility for 20+ years, while improper materials can fail within 2-3 years in our Indiana climate.
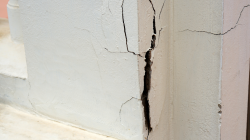
Red Flag #3: Missing Expansion and Control Joints
Buildings move. They expand and contract with temperature changes, settle over time, and respond to environmental forces. Expansion joints and control joints are designed to accommodate this movement without damaging the EIFS.
In Indiana’s climate, where we can see a 70-degree temperature swing in a single day, these joints are particularly important. Yet many contractors leave them out to save time and money.
“About 30% of the repair jobs we handle stem from missing expansion joints,” says Jeff Johnson. “The sad part is that installing them correctly during initial construction costs very little compared to repairing cracked walls later.”
Key areas that need proper joints:
- Where different building materials meet
- At floor lines on multi-story buildings
- Around large openings like windows and doors
- Every 75-100 feet on long wall spans
When expansion joints are missing, look for:
- Long horizontal or vertical cracks
- Bulging or warping of the EIFS surface
- Separation between EIFS and adjacent materials
If your home shows these signs, consider a professional assessment of your expansion joint requirements.
Expansion Joint Placement: A Critical Design Decision
The science of expansion joint placement involves understanding how buildings move and where stress concentrates. Most EIFS manufacturers provide specific guidelines, but here’s what I’ve learned matters most in Central Indiana homes:
- Material transitions – Wherever EIFS meets a different material (brick, siding, stone), an expansion joint is essential because different materials expand and contract at different rates.
- Geometric transitions – Corners, especially inside corners, create stress points that benefit from expansion joints.
- Structural joints – Any joint in the building structure (like where an addition meets the original structure) must have a corresponding joint in the EIFS.
- Large wall areas – Continuous EIFS walls exceeding 75-100 feet should have vertical expansion joints to prevent cracking.
Critical EIFS Expansion Joint Locations
Understanding where & why joints are essential in Indiana’s climate
Figure: Recommended expansion joint locations on a typical Indiana home with EIFS exterior. Areas marked in orange indicate critical joint placement zones to accommodate building movement.
Material Transitions
Required wherever EIFS meets a different material:
- EIFS to brick/stone
- EIFS to vinyl/fiber cement
- EIFS to wood trim
Why it matters: Different materials expand and contract at different rates, creating stress points.
Building Geometry
Required at building shape changes:
- Inside corners
- Floor lines on multi-story buildings
- Bump-outs and projections
Why it matters: Geometric transitions create stress concentrations that lead to cracking.
Structural Elements
Required at structural transitions:
- Building expansion joints
- Between different foundations
- Original structure to addition
Why it matters: Structural movement must be accommodated to prevent system failure.
Panel Size Limits
Required for large wall areas:
- Every 75-100 feet horizontally
- Every 30 feet vertically
- Large wall areas exceeding 625 sq. ft.
Why it matters: Limits the size of each EIFS panel to prevent stress buildup from thermal expansion.
Why Indiana’s Climate Demands More Expansion Joints
Temperature Fluctuation
Central Indiana can experience temperature swings of 40-70°F in a single day during spring and fall, causing rapid expansion and contraction of building materials.
Freeze-Thaw Cycles
Indiana averages 40-50 freeze-thaw cycles per year, among the highest in the nation. Each cycle creates movement stress in the EIFS system.
Seasonal Extremes
With temperatures ranging from -15°F to 105°F annually, Indianapolis-area homes experience more expansion/contraction than many other regions.
Cost Comparison: Prevention vs. Repair
| Scenario | Cost | Notes |
|---|---|---|
| Initial Installation Adding proper expansion joints during construction | $5-8 per linear foot | Minimal cost added to overall project budget |
| Retrofit Installation Adding joints to existing EIFS system | $18-25 per linear foot | Includes cutting, preparation, sealant installation |
| Crack Repair Fixing damage from missing joints | $35-75 per linear foot | Includes crack repair, EIFS patch, finish coat |
| Major Repair Fixing structural damage from movement stress | $8,000-25,000+ per damaged area | Includes EIFS removal, sheathing/framing repair, new installation |
One client in Zionsville had us repair extensive EIFS cracking on their 3,500-square-foot home. The previous contractor had installed no expansion joints whatsoever on a 120-foot continuous wall. After our repair (which included properly placed expansion joints), they haven’t experienced a single crack in five years, despite extreme temperature fluctuations.
The cost of adding proper expansion joints during installation is minimal (roughly $5-8 per linear foot), but retrofitting them later can cost 3-5 times more and requires careful color matching of sealants.
As a rule of thumb, expansion joints should be placed no more than 75 feet apart in our climate. For homes with complex architectural features, specialized joint patterns may be needed.
Red Flag #4: Inadequate Ground Clearance
EIFS should never touch the ground. This fundamental rule is often ignored, leading to serious moisture problems.
“When EIFS extends to the ground or below grade, it’s not a question of if you’ll have problems, but when,” warns Jeff Johnson. “The system will wick ground moisture like a sponge, leading to delamination and mold growth.”
Proper installation requires:
- Minimum 6″ clearance above soil
- 2″ clearance above hard surfaces (like driveways)
- Proper termination with weep screeds or starter tracks
Too often, we see landscape additions that bury the bottom of EIFS systems, creating direct pathways for moisture and pests to enter. If your home’s EIFS extends to the ground, consider having a professional modify the termination points before serious damage occurs.
Ground Clearance Problems: The Hidden Danger
Ground clearance issues are among the easiest EIFS problems to spot yet are surprisingly common. In our Indianapolis service area, I estimate that 35% of EIFS homes have inadequate ground clearance at some point around their perimeter.
Critical EIFS Ground Clearance Requirements
Maintaining proper distance between EIFS and grade level
❌ INCORRECT: Insufficient Clearance
Common Problems: EIFS extends to or below grade, missing proper termination
Problems Caused:
- Wicking: Ground moisture absorbed into EIFS system
- Delamination: Separation of EIFS layers due to moisture
- Pest Entry: Direct pathway for termites and insects
- Freeze Damage: Moisture expands when frozen, cracking system
✓ CORRECT: Proper Clearance
Key Features: Maintained clearance above grade, proper termination details
Benefits:
- Moisture Protection: Prevents ground water contact
- Visual Inspection: Allows for monitoring of system condition
- Pest Barrier: Creates visible zone to detect pest activity
- Longevity: Dramatically extends EIFS lifespan
EIFS Ground Clearance Requirements by Surface Type
| Surface Type | Minimum Required | Recommended | Special Requirements |
|---|---|---|---|
| Soil/Mulch | 6 inches | 8-10 inches | Weep screed; sloped grade away from foundation |
| Hard Surfaces | 2 inches | 4 inches | Sealant joint at transition; flashing under EIFS |
| Roofing | 2 inches | 4 inches | Step flashing with kickout diverter |
| Decks | 2 inches | 3-4 inches | Special ledger board flashing; gap for airflow |
Repair Costs for Ground Contact Issues
| Issue Severity | Typical Cost Range |
|---|---|
| Minor (Surface Damage) | $75-150 per linear ft |
| Moderate (Partial Damage) | $125-275 per linear ft |
| Severe (Structural Damage) | $250-500+ per linear ft |
*Based on Central Indiana EIFS repair data (2020-2025)
Prevention Steps for Existing Homes
- Landscape Maintenance
Keep mulch and soil at least 8″ below EIFS termination.
- Professional Retrofits
Install proper termination details where missing.
- Regular Inspections
Check clearances twice yearly (spring/fall).
The problem often begins during installation when contractors fail to account for final landscaping. Alternatively, homeowners may add soil, mulch, or other landscaping materials after construction, burying the bottom of the EIFS system.
Beyond moisture problems, inadequate ground clearance creates other issues:
- Pest entry – Termites and other wood-destroying insects can access the structure undetected
- Freeze damage – Ground moisture wicked into the system can freeze and cause delamination
- Splash-back – Rain hitting the ground splashes onto the EIFS, leading to dirt and organic growth
One memorable project in Carmel involved a 10-year-old home where decorative mulch had been piled against the EIFS for years. When we removed the affected sections, we discovered the bottom 16 inches of OSB sheathing had completely rotted away, and termites had established colonies inside the walls. The repair cost exceeded $45,000 and required structural reinforcement.
The solution to ground clearance problems usually involves removing the bottom portion of EIFS and installing proper termination details with appropriate flashing and weep systems. This modification typically costs $75-125 per linear foot but provides permanent protection against ground moisture.
For best practice, maintain landscape beds at least 8 inches below the bottom of your EIFS system, and ensure proper sloping away from the foundation to prevent water pooling.
Red Flag #5: Improper Flashing Details
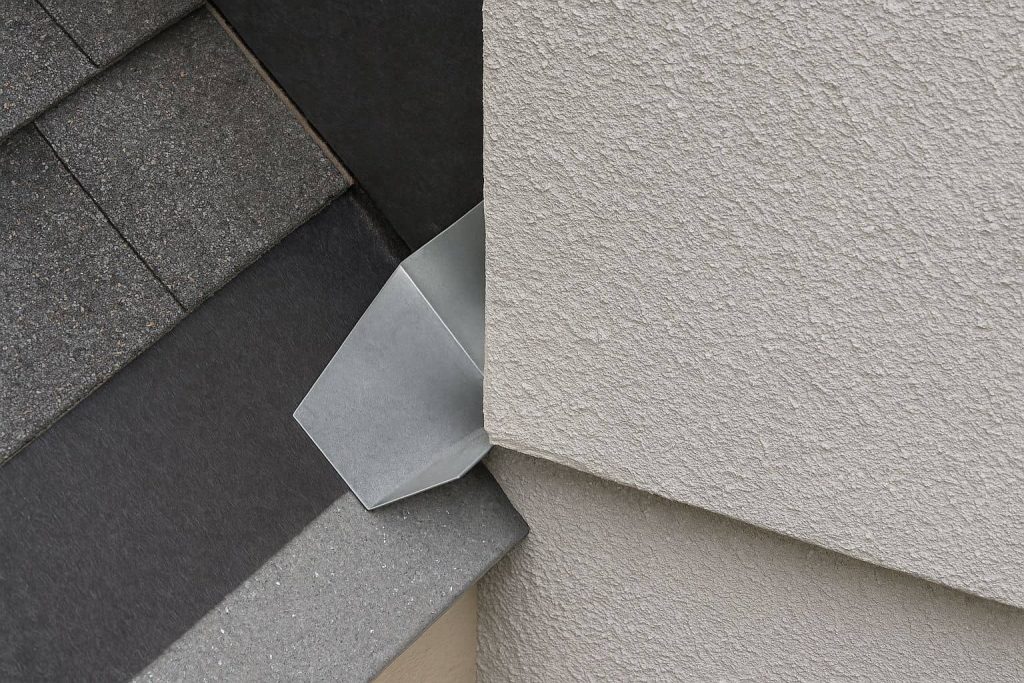
Flashing is your EIFS system’s first line of defense against water intrusion. Yet improper flashing details around windows, doors, rooflines, and penetrations are among the most common installation errors we see.
Critical flashing elements include:
- Kickout diverters where rooflines meet walls
- Proper window head flashing (often hidden but vital)
- Deck and railing attachment flashing
- Penetration sealing around pipes, vents, and fixtures
“In our moisture investigations, improper flashing is implicated in over 80% of cases,” notes Jeff Johnson. “The tragedy is that proper flashing adds very little to installation costs but prevents tens of thousands in damage.”
If you’re considering an EIFS home purchase, pay special attention to these areas during inspection, or better yet, hire an EIFS specialist rather than a general home inspector.
The Critical Role of Kickout Flashing
Of all flashing components, kickout diverters (also called kickout flashing) deserve special attention. These simple devices redirect water away from the wall at the end of roof-to-wall intersections, preventing water from running behind the EIFS.
Missing kickouts are responsible for some of the most severe damage we’ve encountered. In a recent Fishers project, a missing kickout allowed water to penetrate the system for over eight years. The resulting damage extended 12 feet down the wall and 6 feet laterally, requiring extensive structural repairs and mold remediation.
Proper kickout flashing should:
- Extend at least 4 inches up the wall
- Extend at least 4 inches beyond the wall surface
- Include proper integration with the water-resistive barrier
- Direct water into the gutter system
For existing homes without kickouts, retrofitting them costs $150-300 per location but provides immediate protection against one of the most common water entry points.
Window and door flashing is equally important but more complex. Proper installation requires a specific sequence of materials:
- Sill flashing installed first
- Jamb flashing overlapping the sill
- Head flashing overlapping the jambs
- Proper integration with the water-resistive barrier
When inspecting a home, look for staining beneath windows and at roof-wall intersections as evidence of flashing failures.
Red Flag #6: Surface Damage and Improper Repairs
Your EIFS finish coat is more than just decoration – it’s a critical weatherproofing layer. Unfortunately, damage to this surface often goes unrepaired or is fixed incorrectly.
Common problems include:
- Impact damage from lawnmowers, toys, or hail
- Woodpecker damage (a particular problem in wooded areas)
- DIY repair attempts using improper materials
“The thin finish coat on EIFS is like the shell of an egg,” explains Jeff Johnson. “Once cracked, it allows moisture to penetrate to the layers beneath. What starts as a small hole can lead to extensive damage if not properly repaired.”
Proper repairs require matching:
- The exact finish texture
- The correct color
- Compatible materials from the same system
Be wary of contractors who claim they can “patch” damaged areas with standard caulk or construction adhesive. These quick fixes often trap moisture and make problems worse. For lasting repairs, consult a certified EIFS specialist who understands the system’s components and can match your existing finish.
The EIFS Repair Process: Why It’s Not a DIY Project
When I train new technicians at Indiana Wall Systems, I emphasize that EIFS repair is a system process, not just a cosmetic fix. Proper repair involves multiple steps:
- Damage assessment – Determining how deep the damage extends into the EIFS layers
- Material removal – Cutting out damaged sections back to sound materials
- Substrate evaluation – Checking for and addressing any sheathing damage
- System rebuilding – Replacing each layer of the EIFS system with compatible materials
- Finish application – Matching the texture and color of the surrounding area
The most common DIY repair mistake is using standard construction caulk to fill holes or cracks. This approach fails for several reasons:
- Caulk doesn’t bond properly to EIFS components
- It creates a vapor barrier that traps moisture
- It doesn’t match the surrounding finish texture
- It deteriorates quickly in UV light
Another common error is using standard exterior paint to touch up EIFS finishes. These paints lack the flexibility and permeability of proper EIFS finishes, leading to cracking and peeling.
For minor damage, professional repairs typically cost $350-750 per area, depending on size and complexity. This may seem expensive for a small hole, but compared to the potential cost of moisture damage, it’s an investment in your home’s longevity.
We recently worked with a homeowner in Greenwood who had used spray foam from a hardware store to fill woodpecker holes in their EIFS. Within a year, moisture had become trapped behind these repairs, causing over $12,000 in damage to the sheathing and framing – all from holes that would have cost about $600 to properly repair.
What Jeff Wishes Every Homeowner Knew
“After 22 years in this business, if I could tell every Central Indiana homeowner just one thing, it would be this: EIFS is an excellent system when installed correctly, but it’s not a ‘set it and forget it’ product. Annual inspections and maintenance of sealant joints can extend your EIFS life by decades and save you from costly structural repairs.”
Red Flag #7: Insufficient Mesh Reinforcement
Hidden beneath the surface of your EIFS is a layer of reinforcing mesh that provides impact resistance and helps prevent cracking. The weight and installation of this mesh directly affects your wall system’s durability.
In high-traffic areas or regions prone to severe weather (like much of Indiana), heavy-duty mesh or double mesh layers provide crucial protection. However, many contractors use only lightweight mesh to cut costs.
“We often find impact damage in areas where contractors should have used heavy-duty mesh but didn’t,” says Jeff Johnson. “The few dollars saved during installation lead to thousands in repairs later.”
Areas that require heavier mesh include:
- First-floor walls and other high-traffic zones
- Sections exposed to potential impacts (near driveways, patios)
- Regions with severe weather or hail risk
If your EIFS cracks or dents easily from minor impacts, insufficient mesh may be the culprit.
Understanding Mesh Weights and Their Applications
EIFS mesh comes in different weights and strengths, each with specific applications:
- Standard mesh (4 oz/sq yd) – Basic reinforcement for general wall areas above the first floor
- Medium-impact mesh (6 oz/sq yd) – Used for first-floor areas with moderate exposure
- High-impact mesh (15-20 oz/sq yd) – For areas subject to heavy impacts or high traffic
- Ultra-high-impact mesh (20+ oz/sq yd) – For institutional or commercial applications with extreme exposure
In residential applications, we typically recommend:
- High-impact mesh for the first 6-8 feet above grade
- Medium-impact mesh for projections and areas near recreational spaces
- Standard mesh for upper stories and lower-risk areas
A proper high-impact installation actually uses two layers of mesh – the heavy-duty mesh for impact resistance, covered by a layer of standard mesh for a smooth finish. This “double mesh” approach creates a significantly stronger surface.
During EIFS installation, proper mesh embedding is crucial. The mesh should be fully covered by the base coat material, with no visible pattern showing through. If you can see the mesh pattern on your walls, it indicates improper installation.
For homeowners concerned about impact resistance, retrofitting additional mesh is possible but requires removing and replacing the finish coat. This upgrade costs approximately $12-18 per square foot but can dramatically improve durability in vulnerable areas.
Red Flag #8: No Moisture Management Strategy
Modern EIFS should include a comprehensive moisture management strategy. This involves multiple layers working together:
- Water-resistant barrier behind the insulation
- Drainage channels or grooves
- Proper flashing integration
- Appropriate sealant joints
“The most damaging misconception about EIFS is that the finish coat alone keeps water out,” Jeff Johnson explains. “In reality, effective moisture management assumes some water will get in and provides safe paths for it to get out.”
Older EIFS homes often lack this integrated approach, relying solely on the outer surface for waterproofing. This single-line defense inevitably fails over time.
If you own an older EIFS home, consider having a professional evaluate whether a moisture management upgrade is needed. Modern solutions can often be integrated into existing systems without complete replacement.
The Evolution of EIFS Moisture Management
The history of EIFS in Indiana tells an important story about moisture management. When EIFS first gained popularity here in the 1980s and early 1990s, most installations used barrier systems with no secondary moisture protection. The assumption was that the outer face of the system would remain perfectly sealed – an unrealistic expectation in our climate.
By the late 1990s, moisture problems became apparent as the first generation of EIFS homes began experiencing failures. The industry responded with drainage EIFS, which incorporated water-resistive barriers (WRBs) and drainage planes.
Today’s best practices include several moisture management components:
- Two-layer WRB systems – Often combining a drainage mat with a fluid-applied air/water barrier
- Drainage tracks and weeps – Allowing water to exit at the bottom of the system
- Integrated flashing systems – Creating continuous protection at all penetrations and transitions
- Ventilation gap – A small air space behind the insulation that facilitates drying
For homeowners with older barrier EIFS, evaluation options include:
- Moisture content readings using specialized meters that measure through the EIFS
- Infrared thermography to identify temperature differences that may indicate moisture
- Borescope inspection through small test holes to directly observe conditions behind the EIFS
Based on these findings, remediation strategies might include:
- Targeted repair of specific problem areas
- Retrofit drainage in vulnerable zones
- Complete system replacement with modern drainage EIFS
- Modified drainage approaches that work with existing construction
During a recent project in Zionsville, we utilized a custom retrofit approach for a 1990s barrier EIFS home. Rather than complete removal, we installed new drainage details at critical points (windows, roof intersections, and the system base), allowing moisture to escape while preserving most of the original installation. This saved the homeowner over $40,000 compared to complete replacement.
Red Flag #9: Poor Maintenance Practices
Even perfectly installed EIFS requires ongoing maintenance. Unfortunately, many homeowners inadvertently damage their EIFS through improper care.
Common maintenance mistakes include:
- Power washing at high pressure (damages finish coat)
- Using harsh cleaners that degrade finishes
- Neglecting annual sealant inspections
- Attaching items directly to EIFS without proper reinforcement
“One of the most heartbreaking cases we see is when homeowners damage perfectly good EIFS through incorrect cleaning methods,” says Jeff Johnson. “Soft washing at low pressure with gentle cleaners is all you need.”
Proper EIFS maintenance includes:
- Annual visual inspections
- Gentle cleaning with appropriate solutions
- Sealant evaluation every 2-3 years
- Prompt repair of any damage
Following these simple practices can extend your EIFS lifespan by decades and prevent costly repairs.
The EIFS Maintenance Calendar: A Seasonal Approach
In Central Indiana’s variable climate, EIFS maintenance should follow a seasonal rhythm. Here’s the maintenance calendar we recommend to our clients:
Spring (March-May)
- Visual inspection after winter to identify freeze-thaw damage
- Check all sealant joints for winter damage
- Gentle cleaning to remove winter dirt and pollutants
- Inspection of kickout flashings and gutters before spring rains
Summer (June-August)
- Monitor for insect activity, especially wasps and hornets
- Check for UV damage to sealants on south and west exposures
- Inspect ground clearance as landscaping grows
- Address any damage promptly before fall/winter
Fall (September-November)
- Comprehensive sealant inspection and touch-up
- Ensure all drainage paths are clear before winter
- Check all flashings and roof transitions
- Repair any damage before freeze-thaw cycles begin
Winter (December-February)
- Monitor ice dam formation at roof edges
- Check for proper snow clearance from EIFS surfaces
- Watch for icicle formation (may indicate heat loss)
- Plan for spring repairs and improvements
For cleaning, we recommend:
- Low-pressure water (garden hose with spray nozzle)
- Mild detergent specifically formulated for EIFS (never bleach)
- Soft brushes for stubborn areas
- Thorough rinsing from top to bottom
Never use pressure washers exceeding 500 PSI, as they can force water behind the system and damage the finish coat. For algae or mildew, use only EIFS-approved cleaning solutions.
For difficult stains, consult with an EIFS professional rather than experimenting with stronger chemicals that may damage the finish.
Red Flag #10: Unqualified Contractors
Perhaps the most dangerous red flag isn’t in the EIFS itself, but in who installs or repairs it. EIFS is a specialized system requiring specific training and certification.
“EIFS is not a DIY project, nor is it suitable for general contractors without specific training,” warns Jeff Johnson. “Yet we regularly see handymen and painters attempting EIFS repairs, often causing more damage than they fix.”
Before hiring anyone to work on your EIFS, verify:
- Manufacturer certification and training
- Experience with your specific EIFS type
- Knowledge of current industry standards
- Proper insurance coverage
The cost difference between qualified and unqualified contractors is minimal compared to the potential repair costs from improper work. Always check references and ask to see examples of similar projects before hiring.
How to Identify Qualified EIFS Professionals
Finding qualified EIFS contractors requires knowing what to look for. In my experience, these credentials separate true professionals from general contractors who “also do EIFS”:
- Manufacturer certification – Legitimate EIFS contractors will have training and certification from major manufacturers like Dryvit, Sto, Parex, or Master Wall. Ask to see current certification documents.
- AWCI EIFS Doing It Right® certification – This industry-standard program ensures contractors understand proper installation techniques. Certified professionals have passed rigorous testing on EIFS knowledge.
- Dedicated EIFS crews – Quality contractors employ technicians who specialize in EIFS rather than rotating general laborers between various tasks.
- Proper insurance coverage – EIFS contractors should carry specialized coverage for their work, including liability insurance specifically covering EIFS installation.
- Detailed proposals – Professional quotes should include specific materials, preparation steps, and application methods, not just a bottom-line price.
When interviewing potential contractors, ask these revealing questions:
- “What EIFS manufacturer are you certified with?”
- “What drainage system will you use?”
- “How will you integrate flashings with the water-resistive barrier?”
- “What type of sealant do you recommend and why?”
- “Can you provide addresses of EIFS projects you completed 5+ years ago?”
Red flags in contractor responses include:
- Inability to discuss specific system components
- Quoting extremely low prices compared to competitors
- Promising unrealistically quick completion times
- Reluctance to provide references or past project examples
- Unwillingness to obtain proper permits
The right contractor may cost 15-20% more upfront but will save you significantly through proper installation and fewer future problems.
The Insurance Factor: What Every EIFS Homeowner Should Know
An often-overlooked aspect of EIFS ownership is insurance coverage. Many homeowners are surprised to learn that some insurance policies have specific exclusions or limitations for EIFS-clad homes.
This situation arose from the early generation of EIFS problems, when some insurers faced costly claims related to moisture damage. Although modern EIFS systems have resolved most of these issues, some insurance companies still maintain restrictive policies.
Before purchasing or renovating an EIFS home, review your homeowner’s insurance policy carefully for:
- EIFS-specific exclusions – Some policies exclude damage related to EIFS moisture intrusion
- Higher deductibles for EIFS-related claims
- Maintenance requirements that must be met to maintain coverage
- Documentation needs for any repairs or modifications
Working with an insurance broker who understands EIFS can help you find appropriate coverage. Some specialized insurers offer policies specifically designed for EIFS homes with reasonable premiums.
If you’re having trouble obtaining insurance, consider these options:
- Professional moisture inspection report documenting your home’s condition
- EIFS certification letter from a qualified contractor
- Upgrading to drainage EIFS if you currently have a barrier system
- Implementing a documented maintenance program
Many of our clients in Hamilton County have successfully negotiated better insurance terms after completing our certified EIFS evaluation and implementing recommended upgrades.
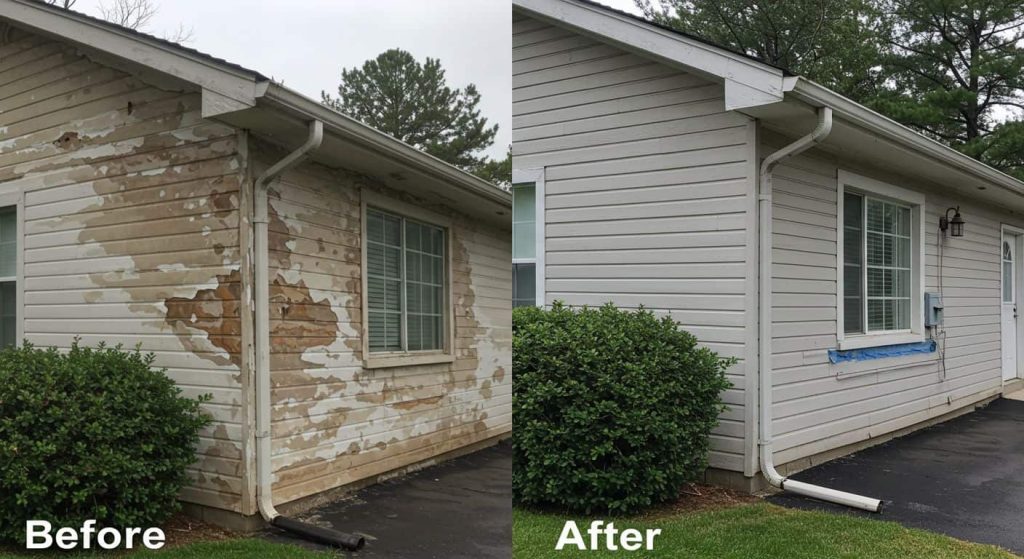
Before & After Results: The Impact of Proper EIFS Remediation
Jeff’s Pro Tip
“The single most valuable tool for EIFS homeowners is a professional moisture scan every 2-3 years, which typically costs $350-500 but can prevent thousands in damage by catching problems early.”
Industry Trends to Watch
As we look ahead, several trends are reshaping EIFS technology and installation:
- Integrated air and water barriers that combine multiple protection layers into single products, simplifying installation and improving performance.
- Advanced drainage designs that move beyond simple channels to create complete pathways for water management throughout the system.
- Smart moisture detection systems that allow homeowners to monitor conditions behind their EIFS electronically, alerting them to problems before damage occurs.
- Higher R-value insulation boards that provide better energy efficiency while maintaining the same wall thickness.
- More impact-resistant finishes developed specifically to withstand extreme weather events.
- Low-VOC and sustainable component options that reduce environmental impact.
- Factory-tinted base coats that provide a color base even if the finish coat becomes damaged.
“I’m particularly excited about new moisture detection technologies,” says Jeff Johnson. “Being able to monitor what’s happening behind your walls in real-time will revolutionize EIFS maintenance and protection.”
New Generation EIFS: Beyond Basic Performance
The newest generation of EIFS systems offers capabilities far beyond the original designs. These advanced systems integrate multiple performance aspects:
- High-performance insulation – Some newer systems use graphite-enhanced EPS that provides 15-20% better thermal performance than traditional white EPS.
- Continuous insulation compliance – Modern EIFS easily meets the continuous insulation requirements in current energy codes, often exceeding minimum standards by 200%.
- Advanced finishes – New elastomeric finishes offer better crack resistance, UV stability, and color retention compared to acrylics.
- Integrated pest resistance – Some systems now incorporate borate treatments in the EPS boards to deter termites and other pests.
- Enhanced impact resistance – New composite mesh technologies provide dramatically improved impact performance without thickness increases.
For homeowners considering EIFS for new construction or retrofit projects, these advancements make today’s systems significantly more durable and efficient than those installed even 10 years ago.
Regional Considerations: The Indiana Difference
Working throughout Central Indiana for over two decades has taught me that different regions have unique EIFS considerations. Within our service area:
Northern Indianapolis and Carmel – Higher wind exposure often requires stronger mechanical attachment of EIFS components and more attention to sealant joint design.
Wooded areas of Hamilton County – Woodpecker damage is significantly more common, often requiring specialized mesh reinforcement and darker color selections (woodpeckers tend to target lighter colors).
Older neighborhoods in Indianapolis – Retrofit applications over existing masonry require specialized detailing and often benefit from thinner insulation profiles.
Newer developments in Fishers and Zionsville – These homes typically have modern drainage EIFS but may suffer from rushed installation due to rapid construction timelines.
Lakefront properties in Hamilton and Boone counties – Higher humidity and constant moisture exposure demand enhanced drainage details and more frequent maintenance.
Understanding these regional factors helps us tailor our recommendations to each home’s specific needs and environment.
Step-by-Step: How to Fix These Red Flags
If you’ve identified red flags in your EIFS, here’s how to address them:
- Get a professional assessment from a qualified EIFS specialist, including moisture readings and thermal scanning.
- Document all issues with photos and written reports for insurance and contractor discussions.
- Develop a comprehensive repair plan that addresses not just symptoms but underlying causes.
- Verify contractor qualifications through manufacturer certifications and references.
- Ensure proper permits are obtained for significant repairs or modifications.
- Document the repair process with photos for future reference and home records.
- Schedule follow-up inspections at 6 months and 1 year to verify repair effectiveness.
- Establish a maintenance schedule for ongoing care and early problem detection.
Remember, addressing EIFS issues early typically costs 75-85% less than waiting until structural damage occurs.
The True Cost of Waiting

When homeowners discover EIFS issues, there’s often a temptation to delay repairs, especially for problems that aren’t causing obvious interior damage. Unfortunately, this approach usually leads to much higher costs later.
Based on our repair data from hundreds of Central Indiana homes, here’s how costs typically escalate:
Early Intervention (Problems caught in first 6 months)
- Average repair cost: $1,200-$3,500
- Typical scope: Sealant replacement, minor finish coat repairs
- Structural damage: Rare
Moderate Delay (Problems addressed within 1-2 years)
- Average repair cost: $5,000-$12,000
- Typical scope: Localized EIFS replacement, minor sheathing repair
- Structural damage: Limited to small areas
Significant Delay (Problems ignored for 3+ years)
- Average repair cost: $18,000-$45,000+
- Typical scope: Large-scale EIFS removal, extensive sheathing replacement, possible structural repairs
- Structural damage: Often extensive and requiring specialized contractors
One particularly dramatic example from our experience involved a Geist-area homeowner who noticed a small crack above their dining room window but waited four years to address it. What would have been a $1,800 repair initially eventually required:
- Complete EIFS removal on two walls
- Replacement of 60% of the wall sheathing
- Treatment for extensive mold growth
- Structural repairs to three load-bearing studs
- Complete reinstallation of a drainage EIFS system
Final cost: $37,500, plus interior renovations to address mold-damaged drywall and trim.
The lesson is clear: with EIFS, early intervention is always the most cost-effective approach.
The EIFS Inspection Toolkit: What Professionals Look For
Professional EIFS inspectors use specialized tools and techniques to assess system condition. Understanding these methods can help you evaluate the thoroughness of an inspection:
- Non-penetrating moisture meters – These scan through the EIFS without damaging it, identifying potential moisture concerns.
- Infrared thermography – Thermal cameras detect temperature differences that may indicate moisture or missing insulation.
- Borescopes – These small cameras can be inserted through minimal test holes to visually inspect conditions behind the EIFS.
- Tap testing – Experienced inspectors can identify delamination by tapping the surface and listening for hollow sounds.
- Sealant adhesion tests – These evaluate whether sealants are properly bonded to adjacent materials.
A thorough inspection should include documentation of findings with photos, moisture readings, and specific recommendations. Beware of inspectors who provide only verbal assessments or vague recommendations.
Typical costs for professional EIFS inspections in the Indianapolis area range from:
- $350-500 for basic visual inspection with moisture meter readings
- $650-950 for comprehensive inspection including thermal imaging
- $1,200-1,800 for detailed assessment with test cuts and laboratory analysis
Given the potential costs of undetected problems, even the most comprehensive inspection represents an excellent investment in your home’s long-term value.
Frequently Asked Questions
How long should properly installed EIFS last?
When correctly installed and maintained, modern drainage EIFS should last 30-50 years. The key factors affecting lifespan are installation quality, climate exposure, and maintenance practices. In Indiana’s climate, maintaining sealant joints is especially important due to our freeze-thaw cycles.
Can I paint my EIFS if the color fades?
Yes, but only with specialized breathable acrylic paints designed for EIFS. Standard exterior paints can trap moisture in the system. Always consult with an EIFS professional before painting, as improper coatings can void warranties and cause damage.
How can I tell if I have barrier or drainage EIFS?
Look for weep holes or screeds at the bottom of the system. Drainage EIFS typically has visible termination details where water can exit. Homes built before 2000 in Indiana are more likely to have barrier EIFS. When in doubt, a professional inspection can determine your system type.
What’s the typical cost to repair damaged EIFS?
Minor repairs typically range from $500-1,500. Moderate damage requiring partial removal and replacement runs $3,000-10,000. Extensive damage involving structural repairs can exceed $25,000. Early intervention is always more cost-effective.
Should I consider replacing barrier EIFS with drainage EIFS?
If your barrier EIFS is performing well and moisture scans show no hidden problems, replacement may not be necessary. However, if you’re experiencing issues or planning renovations, upgrading to a drainage system is strongly recommended, especially in Indiana’s moisture-heavy climate.
How does EIFS affect my home’s resale value?
Properly installed and maintained EIFS can enhance resale value through improved energy efficiency and aesthetic appeal. However, homes with documented moisture problems or older barrier systems may face value reductions. A professional inspection report showing proper condition can help protect your investment during resale.
What are the most important maintenance tasks for EIFS homeowners?
The critical maintenance practices include:
- Annual visual inspection of the entire system
- Sealant joint evaluation every 2-3 years
- Gentle cleaning with appropriate methods
- Professional moisture scanning every 3-5 years
- Immediate repair of any damage or cracks
Can EIFS be installed over existing siding or stucco?
Yes, with proper preparation. EIFS can be installed over stable existing cladding, though this requires specialized detailing for attachment, flashing integration, and drainage. This approach is becoming increasingly popular for energy upgrades to older homes in the Indianapolis area.
Protecting Your EIFS Investment
EIFS offers exceptional benefits when properly installed and maintained – from superior energy efficiency to design flexibility and durability. By understanding these 10 red flags, you’re now equipped to protect your investment and ensure your home remains beautiful and problem-free for decades.
Remember that prevention and early detection are your best strategies. Annual visual inspections, professional moisture scans every 2-3 years, and prompt attention to sealant maintenance will help you avoid the costly problems that occur when small issues grow into major damages.
If you have concerns about your EIFS or would like a professional evaluation, Indiana Wall Systems offers comprehensive inspections throughout Central Indiana. With our 22 years of specialized experience and manufacturer certifications, we provide the expert guidance needed to maintain, repair, or upgrade your EIFS.
Contact us at (765) 341-6020 or email indianawallsystems@yahoo.com to schedule your free consultation. All our repairs are backed by our industry-leading workmanship guarantee.