How to Mount Heavy Hardware on EIFS Without Leaks or Cracked Lamina
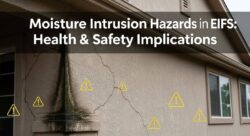
Every year, Indiana Wall Systems gets calls from homeowners and property managers who bolted something heavy to their EIFS wall and now have water staining, cracked lamina, or soft spots spreading outward from the fastener. The item looked fine when it went up.
Six months later, water found the opening, soaked the sheathing, and turned a simple bracket into a $3,000 to $8,000 repair.
Mounting heavy items on EIFS requires more thought than grabbing a lag bolt and a drill. EIFS (Exterior Insulation and Finish System) is an insulation and finish system, not a structural surface. Any heavy load attachment needs a clear load path to structure, meaning the weight must pass through the foam and connect to framing, blocking, or masonry behind the wall. Property owners across Central Indiana who skip this step end up calling for EIFS repair far sooner than they expected.
Short Answer
EIFS is not structural, so railings, signs, and hose reels must bolt through the foam and sheathing into solid blocking, studs, or masonry behind the wall. A compression sleeve prevents the foam from crushing, and every penetration needs proper flashing, backer rod, and sealant to keep water out. Skip any of those steps and the mount will eventually leak, crack, or pull free.
This article is specifically about heavy items and high-risk mounts. If you are looking for guidance on lightweight holiday lights, small planters, or adhesive hooks, Indiana Wall Systems has a separate post on safely decorating an EIFS-clad home. This guide covers items that create real loads (pull-out, shear, leverage, wind, and repeated yanking) and real leak paths when the waterproofing detail is wrong.
▶ Key Takeaways
| ① | EIFS is not structural. The foam, mesh, and finish coat cannot hold weight. Every heavy mount needs a direct connection to framing, blocking, or masonry behind the wall. |
| ② | Compression sleeves protect the foam. Without a crush protection sleeve, tightening a bolt will compress the EPS insulation, crack the lamina, and create a water entry point. |
| ③ | Every penetration is a potential leak. Proper flashing, backer rod, and ASTM C920 sealant are required around every bolt and bracket to maintain WRB continuity. |
| ④ | Preplanning saves thousands. Adding in-wall blocking during construction costs a fraction of what it costs to cut open a finished wall and retrofit backing later. |
| ⑤ | Corrosion-resistant fasteners are mandatory. Stainless steel or hot-dip galvanized hardware prevents rust staining and galvanic corrosion that weakens the connection over time. |
| ⑥ | Periodic inspection catches problems early. Sealant, flashings, and fasteners all need regular checks, especially after Indiana’s freeze-thaw cycles and severe storms. |
Why EIFS Cannot Support Heavy Loads on Its Own
Understanding why EIFS cannot carry weight is the first step toward doing the job right. An EIFS wall is built in layers. From the outside in, those layers typically include an acrylic finish coat, a reinforced base coat with fiberglass mesh, expanded polystyrene (EPS) foam insulation boards, adhesive or mechanical fasteners holding the foam to the substrate, the substrate itself (usually gypsum sheathing, OSB, or plywood over studs), and a weather-resistive barrier (WRB).
The finish coat and base coat together are usually only about 1/16 to 1/8 of an inch thick. The EPS foam is soft enough to dent with a thumbnail. Neither layer can hold a railing bracket, a commercial sign raceway, or a retractable hose reel without crushing, cracking, or pulling free.
The Structural Layers Are Behind the Foam
The structural members (wood studs, steel studs, concrete, or CMU) sit behind the sheathing. That is where load-bearing capacity lives. Any structural backing for EIFS mounts must connect the item on the exterior surface to the studs, blocking, or masonry behind the insulation layer. The foam and lamina are just along for the ride.
No direct fastening to EPS will hold over time. Screws driven into foam alone will pull out under hand pressure. No direct fastening to lamina works either because the base coat and mesh are thin coatings on top of the foam, not solid material.
Barrier EIFS vs. Drainage EIFS: Why It Matters for Mounts
Older homes (particularly those built in the 1990s) may have barrier EIFS, which has no drainage plane behind the foam. Every penetration in a barrier EIFS wall carries extra risk because there is no second line of defense if water gets past the sealant. Modern EIFS with drainage includes a drainage plane and vertical grooves or drainage mat behind the insulation boards. Water that enters can drain down and weep out at the base. Even with drainage, though, a poorly sealed mount will still cause damage.
The attachment risk on barrier EIFS is higher because moisture has nowhere to go once it enters the wall cavity. Homeowners in Carmel, Fishers, and other Hamilton County communities with 1990s-era EIFS homes should have existing penetrations inspected before adding new ones.
Barrier EIFS vs. Drainage EIFS: Attachment Risk Comparison
| Factor | Barrier EIFS (No Drainage) | Drainage EIFS (Water-Managed) |
| Water path after seal failure | Trapped in wall cavity | Drains to weep screed at base |
| Sheathing rot risk | High | Moderate (if drainage plane intact) |
| Mold risk behind EIFS | High | Lower |
| Sealant failure tolerance | Zero tolerance | Some tolerance (backup drainage) |
| Pre-mount inspection needed? | Critical | Strongly recommended |
What Needs Structural Backing (and What Doesn’t)
Not everything hung on an EIFS wall requires blocking, through-bolts, or standoff brackets. The distinction comes down to weight, leverage, repeated force, and safety consequences.
Items that require structural backing behind the EIFS:
- Railings and guardrails (safety and code implications under IBC and IRC)
- Handrail brackets for stairs and balconies
- Commercial signs, channel letters, and sign raceways
- Retractable hose reels (spring rewind forces and water weight)
- Pressure washer hose reel mounts
- Awning and canopy brackets
- Flagpole brackets
- Satellite dish mounts
- Heavy security cameras
- Trellis and pergola ledger connections
- Electrical panels and meter bases
- Exhaust hood brackets
Items that typically do not require structural backing (covered in the companion decorating article):
- String lights and small holiday decor
- Small address plaques under 2 lbs
- Lightweight plant hooks with adhesive clips
- Removable cup hooks for small items
If the item weighs more than a few pounds, sticks out from the wall, catches wind, gets pulled on repeatedly, or has safety or liability implications, it belongs in the structural mounting category.
Finding Structure Behind the Wall
Before any heavy mount goes onto an EIFS wall, the installer needs to know exactly what is behind it. That means identifying the stud spacing, the sheathing type and thickness, and whether there is existing in-wall blocking at the planned mounting location.
Stud Finder Limitations on EIFS
Standard magnetic or electronic stud finders have stud finder limitations on EIFS walls. The EPS foam insulation (usually 1 to 4 inches thick) puts the studs well beyond the detection range of most consumer-grade stud finders. A typical stud finder works through 3/4-inch drywall. It cannot reliably detect a wood stud sitting behind 1 inch of sheathing plus 2 inches of foam.
Professional-grade deep-scan stud finders and radar-based scanners can sometimes locate studs behind EIFS, but results vary depending on the total wall thickness and substrate material. Steel studs are easier to locate with magnetic methods than wood studs at the same depth.
The most reliable way to locate studs behind EIFS is to:
- Check the original construction drawings or framing plans
- Access the interior side of the wall and measure from a known reference point (window, corner, or electrical box)
- Use a small exploratory probe through the EIFS at an inconspicuous location to confirm stud location and sheathing thickness
Any probe hole must be sealed afterward with sealant to prevent moisture intrusion.
Substrate Types and What They Mean for Fasteners
The substrate behind the foam determines what fasteners will work and how much pull-out resistance and withdrawal strength are available.
Substrate Types and Fastener Strategy
| Substrate | Common Thickness | Best Fastener Strategy | Key Notes |
| Wood studs (2×4 or 2×6) | 1.5 in. actual | Lag bolts or structural screws into studs | Minimum 1.5 in. embedment into stud face |
| Steel studs | 20 to 16 gauge | Self-drilling structural screws | Gauge determines shear capacity |
| OSB sheathing | 7/16 to 5/8 in. | Pass through to studs (OSB alone is too thin) | ⚠ OSB swells from moisture leaks |
| Plywood sheathing | 1/2 to 3/4 in. | Pass through to studs | ⚠ Plywood can delaminate from moisture |
| Gypsum sheathing (glass-mat) | 1/2 to 5/8 in. | Pass through to studs (gypsum holds almost no load) | ⚠ Very weak in withdrawal |
| CMU (concrete block) | 8 in. typical | Tapcon screws or chemical anchors | Only into solid masonry, not foam |
| Poured concrete | Varies | Sleeve anchors, epoxy anchors, or chemical anchors | Confirm concrete strength first |
Sheathing thickness adds to the total distance a fastener must travel before reaching the structural member. Always calculate total fastener embedment depth from the face of the EIFS through the foam, sheathing, and into the stud or masonry.

The sheathing thickness adds to the total distance the fastener must travel before reaching a stud. A bolt going through 2 inches of foam, 7/16-inch OSB sheathing, and then into a stud has a very different fastener embedment depth into the structural member than a bolt going through 3 inches of foam and 5/8-inch gypsum.
Adding Blocking When None Exists
If the planned mounting location does not line up with existing studs (most stud spacing is 16 inches on center, sometimes 24 inches on center), the installer has two choices: move the mount to hit a stud, or add solid blocking behind EIFS.
Preplanned backing at construction is the ideal scenario. Builders who install EIFS should add plywood backing plates or dimensional lumber blocking at locations where railings, signs, or hose reels will eventually be mounted. This costs very little during the framing stage. Indiana Wall Systems recommends this practice to every homebuilder it works with.
For existing walls, a retrofit backing installation requires a cut-and-patch approach:
- Mark the area for the mounting block
- Cut and carefully remove the EIFS layers (finish, base coat, mesh, and foam)
- Preserve or set aside any salvageable material
- Install a plywood backing plate or solid blocking between the studs, secured to the stud faces
- Restore the weather-resistive barrier (WRB) and any drainage mat
- Replace the EPS foam, cut to fit around the new blocking
- Apply new base coat and mesh with proper mesh overlap requirements (minimum 2.5 inches on all edges)
- Apply the finish coat and match the texture and color
This surgical EIFS removal for blocking process is time-consuming and should be done by an experienced EIFS contractor. Improper patching leaves behind weak spots that crack and leak.
The Stand-Off Mounting Method: How It Works
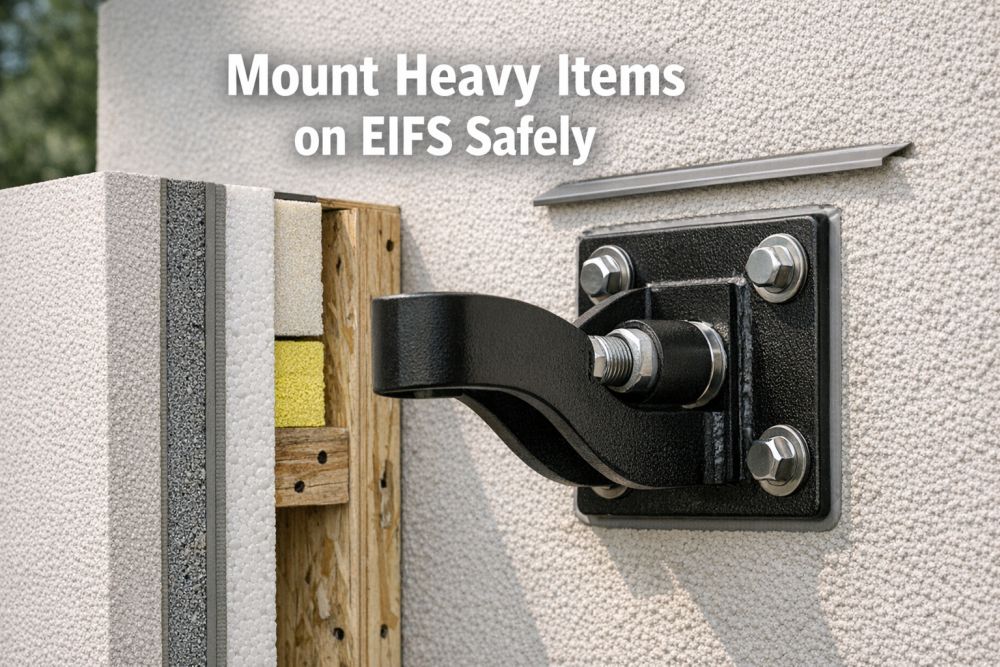
The most common way to mount heavy items on EIFS is with a stand-off mounting bracket system that bridges over the insulation layer. This method uses a threaded rod standoff mount or spacer tube standoff to transfer the load from the exterior bracket, through the foam and sheathing, into the structural framing behind the wall.
Components of a Stand-Off Mount
A typical stand-off mount assembly includes:
- Exterior mounting plate: The bracket, base plate, or flange that holds the item (railing post, sign bracket, hose reel bracket)
- Threaded rod or bolt: Passes through the foam and sheathing to reach the structural member
- Compression sleeve (also called a crush protection sleeve): A rigid tube (metal or high-density PVC) that surrounds the bolt and spans the exact thickness of the foam. When the bolt is tightened, the sleeve prevents the EPS from compressing.
- Bearing plate behind sheathing: A steel or plywood plate on the interior side of the sheathing that distributes the load across a wider area
- Fender washers for through-bolts: Large-diameter washers that spread clamping force and prevent pull-through
- Sealant and flashing: Waterproofing at every penetration point
Why Compression Sleeves Matter
EPS foam insulation has very low compressive strength. Standard EPS (Type I, 1 lb/ft³ density) crushes at around 10 to 15 psi. Tightening a 3/8-inch bolt without a sleeve concentrates all the clamping force on a tiny area of foam. The foam crushes, the lamina cracks from over-tightening, and the finish coat develops stress cracks around the bracket.
A crush protection sleeve prevents this by transferring the clamping force directly from the exterior plate to the sheathing, bypassing the foam entirely. The sleeve must be cut to the exact thickness of the foam layer so it sits flush.
Stand-Off Mount Assembly: Layer by Layer
| Step | Component | Purpose |
| 1 | Exterior mounting plate | Holds the railing, sign bracket, or hose reel bracket |
| 2 | Sealant ring and gasket | First water barrier at the face of the wall |
| 3 | Compression sleeve | Prevents EPS compression; transfers clamping force past the foam |
| 4 | Threaded rod or lag bolt | Carries the load through the wall to the structural member |
| 5 | Sheathing (OSB, plywood, gypsum) | Passed through, not relied upon for load |
| 6 | Structural member (stud, blocking, CMU) | Carries all weight and force |
| 7 | Interior bearing plate and washer | Distributes load on the back side (for through-bolt details) |
Pre-Manufactured EIFS Mounting Blocks and High-Density Inserts
Several manufacturers offer pre-manufactured EIFS mounting blocks designed for exactly this purpose. These blocks replace a section of EPS foam with a high-density foam insert (HDI) or a solid composite block that can accept fasteners directly. They come pre-coated with base coat compatible material, making the patching process easier.
A high-density insert (typically 15 to 25 lb/ft³ density) can hold a screw or lag bolt much better than standard 1 lb/ft³ EPS, but it is still not a substitute for connecting to framing on heavily loaded mounts. HDIs work well for moderate loads like hose bibs and junction boxes but should not be the sole anchor for a guardrail or large commercial sign.

Major EIFS manufacturers including Dryvit, Sto, Parex USA, Senergy, and Master Wall all publish attachment detail drawings in their technical manuals. Indiana Wall Systems references these manufacturer details for attachments on every project to make sure the mounting method is approved and the warranty stays intact.
Waterproofing Every Penetration
A bolt through an EIFS wall is a hole in the building envelope. Unless that hole is properly sealed and flashed, water will find it. In Central Indiana’s climate (with an average of 42 inches of rain per year and 50+ freeze-thaw cycles each winter), even small failures in waterproofing details grow quickly.
Sealed Penetration Detail: Step by Step
A proper sealed penetration detail for a stand-off mount includes:
- Oversize the hole in the foam and lamina slightly larger than the compression sleeve (1/4 inch clearance typical)
- Apply sealant inside the hole before inserting the sleeve. Use an ASTM C920 rated sealant (silicone or polyurethane, depending on manufacturer compatibility)
- Seat the compression sleeve and bolt assembly
- Apply a sealant ring around the fastener head or around the mounting plate perimeter
- Install a closed-cell backer rod in any gap between the mounting plate and the EIFS surface to control joint depth
- Tool the sealant correctly with a concave profile for maximum adhesion and weather resistance
- Check for head flashing needs above the bracket. Any horizontal surface where water can pool needs a drip edge above attachments or a small counterflashing
The goal is a water-managed penetration where even if the outer seal ages and cracks, there is a secondary barrier (the sleeve sealant and the WRB behind it) to protect the sheathing.
Sealant Selection and Joint Design
Not all sealants work on EIFS. The silicone sealant compatibility and polyurethane sealant compatibility with specific EIFS finish coats varies by manufacturer. Always check the EIFS manufacturer’s approved sealant list.
Key sealant rules for EIFS mounting penetrations:
- Use ASTM C920 sealant rated for exterior use and the expected movement range
- Apply a primer for sealant adhesion if the manufacturer requires it (many EIFS finish coats need a primer to get full adhesion)
- Use a closed-cell backer rod to control joint depth and prevent three-sided adhesion (sealant should bond to two surfaces only, not the bottom of the joint)
- Apply bond breaker tape at the back of shallow joints
- Maintain a proper joint depth-to-width ratio (typically 1:2 for movement joints)
- Avoid sealing over wet substrate because sealant will not bond to damp acrylic finishes
For a deeper look at sealant types and best practices, Indiana Wall Systems has a detailed guide on choosing the right caulking types for exterior applications.
Flashing Above and Around Mounts
Any bracket or mounting plate that creates a horizontal ledge needs head flashing for attachments. Water running down the wall hits the top of the bracket and needs somewhere to go. Without a drip edge or counterflashing, it pools behind the bracket and seeps into the penetrations.
Proper flashing details include:
- Counterflashing for mounts: A small metal or self-adhered flashing membrane installed above the bracket, lapped over the EIFS surface
- Kick-out flashing awareness: Mounts near roof-to-wall transitions need to account for concentrated water flow at kick-out flashing locations
- Preformed flashing boots: Available for round pipe-style penetrations
- EPDM gaskets for penetrations: Rubber gaskets that compress between the mounting plate and the wall surface
The flashing must tie back into the WRB to maintain air barrier continuity and WRB continuity across the entire wall assembly. On EIFS with drainage systems, the flashing must not block the drainage plane protection or interfere with vertical grooves in the EPS.
Waterproofing Checklist for EIFS Mounting Penetrations
| ☑ | Oversize hole drilled with 1/4 in. clearance around compression sleeve |
| ☑ | ASTM C920 sealant applied inside hole before sleeve insertion |
| ☑ | Compression sleeve cut to exact foam thickness |
| ☑ | Closed-cell backer rod installed in perimeter gap (no three-sided adhesion) |
| ☑ | Sealant tooled with concave profile at all joints |
| ☑ | Head flashing or drip edge installed above bracket |
| ☑ | Flashing lapped into WRB to maintain weather-resistive barrier continuity |
| ☑ | Backwrapping at cut edges of EPS foam (base coat and mesh returned over exposed foam edges) |
| ☑ | Drainage plane and weep path not blocked by bracket, flashing, or sealant buildup |
Fastener Selection and Corrosion Protection
The bolts, screws, and hardware holding a bracket to an EIFS wall will be exposed to rain, humidity, and temperature swings for decades. Choosing the wrong material leads to rust staining from fasteners, fastener weakening, and eventual failure.
Stainless Steel vs. Hot-Dip Galvanized
For exterior EIFS penetrations, Indiana Wall Systems specifies either stainless steel fasteners (304 or 316 grade) or hot-dip galvanized fasteners. Electroplated zinc coatings (the shiny silver finish on most hardware store bolts) are not thick enough for long-term exterior exposure and will corrode within a few years.

Galvanic corrosion is a concern when mixing metal types. A stainless steel bolt in a galvanized bracket, or an aluminum sign raceway on steel bolts, creates an electrochemical reaction that accelerates corrosion of the less noble metal. The fix is to use dissimilar metals isolation (nylon washers, rubber bushings, or matching all hardware to the same metal family).
Torque Control and Load Types
Over-tightening a bolt against an EIFS wall, even with a compression sleeve, can crack the surrounding lamina or distort the bracket. Torque control on fasteners should follow the bolt manufacturer’s specifications.
Two primary load types act on EIFS mounts:
- Shear load (downward force parallel to the wall): This is the dominant load on sign brackets, most railing brackets, and hose reel weight
- Tension load (pull-out force perpendicular to the wall): This is the load when someone leans on a railing, when wind pushes on a sign, or when a hose reel arm is yanked away from the wall
Most mounts experience a combination of both. The fastener must have adequate shear strength of lag bolts or structural screws and adequate pull-out resistance in the structural member to handle the worst-case loading.
Structural screws vs lag bolts: Modern structural screws (like GRK, SPAX, or Simpson Strong-Tie SDS series) often outperform traditional lag bolts in withdrawal strength, require no pre-drilling, and have better corrosion-resistant coatings. For through-bolt applications, standard hex bolts with nuts and washer plates for load distribution are still the most reliable option.
Railing and Guardrail Attachment on EIFS
EIFS railing attachment is one of the highest-stakes mounting situations because failure can cause injury. The IBC (International Building Code) requires residential guardrails to withstand a minimum 200-pound concentrated load applied in any direction at the top of the rail. The IRC (International Residential Code) has similar requirements for handrails.
Why Rail Brackets Need Extra Attention
A guardrail attachment on an EIFS wall creates significant leverage. A 42-inch-tall rail post with a person leaning on it generates a pull-out force at the base that is several times the person’s weight because of the lever arm. That force pulls directly on the fasteners, trying to rip them out of the wall.
Standard lag screws into studs can handle this load, but only if:
- The stud is directly behind the bracket (not offset)
- The fastener embedment depth into the stud is at least 2.5 to 3 inches
- The compression sleeve and sealant detail are correct
- A bearing plate behind sheathing distributes the load so the bolt cannot pull through the sheathing
For balcony rail post penetrations and deck ledger connections near EIFS, the stakes go even higher. These connections often require engineering review and must meet local building code requirements. Property owners in Indianapolis, Carmel, Fishers, Zionsville, and other Indiana communities should verify permit requirements with their local building department.
Surface-Mounted vs. Through-Mounted Rail Systems
Two approaches exist for rail attachment on EIFS walls:
Surface-mounted rail systems use brackets that bolt to the face of the wall. The bolts pass through the EIFS and into blocking or studs behind the wall using the stand-off method described above. This is the more common approach for residential railings on EIFS.
Through-mounted rail systems use bolts that pass entirely through the wall, with a bearing plate and nut on the interior side. This is the strongest connection because the bolt is in pure tension (no withdrawal from wood) and the bearing plate prevents pull-through. The downside is that it requires interior access and an interior escutcheon plate to cover the hardware.
Indiana Wall Systems recommends through-bolting for guard posts on balconies and elevated decks, where the safety implications of failure are most severe.
Sign Mounting on EIFS: Commercial Considerations
Sign mounting on EIFS is one of the most common commercial mounting challenges. Retail tenants, office buildings, and multi-tenant properties across Central Indiana need wall-mounted signage, and many of those buildings are clad in EIFS.
Types of Sign Mounts

Commercial Sign Types: Weight, Wind Load, and Recommended Mount Method
| Sign Type | Typical Weight | Wind Load | Recommended Mount Method |
| Individual channel letters | 3 to 15 lbs each | Moderate | Threaded rod standoffs into blocking |
| Sign raceway (cabinet) | 50 to 200+ lbs | High | Through-bolts into structural framing |
| Flat panel sign | 10 to 80 lbs | High | Standoff brackets into studs or blocking (large flat area catches wind) |
| Standoff letters | 1 to 5 lbs each | Low | HDI inserts may suffice for small, lightweight letters |
| Projecting blade sign | 30 to 100 lbs | Very High | Through-bolts with engineered bracket (high leverage + wind) |
Wind load on a 4 ft x 8 ft flat panel sign can exceed 30 psf during storms, translating to nearly 1,000 lbs of force on the fasteners. Always calculate both dead load (sign weight) and live load (wind) when sizing fasteners and backing.
Channel letters on EIFS are typically mounted on a raceway (a rectangular metal cabinet that houses wiring) or individually on threaded studs. Either way, the load must reach the structure behind the wall. A sign raceway mounting detail usually involves four or more threaded rod standoff mounts at the corners, with the raceway held off the wall surface by the sleeves.
Wind load on signs is a critical factor in Central Indiana. A 4-foot by 8-foot flat panel sign can see wind loads exceeding 30 pounds per square foot during storms. That translates to nearly 1,000 pounds of force on the fasteners during high winds. Undersized fasteners or mounting directly into foam will fail.
Commercial signage attachment also involves municipal permit requirements. Most jurisdictions in Marion County, Hamilton County, and surrounding counties require a sign permit for exterior business signage. Some commercial tenants and HOAs have additional rules governing sign size, placement, and illumination.
For property managers dealing with commercial EIFS signage in Indiana, Indiana Wall Systems works with sign companies to make sure the wall can handle the proposed sign load. More details on commercial services are available on the property managers page.
Hose Reel Mounting on EIFS
Hose reel mounting on EIFS is one of the most frequently botched installations Indiana Wall Systems sees. The problem is that most homeowners treat a hose reel like a lightweight accessory. A retractable hose reel loaded with 100 feet of 5/8-inch garden hose holds about 30 to 40 pounds of water and hose combined. The spring rewind mechanism adds a sudden jerk force every time the hose retracts. Add in years of pulling the hose at an angle, and the bracket takes repeated dynamic loads in every direction.
What Goes Wrong with DIY Hose Reel Mounts
The typical failed hose reel mount on EIFS involves:
- Homeowner buys a wall-mounted hose reel from a hardware store
- Drills through the EIFS and drives lag screws into what they hope is a stud
- Skips the compression sleeve entirely
- Uses no sealant around the screw holes
- Hose weight and rewind forces loosen the screws over 6 to 12 months
- Water enters the open screw holes, soaks the sheathing, and spreads behind the foam
- By the time the homeowner notices soft EIFS around fasteners or water staining, the sheathing behind the mount has begun to rot
A hose reel mounted with no structural backing is also a common source of hidden water damage behind EIFS.
Proper Hose Reel Mount Detail
A mounting a hose bib reel on stucco EIFS the right way follows the same stand-off principles as any heavy mount:
- Locate a stud or add blocking behind the planned mount location
- Drill oversized holes through the EIFS
- Install compression sleeves cut to the foam thickness
- Apply ASTM C920 sealant inside the holes and around the sleeve
- Bolt the hose reel bracket through the sleeves and into the stud or blocking
- Seal the bracket perimeter with backer rod and sealant
- Install a small drip edge or slope the top of any mounting block to shed water
For industrial hose reel wall mounts or pressure washer hose reel mounting on commercial buildings, the loads are even higher. These installations often need a dedicated plywood backing plate spanning two studs and through-bolts with a bearing plate on the inside.
Repairing EIFS After a Bad Mount or Removed Attachment
Removing a failed bracket or sign from an EIFS wall leaves behind holes, cracked lamina, and sometimes water-damaged sheathing. The repair process involves:
Assessment First
Before patching, check for hidden damage. Probe testing around mounts with a moisture meter can reveal whether water has traveled beyond the visible damage. Infrared scans around attachments can identify larger wet areas behind the foam. If the EIFS feels spongy or soft within 12 inches of the old mount, the damage has spread into the sheathing and possibly the framing.
For a more detailed walkthrough of inspection processes, see the Indiana Wall Systems guide on what an EIFS inspection involves.
Patch and Repair Process
Once the extent of damage is known:
- Remove all damaged EIFS layers and any rotted sheathing
- Replace sheathing if needed and restore the WRB
- Install new EPS foam, cut to fit and adhered properly
- Backwrapping at cut edges: Return the base coat and mesh over any exposed foam edges
- Apply new base coat with localized reinforcement mesh or double mesh reinforcement at high-stress areas
- Finish coat texture matching and color matching after patch to blend with the existing wall
- Seal all edges and transitions
A lamina repair after penetration done poorly will show through as a visible patch, crack lines, or a color mismatch. An experienced crew knows how to match EIFS texture and color so the repair disappears. Indiana Wall Systems covers this process in detail in their post on how contractors match EIFS texture and color after a repair.
Common Failure Modes and What to Watch For
Understanding how mounts fail helps property owners catch problems before they become expensive.
EIFS Attachment Failure Modes
| Failure Type | What You See | What Caused It |
| Lamina cracking | Spider-web cracks radiating from bolt heads | EPS compression from missing compression sleeve or over-tightening |
| Delamination around fasteners | Base coat lifting away from foam near the bracket | Water behind the lamina from unsealed penetration freezing and expanding |
| Water staining at fasteners | Brown or orange streaks below bracket or bolt heads | Rust from non-corrosion-resistant fasteners or sealant failure |
| Soft EIFS around fasteners | Wall feels spongy when pressed near the mount | Moisture has saturated EPS and possibly rotted the sheathing behind it |
| Bracket pulling loose | Mounting plate wobbles or gaps appear between bracket and wall | Fasteners driven into foam only, or stud missed, or sheathing rot weakened hold |
| Differential movement cracking | Hairline cracks that open and close with temperature changes | Metal bracket expands and contracts at a different rate than the EIFS, stressing the lamina |
Periodic Inspection of Mounts
Indiana Wall Systems recommends inspecting every EIFS mount at least once a year and after any severe storm. The sealant maintenance interval for exterior penetrations is typically 5 to 7 years, but Indiana’s freeze-thaw cycling and summer humidity can shorten that.
During inspection, check for:
- Sealant that has pulled away from the EIFS surface or the bracket (adhesion failure)
- Sealant that has split down the middle (cohesion failure)
- Rust staining on the wall below any fastener
- Cracks in the EIFS lamina near mounting hardware
- Looseness or play in the bracket when pushed or pulled
- Soft or spongy areas in the EIFS within 12 to 18 inches of the mount
Catching these signs early can mean the difference between a $200 sealant repair and a multi-thousand-dollar sheathing replacement. Indiana homeowners can learn more about what to look for in the spring EIFS checklist for Indiana homeowners.
Locations and Placements to Avoid
Not every spot on an EIFS wall is a good candidate for a heavy mount. Some locations create extra risk because of water flow patterns, structural limitations, or code restrictions.
High-risk mounting locations to avoid or treat with extra caution:
- Near roof-to-wall transitions: Concentrated water flow at kick-out flashing locations can overwhelm a mount seal
- Near parapet wall coping: The top of a parapet already collects water; adding penetrations here increases leak risk
- Near window heads: Water sheets off window head flashings and can enter mount penetrations just below
- Near downspout discharge points: Splashback from downspout elbows can repeatedly wet the seal area
- Across expansion joints: Never mount a bracket that bridges an EIFS expansion joint. The joint needs to move freely.
- Near active cracks: Fix the crack first, then mount. A bracket installed over or near an unrepaired crack will accelerate the damage. For more detail on crack repair, see how to repair stucco cracks on the outside of your house
- Low on the wall near grade: Landscape irrigation overspray and dripline splashback can keep mount seals perpetually wet
- Adjacent to EIFS penetrations (hose bibs, vents, electrical boxes): Clustering penetrations concentrates risk; space them out when possible
Warranty and Liability Considerations
Adding penetrations to an EIFS wall can affect the manufacturer’s system warranty. Most EIFS manufacturers include language in their warranty documents that excludes damage caused by “unauthorized penetrations” or “modifications not performed in accordance with manufacturer specifications.”
That does not mean you cannot mount anything. It means the mount detail must follow the manufacturer’s published guidelines. Indiana Wall Systems references EIMA guidelines for attachment details and keeps documentation of the backing installation and waterproofing steps for every project.
For guardrail attachments and other safety-related mounts, contractor liability is also a concern. If a railing fails and someone is injured, the question of whether the attachment was done to code (IBC guardrail code and IRC handrail requirements) and to manufacturer specifications will be central to any liability claim.
Photo documentation of the backing install (blocking, sheathing, WRB, and flashing) before the EIFS is closed up provides a record that can prove the work was done correctly. Indiana Wall Systems photographs every stage of a mounting project for this reason.
Indiana Climate Considerations for EIFS Mounts
Central Indiana’s climate puts unique stress on EIFS mounting details.
- Freeze-thaw cycling: Indiana averages 50 to 80 freeze-thaw cycles per year. Water that enters a poorly sealed penetration freezes, expands, and progressively widens the gap. Each cycle makes the leak worse.
- Summer humidity: High humidity during Indiana’s humid summers (June through September) slows sealant curing and can trap moisture behind brackets installed during warm, damp weather
- Thermal expansion of metal brackets: A large steel sign bracket can expand and contract enough to stress the sealant joint. Mounting details need to account for thermal movement at attachments
- Storm-driven rain: Indiana sees severe thunderstorms with wind-driven rain that can force water upward and laterally into gaps that gravity alone would not reach
These conditions make quality waterproofing details and regular inspection more important here than in milder or drier climates. For additional guidance on storm-related concerns, check post-storm EIFS checks to protect structural integrity.
Frequently Asked Questions
Can I screw directly into EIFS to hang a heavy item?
No. Screwing directly into the EPS foam or lamina will not hold any significant weight. The foam is too soft for pull-out resistance, and the lamina is only about 1/16 to 1/8 inch thick. Heavy items need a load path to structure through the foam and sheathing into studs, blocking, or masonry behind the wall.
What is a compression sleeve and why does my EIFS mount need one?
A compression sleeve is a rigid tube (metal or high-density PVC) that fits around the bolt and spans the exact thickness of the EPS foam. It prevents the bolt from crushing the foam when tightened. Without one, the EPS compression will crack the base coat and mesh, creating an entry point for water.
How do I find studs behind an EIFS wall?
Standard stud finders often cannot detect studs through 2 to 4 inches of EPS foam. The most reliable methods are checking original construction plans, measuring from the interior side, or using a professional deep-scan or radar-based stud finder. An experienced contractor can also use a small exploratory probe at an inconspicuous spot.
Will mounting on EIFS void my warranty?
It depends on how the mount is done. Most EIFS manufacturer warranties exclude damage from unauthorized penetrations. If the mount follows the manufacturer’s published attachment details (from Dryvit, Sto, Parex USA, Senergy, or Master Wall), the warranty should remain intact. Indiana Wall Systems follows manufacturer details for attachments on every project.
How often should I inspect mounts on my EIFS wall?
Inspect all EIFS mounting points at least once per year and after any severe storm. Check for sealant failure, rust staining, cracking, and softness in the wall near the hardware. The sealant maintenance interval is typically 5 to 7 years in Central Indiana’s climate, but damage can appear sooner.
Can I use Tapcon screws to mount a railing bracket on EIFS?
Tapcon screws are designed for concrete and masonry substrates. They can only be used in EIFS if the substrate behind the foam is CMU or poured concrete. Tapcon use is only appropriate for masonry substrates, not wood studs, steel studs, or gypsum sheathing. Even then, the compression sleeve and sealant detail are still required.
What type of sealant should I use around EIFS mounts?
Use an ASTM C920 rated exterior sealant. Both silicone and polyurethane formulations work, but you must verify silicone sealant compatibility or polyurethane sealant compatibility with the specific EIFS finish coat. Apply a primer for sealant adhesion if the manufacturer requires it. Always use a closed-cell backer rod to prevent three-sided adhesion.
Is it cheaper to add blocking during construction or retrofit it later?
Adding in-wall blocking during the framing stage costs very little, often less than $50 to $100 per location in materials and labor. Retrofitting blocking into a finished EIFS wall requires cutting out the EIFS, installing the blocking, restoring the WRB, replacing the foam, and patching the finish, which can cost $500 to $1,500 or more per location depending on the extent of the work.
Key Insights
- EIFS is an insulation and finish system, not a structural surface. Every heavy mount needs a direct connection through the foam to framing, blocking, or masonry. No adhesive, no foam-only fastener, and no lamina screw will hold.
- The three components that prevent mount failure are structural backing, compression sleeves, and proper waterproofing. Skip any one of these and the installation will eventually fail through pull-out, foam crushing, or water intrusion.
- Barrier EIFS walls have zero tolerance for seal failures at penetrations. If the wall has no drainage plane, every penetration must be treated as if it is the only thing between the weather and the framing.
- Preplanning saves thousands of dollars. Adding blocking during construction is a fraction of the cost of cutting open a finished wall to retrofit it later. Builders should install backing at every anticipated mounting location.
- Indiana’s freeze-thaw cycles punish poorly sealed mounts. What starts as a minor sealant gap in October becomes a visible water stain, soft spot, or sheathing rot problem by spring.
- Annual inspection of every EIFS mounting point is not optional. Sealant ages, fasteners corrode, and brackets loosen over time. Catching problems early keeps small repairs from becoming large ones.
Indiana Wall Systems has served Central Indiana property owners for over 26 years. For help with mounting heavy items on your EIFS wall, repairing a failed mount, or inspecting existing penetrations, call (765) 341-6020 or request a free estimate online.
Need to Mount Something Heavy on Your EIFS Wall?
Indiana Wall Systems helps homeowners and property managers across Central Indiana with safe EIFS mounting details, failed mount repairs, and moisture inspections around penetrations. Over 26 years of EIFS-specific experience across Hamilton, Marion, and Johnson Counties.
| Schedule a Free Estimate | Call (765) 341-6020 |
Free estimates • 10-year workmanship warranty